
Grandma’s Date Bars Recipe (Oven or Air Fryer)
These Date Bars are an Old-Fashioned Favorite!
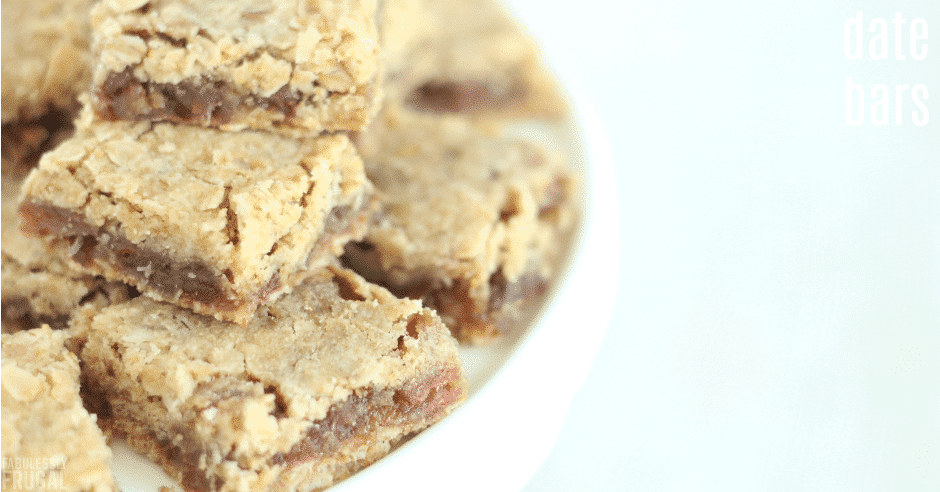
Grandma’s Date Bars are Chewy, Buttery, Nostalgic & Easy
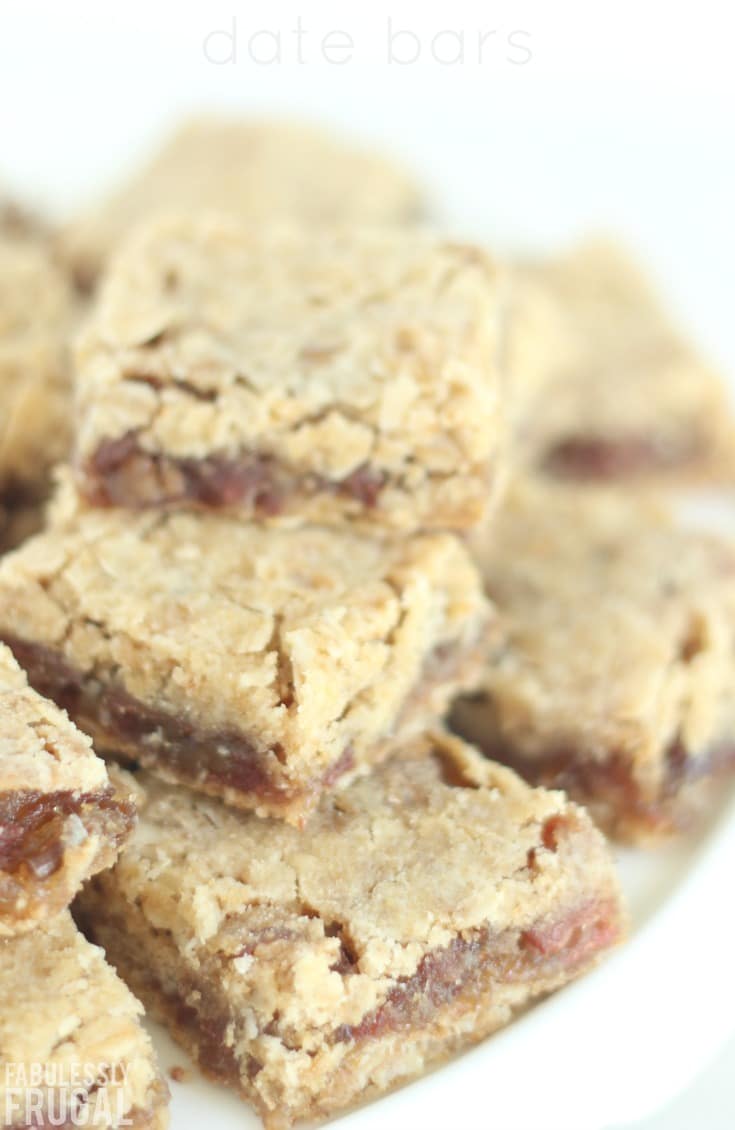
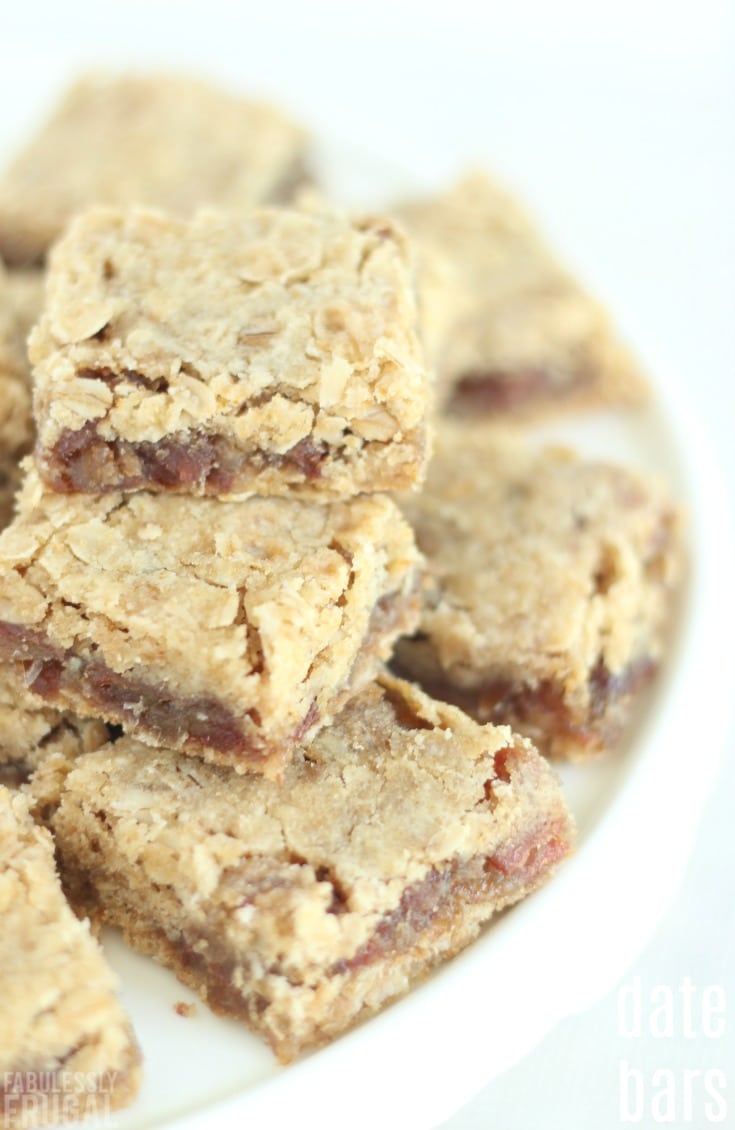
These old-fashioned date bars are straight from our family recipe box. Gooey, chewy sweet date filling is sandwiched between a buttery oatmeal crumb crust—simple ingredients that bake up into the most comforting treat. I first fell in love with them in my Grandma Dorothy’s kitchen, and every pan still brings that same cozy, nostalgic aroma through the house and makes my heart happy to see my kids enjoying these.
Why these are special: My mom, my sisters and I always made big pans of these for our family reunions, in honor my late Grandma Dorothy who taught us this recipe. She loved practical, make-ahead treats that fed a crowd, and cookie bars were her go-to. These hit the perfect salty-sweet balance with their buttery oats and caramel-like dates—no fancy tools, just classic comfort that disappears fast at parties. My mom has now passed and I continue to make these (and taught my own daughters) in honor of all the women in our family who share solidarity, joy and love through our recipes.
Ingredients You’ll Need to Make Date Bars
- Dates: Use pitted, chopped dates. They soften as they cool after simmering. (Medjool are richer/sweeter; Deglet Noor are classic.)
- Butter: Cold works great—see the shred tip below if you forgot to soften.
- Oats & flour: The classic oat crumble gives these bars their old-fashioned texture.
- Brown sugar, baking soda, salt: For sweetness, lift, and balance.
- Optional: Walnuts or pecans, shredded coconut, or a pinch of cinnamon.
Helpful Tools
These aren’t required, but they make the process easier and more consistent:
- Pastry cutter for quick, even crumbs
- 10×15 jelly roll pan (thin, classic bars) or use a 9×13 for thicker bars
- Box grater to shred cold butter fast
- Rimmed baking sheet + parchment (for clean release and easy lifting)
How to Make Date Bars (Step by Step)
- Line the pan: Line your 10×15 jelly roll pan with parchment and leave two long overhang “handles” for easy lifting after baking.
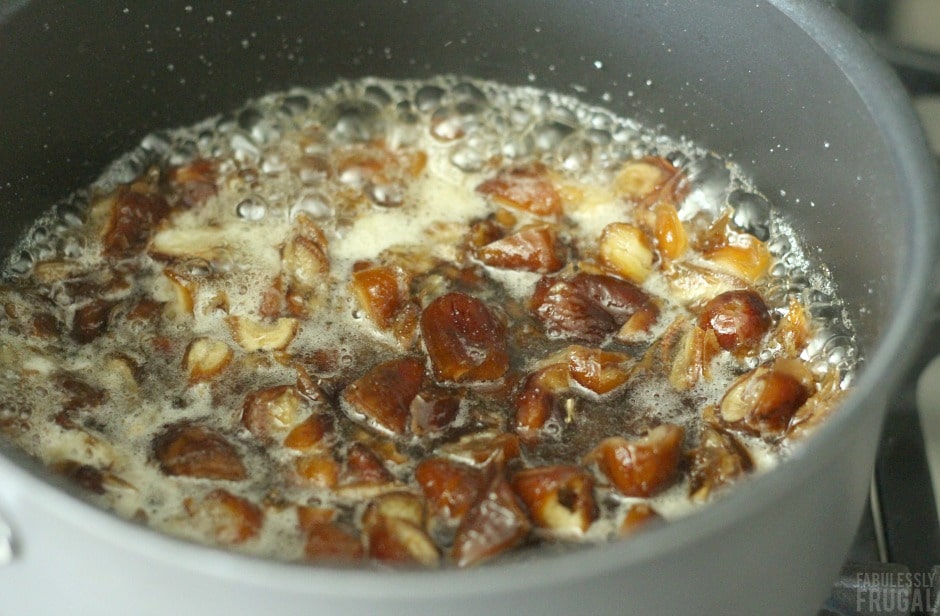
- Simmer the filling: Combine chopped dates with sugar and water in a saucepan. Bring to a boil, then remove from heat and cool completely. The mixture thickens and the dates break down as it cools, turning jammy.
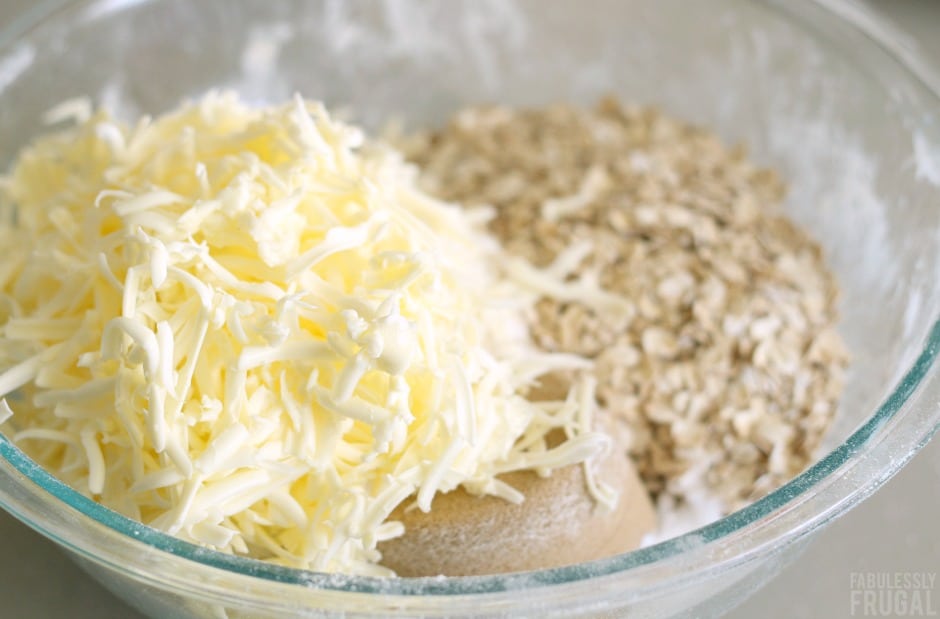
- Mix the crumble: Whisk oats, flour, brown sugar, baking soda, and salt. Cut in cold butter with a fork or a pastry cutter until it looks like damp sand with pea-size bits. (No pastry cutter? Use the box grater to shred cold butter.)
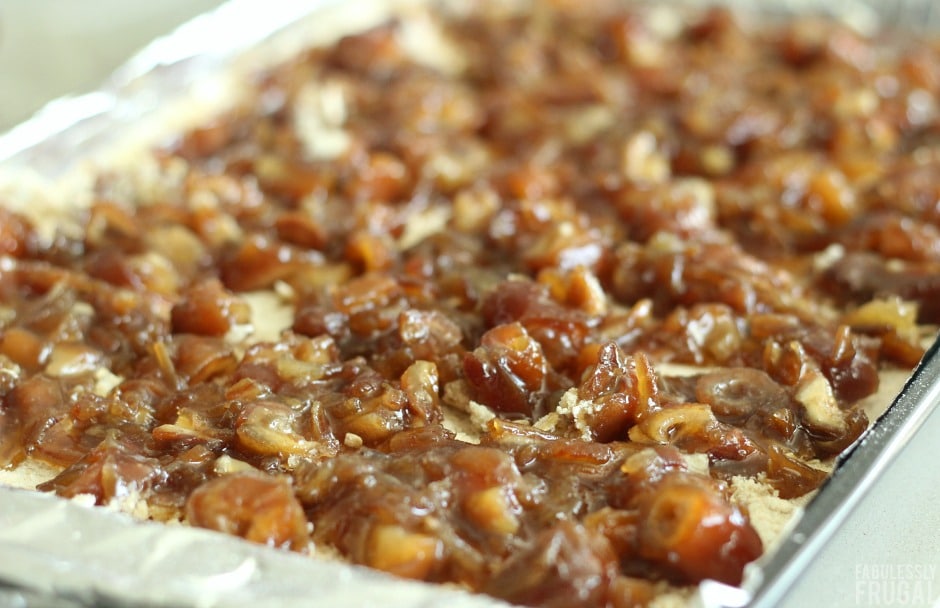
- Press the base: Firmly press about half the crumb into the lined pan. Really compress the edges—this prevents crumbling when you slice.
- Layer & top: Gently spread the cooled date filling to the edges, then sprinkle and lightly press the remaining crumb over the top.
- Bake: Bake until the top is lightly golden and the edges are set. (See your recipe card time/temp.)
- Cool fully: Cool on a rack until room temp, then chill 20–30 minutes to set before cutting.
How to Cut Perfect, Clean Squares
- Chill first: After cooling to room temp, refrigerate 20–30 minutes. This firms the filling.
- Lift to a board: Use the parchment handles to lift the slab out of the pan.
- Use the right knife: A long, sharp chef’s knife (or serrated for very crumbly tops) works best.
- Wipe between cuts: Wipe the blade clean and dry after each cut for crisp edges.
- Size guide: For a 10×15 pan, cut 6×4 for 24 bars, or 5×3 for 15 generous bars.
Pro Tips, Swaps & Add-Ins
- Forgot to soften butter? Shred cold butter on a box grater and toss into the dry mix—works like a charm.
- Oats: Old-fashioned rolled oats keep the crumb hearty; quick oats make it finer. Both work. Avoid instant packets.
- Walnuts or pecans: Fold 1/2 cup into the top crumble for crunch. Toast first for extra flavor.
- Coconut date bars: Add 1/3 cup unsweetened shredded coconut to the crumble.
- Spice it up: 1/2 tsp cinnamon in the crumble complements the dates beautifully.
- Pan choice: We love a 10×15 jelly roll pan for classic thin bars. A 9×13 yields thicker, bakery-style squares—add a few minutes to the bake time.
- Make ahead: Bake 1–2 days in advance; flavors meld and slices stay clean.
- Allergy-friendly swaps: Use a 1:1 gluten-free flour blend and certified GF oats; use plant-based butter for dairy-free.
FAQs Making and Storing Date Bars
Can I freeze Grandma’s date bars?
Yes. Cool completely, slice, and freeze in a single layer. Once solid, stack with parchment between layers in an airtight container for up to 2–3 months. Thaw at room temp.
What kind of oats work best?
Old-fashioned rolled oats give the most “classic” texture. Quick oats also work and make a finer, softer crumb. Avoid instant packets.
Can I use fresh dates instead of dried?
You can, but moisture and sweetness vary. If using very soft dates, reduce water slightly in the filling and simmer to a thick, jammy consistency.
Why is my crumb too loose?
Make sure butter is well incorporated and the bottom layer is firmly pressed before adding the filling. Bake until edges are golden, then cool fully to set before slicing.
Troubleshooting Common Issues
- Top looks dry or sandy: Butter pieces were too large or mixture under-mixed. Cut butter in until the mix resembles damp sand and lightly press the top crumble.
- Filling runs when cutting: Bars were cut warm. Chill 20–30 minutes first and use a sharp knife, wiping between cuts.
- Edges crumble apart: Compress the base layer firmly, especially at the edges. Line with parchment and lift before slicing.
- Bars taste overly sweet: Reduce brown sugar slightly or use Deglet Noor dates. Add a pinch more salt to the crumble for balance.
- Underdone center: Bake until edges are golden and the center is set; extend time a few minutes if using a 9×13 pan.
Scaling: How to Make Half-Batch & Party-Size Date Bars
- Half-batch: Assemble in an 8×8 pan. Reduce bake time slightly and watch for golden edges.
- Standard (as written): 10×15 jelly roll pan yields thin, classic bars for potlucks.
- Thick bakery-style: Use a 9×13 pan; add a few minutes to the bake.
- Big-batch / catering: Double the recipe in a rimmed 13×18 half-sheet. Bake longer; rotate pan halfway for even browning. Cool fully before lifting and cutting.
Air Fryer Date Bars (Small Batch Option)
Want to bake just a few bars without heating the whole oven? You can make a small batch of Grandma’s date bars right in the air fryer. The crumb gets golden and crisp, and the filling stays soft and jammy.
- Prep the filling: Make the date mixture on the stovetop as directed and let it cool until thickened.
- Assemble a mini batch: Use half of the crumble mixture and about one-third of the filling. Line a 7×7-inch air fryer baking pan (or similar) with parchment.
- Layer: Press half the crumb mixture into the pan, spread the filling, and top with remaining crumbs.
- Air fry: Air fry at 320°F (160°C) for 18–22 minutes, until the top is golden and set. Start checking at 15 minutes—air fryers vary.
- Cool completely: Cool on a rack before slicing. The bars firm up as they rest.
Note: Air fryer times can vary by model and wattage. Bake until the top is lightly golden and the center feels set.
Love the story behind date squares? Read more about the classic dessert’s roots from Taste of Home.
More nostalgic bakes to try next:

Grandma's Date Bars Recipe
Equipment
- 10x15-inch jelly roll pan
Ingredients
- 1 pound pitted dates chopped
- 1 cup granulated sugar
- 1 cup water
- 1 cup brown sugar
- 1 cup butter softened
- 1 ½ cups old fashioned oats
- 2 ½ cups all-purpose flour
- 1 teaspoon baking soda
- ½ teaspoon salt
Instructions
- Add the chopped dates, granulated sugar, and water to a medium saucepan over medium-high heat. Bring to a boil. Remove from heat and set aside to cool.
- In a large mixing bowl, combine the brown sugar, softened butter, oats, flour, baking soda, and salt (I usually use a pastry cutter).
- Spread 1/2 of the crumble mixture evenly in a 10 x 15 pan (jelly roll pan) and press it into the pan. Gently spoon the date filling over the crust. Firmly press the remainder of the crumble mixture on top.
- Bake at 350 degrees for 25 minutes. Let cool, then cut into 24 squares.
Nutrition
💬 What Readers Are Saying
⭐️⭐️⭐️⭐️⭐️ Marilyn W.
“Omg! These are so delicious! I followed the directions exactly — didn’t want to change what might already be good. Big hit with the family.”
⭐️⭐️⭐️⭐️⭐️ Kacie D.
“These baked up perfectly and they’re so delicious! I didn’t have quite enough dates so I added a little blackberry jam to make up the difference. I will definitely make this again!”
Kathy B.
“This will be the only date bar recipe I need. Excellent! Made them for a church luncheon — huge hit!”
Jacqueline
“Cut the recipe in half and baked in a loaf pan. Delicious! I patted the dough between cling wrap for even layers — perfect small-batch quarantine bake.”
Cheri R.
“Used a 9×13 glass pan. Loved the recipe! I didn’t chop my dates enough, but warming individual bars in the microwave made them soft and just like my mom’s.”
Shelley
“Planning to sub chopped apples for the dates — maybe add some apple butter too!”
💡 Loved this recipe too? Leave a comment and tell us how you made it your own!
Serving & Storage
- Serve: Room-temp squares are classic; for neat cuts, chill 20–30 minutes before slicing.
- Store: Airtight at room temp 2–3 days or refrigerated up to 1 week.
- Freeze: Up to 2–3 months; thaw at room temp. For a just-baked feel, warm a square 5–10 seconds in the microwave.
More Easy Desserts You’ll Love
Tested and shared by Cathy, inspired by her Grandma Dorothy’s handwritten recipe card. This post reflects our home kitchen testing (pan sizes, oats, cutting techniques, and small-batch air fryer option) to help you get the same results.
Trending Recipes


Comments & Reviews
Leave a Review/Reply
More Related Recipes


Trending Recipes
- Recipes
- DIY
- Deals
- Blog


Popular
Recommended
About Us

At Fabulessly Frugal, our goal is to help you live HEALTHY, WEALTHY, and WISE! My team and I work hard to bring you the best, online deals, clean eating, DIY's, freezer meal recipes, and more! I LOVE coaching and inspiring people to improve their health in my fitness challenge! You should also check out my favorite cleanse! Learn more about me and the rest of my team.


Copyright © 2008–2026
Fabulessly Frugal: A Coupon Blog Sharing Gift Ideas, Amazon Deals, Printable Coupons, DIY, How to Extreme Coupon, and Make Ahead Meals. All rights reserved
This is my second review. I made these for a church luncheon. This will be the only date bar recipe I need. Excellent!
I’m so glad that you like this date bar recipe! Thank you for your comment and review, Kathy!
I used your recipe but used a 9×13 glass pan. Love the receipe but I didn’t chap my dates enough. Even letting them set didn’t make them like a spread. After I cut them , I warmed the individual pieces in the microwave for 15 seconds and they were more like my moms. We never let the cool completely before we ate them.
Cut the recipe in half and baked in a loaf pan. Delicious! I patted the dough between two sheets of cling wrap then dropped on top for even layers, as it kept sticking to my fingers. Dough is also delicious! Great, healthy-ish recipe – perfect for quarantine to secretly aid with digestion.
Oh, great idea! I love the dough for these date bars, it’s addicting! Thank you for commenting, Jacqueline.
These baked up perfectly and they’re so delicious! I didn’t have quite enough dates for the recìpe so I added a blackberry jam to make up the difference. I will definitely make this again!
That sounds yummy! Thanks for the rating and the tip.
Omg! These are so delicious! I followed the directions per the instructions. I didn’t want to change what might already be good. Big hit with the family.
Going to sub chopped apples for the dates ( maybe add some apple butter, if needed)
Sounds delicious, Shelley!
I’ve made my Mom’s recipe for date bars for years, and the worst part has always been the dreaded, messy task of chopping those sticky, sticky dates. What a horrible chore. This year my genius solution was to make the jam filling with whole dates, and then use an immersion blender to break them all down once they’re cooked. Eureka! The worst part of this recipe is now resolved.
This time I’m also going to experiment with making date “balls” by rolling so,e jam in the crumb mixture and baking them in mini cupcake tins.