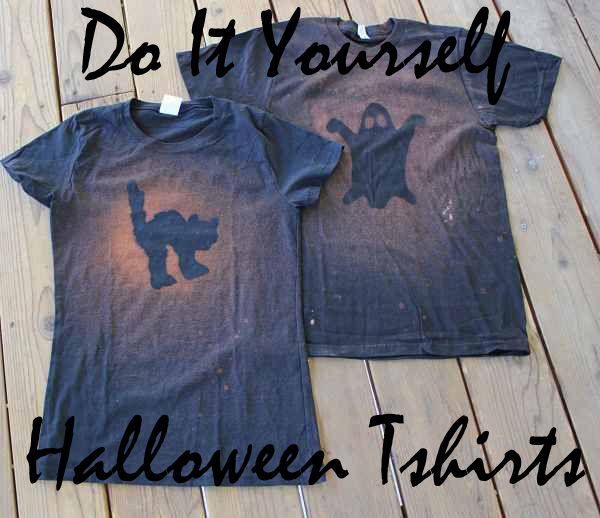
DIY Halloween T-shirts! Only $1.50 each!
I LOVE Halloween!!! The only thing I don’t love, is paying $10 or more for a shirt I’ll wear once or twice during the holiday. So, I decided to make my own! It only costs $1.50 a shirt to make! Want to make one too? Here’s how!
Ok, everything I used I bought at the Dollar Tree!!
Here’s what you’re going to need:
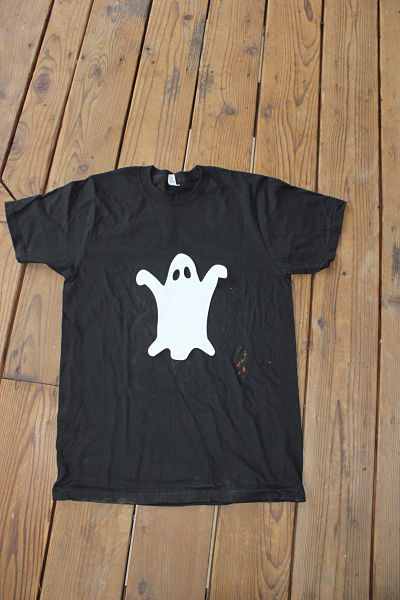
- Black Tshirt
- Spray Bottle
- Bleach
- Stencils
- Water
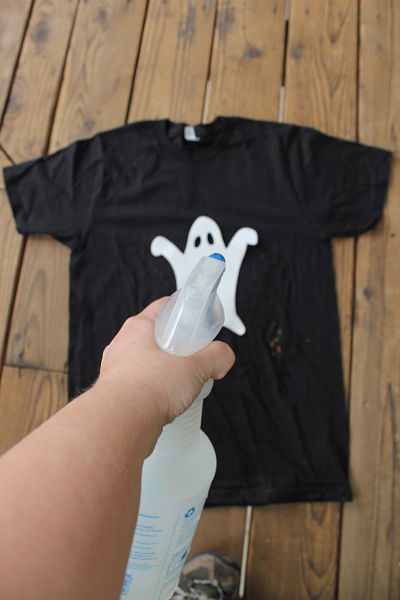
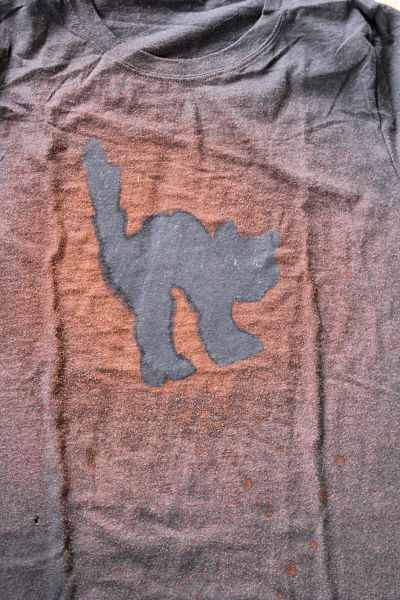
The first thing you need to do is add bleach to a spray bottle. I added one part bleach to three parts water. Be careful if you’re wearing anything black! I splashed on my shirt and now I have a stain. 🙁
Once your bottle of bleach water is prepared, take your shirt outside or put it on top of newspapers. You don’t want to accidentally bleach your floor! Now, place your stencil on your shirt; anywhere you like it.
Once your stencil is placed, spray the bleach water around it.
All you have to do now is let the bleach set in! Don’t remove your stencil right away as it will also be covered in bleach.
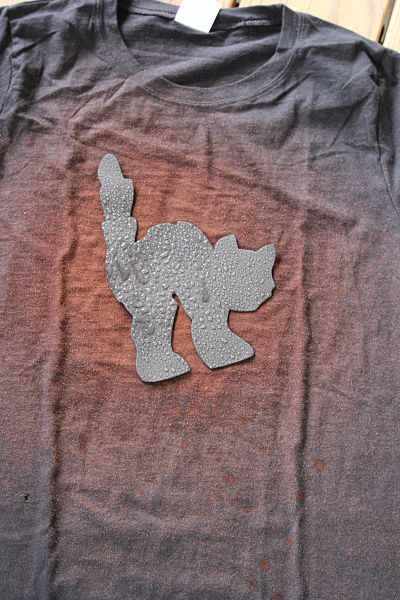
Once your bleach has set in, carefully remove your stencil so you don’t drip!
Guess what?
You’re done!!!
This is the most simple and fun way to make your own Halloween shirts! Your kids will LOVE making and wearing their own creations too!
If you like this post, please share it with your friends, like it on Facebook, Tweet away, and Pin on Pinterest! Thank you! 🙂
Trending Diys


Comments
Leave a Reply
More Related Diys


Trending DIY Projects
- DIY
- Recipes
- Deals
- Blog


Report a Problem
Please select the problem you are facing with this deal:
- Price Increased
- Price Decreased
- No longer available
- Expired
- Link doesn't work
- Suggestion
- Compliment
- Other
Add more details:
Thank you for your feedback. We really appreciate it.
Enter your email address if you would like
to receive a follow up.
Please Try Again
Thanks for providing the email address.
We will reach out to you as soon as possible.


Popular
Recommended
About Us

At Fabulessly Frugal, our goal is to help you live HEALTHY, WEALTHY, and WISE! My team and I work hard to bring you the best, online deals, clean eating, DIY's, freezer meal recipes, and more! I LOVE coaching and inspiring people to improve their health in my fitness challenge! You should also check out my favorite cleanse! Learn more about me and the rest of my team.

Copyright © 2008–2026
Fabulessly Frugal: A Coupon Blog Sharing Gift Ideas, Amazon Deals, Printable Coupons, DIY, How to Extreme Coupon, and Make Ahead Meals. All rights reserved
Great idea!
Did you place anything inside the shirt to keep the back from getting soaked though from the front? Might be a good idea if you don’t want to have this happen. I would think heavy cardboard might work. I am so wanting to try this now. Thanks for sharing 🙂
You know, I didn’t put anything inside the shirt. Since I used a light spray, it really didn’t soak through but doing that certainly wouldn’t hurt anything! 🙂 thanks for the tip!
i did something like this for the 4th of July (I didn’t put anything inside) and ended up having to make the bleached design work on both sides 🙂
I made these with my kids last night. They were super fun and super easy. Because I let my kids do the spraying, they spray was put on a little heavier I am sure. I put wax paper in between the shirts to stop it from soaking through. WE also made our stencils out of the wax paper. My only tip is to make sure the shirts are 100% cotton. We got our shirts from dollar tree. The small toddler ones were 50% cotton 50% poly. The water sat on top and then ran weird and the pictures did not turn out. But the 100% cotton shirts worked great and my kids are excited to wear them.. Thanks so much for the idea!
This is cute! To stop the degenerative action of the bleach on the fibers, rinse or launder the item in water with either color safe bleach (usually in a detergent form) or vinegar (an acid neutralizes a base). I used to use bleach as described in this tutorial or gel bleach bathroom cleaner (used to paint a design) to either make a printed fabric or a design on a finished item, and that was how we neutralized the action. If you literally won’t wear it but a couple times don’t bother, just rinse and dry before wearing, but if you are going to have it a while neutralize it.