Ultimate Coupon Decoding Cheat Sheet
Coupons can be a bit confusing! For example, have you ever stopped and wondered:
- Why some coupons beep while others do not?
- What products are really included in the vague coupon wording?
- Why some coupons take off different values than printed on the coupon?
If you’re a curious couponer and you want to get to the bottom of these mysteries, today is your day! The answer lies in the code – the coupon barcode that is! Today we’ll be figuring out what those numbers on your coupons really mean with our coupon decoding cheat sheet.
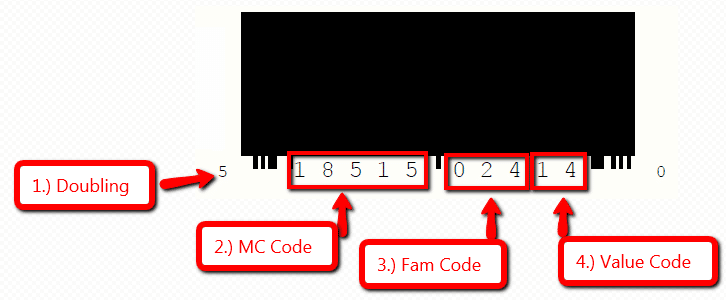
As an example, I’ve taken a bar code from a currently available PDF coupon. I’ve blacked out the actual barcode for copying purposes. This should help you visualize what I am referring to.
Here is our example coupon:

Coupon Decoding Cheat Sheet
Coupon Doubling Code
The first number you find on the barcode will generally be a 5 or a 9. This number tells the register if it can double the coupon. This will only apply to you if you are using the coupon at a store that has a policy to automatically double a coupon. This will not apply to Albertsons double coupons that are released in the ads.
If this number is a 5, the register will double the coupon according to the store’s policy. If the number is a 9 the register will not double the coupon. Easy peasy!
Coupon Manufacturer Code
The next set of numbers (5 of them) refer to the coupons manufacturer code. These numbers should match the numbers found on the barcode on the product (same spot).
This is a general number that usually matches up with an entire brand or product line. It’s usually not specific to one variety/flavor of the product.
Coupon Family Code
The next set of 3 numbers is the Family or Product Code. This is where coupons become more or less specific to the products included. The language on the coupon is the intended use of the coupon! Please use this information responsibly.
Here’s a list of a few special family codes to be aware of:
- 000 – This coupon will not beep on any product if the Manufacturer code matches
- XX0 – Any code with 1 zero at the end means the coupon can be used for more than one variety/flavor of the product
- X00 – Any code with 2 zeros a the end can be used for more than one product in the brand line
- 992 – The coupon will either beep every time or never beep on any product, regardless of your purchase. Because the item does not have to be purchased for the coupon to be redeemed, most retailers have programmed their registers to beep every time a 992 code is used. This prevents fraud and encourages the cashiers to verify the product is bought. There used to be a mass amount of coupon fraud with people trying to use these coupons without purchasing the product.
Unfortunately, we can’t provide an entire database of family codes because manufacturers regular change them and add new ones.
Coupon Value Code
This set of 2 numbers refers to the value of the coupon. It tells the register how many products need to be bought and how much to deduct. I’ve only posted some of the most common amounts. To see a full list of code amounts, go HERE.
- 00 – Manual Input (from the cashier)
- 01 – Free item (manual input usually required)
- 02 – B4G1 Free
- 07 B3 – $1.50
- 08 B2 – $3
- 10 – $.10
- 13 B4 – $1
- 14 – B1G1 Free (this tags to both products, so if you try to use another $ off with it – it will beep)
- 16 – B2G1 Free
- 20 – $.20
- 21 – $.34
- 22 – $.40
- 23 – $.45
- 24 – $.50
- 25 – $.25
- 28 B2 – $.55
- 30 – $.30
- 31 B2 – $.60
- 32 B2 – $.75
- 34 B2 – $1.25
- 41 B3 – $.50
- 42 B3 – $1
- 75 – $1
- 78 – $1.50
- 82 – $2.00
- 84 – $2.50
The Second Barcode
This barcode has to deal with the expiration date – I think. From my limited understanding, most registers aren’t programmed to read this code so it’s not really that relevant to us couponers. The expiration date is pretty straightforward anyway :).
That’s How to Decode a Coupon!
I’m not a coding specialist or claim to know everything about codes, this is just the general info that I do know. I’m sure there are exceptions and other rules or factors involved. If anyone has anything to share – I would love to hear from you!! Leave a comment!
Want More Couponing Tips?
Check out some of our favorite coupon posts:
- Extreme Coupon Education: How to Get a Rain Check
- The Truth About Couponing for Charity
- Buying Meat for Less { Extreme Couponing Education }
View all our coupon tips & tricks here!
Thanks, Slick Deals and more specifically mahgobbi for sharing the code values!
Trending Posts
Comments
Leave a Reply
Report a Problem
Please select the problem you are facing with this deal:
- Price Increased
- Price Decreased
- No longer available
- Expired
- Link doesn't work
- Suggestion
- Compliment
- Other
Add more details:
Thank you for your feedback. We really appreciate it.
Enter your email address if you would like
to receive a follow up.
Please Try Again
Thanks for providing the email address.
We will reach out to you as soon as possible.


Wow, very interesting and helpful. I enjoyed this and all other “beginner tips.” Thanks!
I am not new to couponing, but everyday I learn something new and this is great information! thanks for all you do!!
Wow!! Very interesting. I had no idea there was so much information to be had from paying attention to barcodes! I’m going to go decipher some barcodes now…yes, I am a nerd. Lol….
Wow, who knew I could actually read a barcode. This is so interesting. I was comparing some coupons while reading this and it matched up to what was explained. Very cool!
Any info on the new coupon barcode GS1 standard?
I believe GS1 is going to replace the current coupon barcode in the future.
Hi,
Wow, what great info…I am going to check out your links too.
I have a question. ok, i get the 14 means it tags to both items so you can’t use a $1 off coupon but do you know if there is something similar with b2g1 coupons. like if it is just 16 can i use a $1 of coupon on each of the products i am buying and the coupon tags to the free item? i have been trying to find the answer to this.
also, would it be ok to use some of this info in a post of mine and link back to you? i don’t want to step on any toes, but it is great info. and I want to give credit where credit is due.
I found this very interesting and I have been able to read coupons in the past but I am not finding the codes exactly as they’re published here is there any way that you could post a picture of a coupon barcode and decoded step-by-step? Play like Procter & Gamble I don’t see a 5 or at 9 to start with I don’t see a 14 for the buy one get one can you help?
Thank you so much for all of you advice! I did find out that you can use two BOGO coupons and get two items free at Walgreens, I do it all of the time! The same coupons did not work at other stores ie. Jewel, Target but did work there.
Ok I have a question. I’m a cashier at a dollar general and at least once a week these two women comes in and ties me up at my register with their coupons. I wouldn’t care if I didn’t think they wasn’t commiting fraud. How can I tell if these women are in the wrong? They are greedy and never leave anything for anyone else.
I believe in saving money but being a couponer and being a crook are two different things.
Hi Tyler, I think I can answer your question, but I need to know a little more. How do they tie your time up at the register? Are you having to key in coupons? Why do you specifically think they are being fraudulent? Do the coupons not look real? If they are leaving nothing for other customers that could probably be resolved by sticking to the manufacturer’s guidelines on the coupon (usually four; but there are exceptions). What is their total % savings? And what do they buy? If it is 50% or less, they are almost definitely NOT committing fraud, and if they are, they are no good at it. Lol. 75% is my average, but that’s at the grocery. If I go to a store like yours, having a clearance sale, combined with coupons, I could save 100%. So let me know, and hopefully I can get u answers:)
Thank you I was looking everywhere for information on this!
This was very helpful. Thanks for sharing!
When my QSeer reads the codes it sometimes says in the family how or where can I find lists of the “family “ of products for this. Does it mean anything that company makes?
How can I print this information