
How to Start a Blog and Make Money From Home
Inspired to start a blog? That’s great! I was in the same position as you once upon a time and one of the things I wish I had back then was an in-depth guide to help me get started. So, I’m finally releasing my own guide to creating a blog, made for aspiring bloggers like you!
Below, I’ll explain more about what a blog is, why you should start one of your own, and I’ll break down how to start a blog and make money from your blog in 10 simple steps.
Yes, this is a long post, but it’s PACKED full of valuable information. I’ve literally detailed every little step of starting a blog in a straightforward way. So grab your favorite beverage and dive in!
PS: If you’re worried about the technical aspects of starting a blog, don’t be! It’s all actually quite simple 🙂
What is a Blog?
Blogs have changed a lot since the early days of the internet. In the past, a traditional blog was mostly seen as a chronological collection of posts written by a single person. It was sort of like an online diary or a journal of sorts.
Nowadays, blogs are a lot of different things. In technical terms, a blog is still a collection of posts. But, in reality, a blog can basically be whatever you want it to be. There are no set rules on how a blog has to work. Pretty freeing, right?
With that in mind, let’s get back to the question: what is a blog?
Well, in mind, a blog is a place where you can share your thoughts, knowledge, and learning experiences with others. It’s a place where you can build a community of like-minded individuals. It’s almost like your own little home on the internet.
Another thing a blog is? A business. Many people don’t think of it this way, but it’s the truth, and you should always treat your blog this way (especially if your goal is to make money).
Why Start a Blog
There are many reasons you may be thinking of starting a blog. Maybe you want extra money. Maybe you want to help others. Or, maybe you’re just bored and want something to do during your free time.
Maybe you want to start a blog for ALL of those reasons, or for some reason I didn’t mention. Whatever it is, that’s your WHY. Write it down and remember it because it will remind you of the reason your blog exists in the first place.
Once you have your WHY, the next steps will get easier. Staying committed to your blog will be easier too.
Why I Started FabulesslyFrugal.com:
I started this site way back in 2008 for one reason… I wanted to share something I was excited about with my friends and family: how to save money on groceries.
-
- I had no idea blogging could be an income source.
- I knew NOTHING about computers, code, or running a blog, let alone managing a team of people.
- I started it because I love helping others.
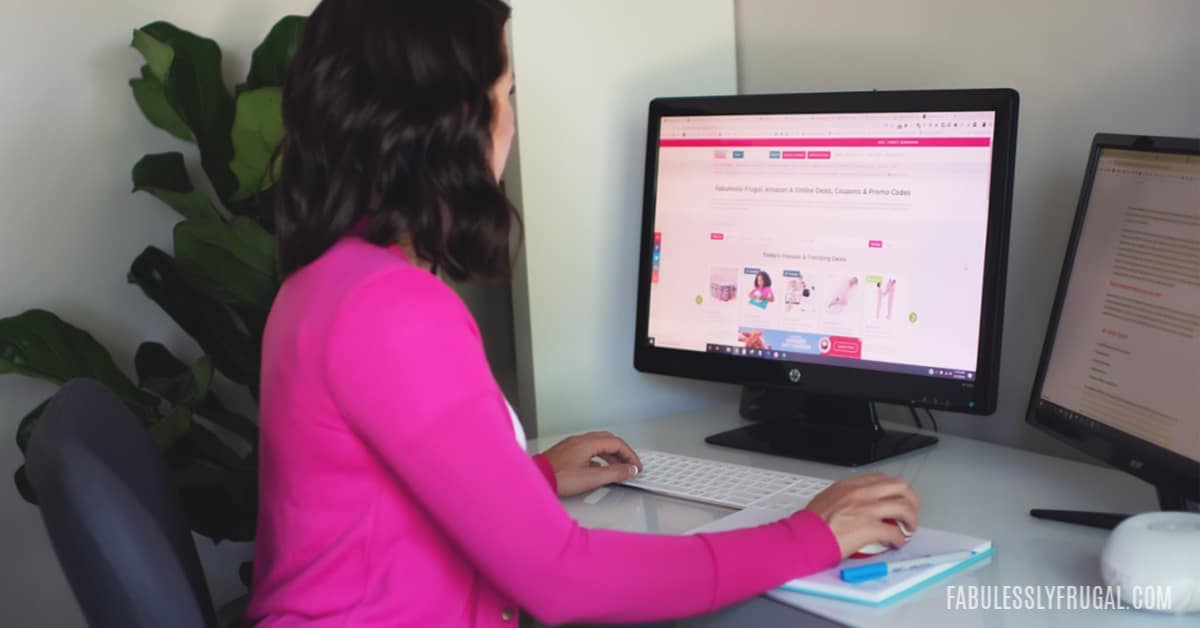
I totally learned the business of blogging day to day, year to year. Now I love doing what I do because it’s a powerful way to help others. I have an amazing team and we work together virtually every day. I love that I can provide an income for stay at home moms throughout the world as well as some great men I get to work with as well!
So that’s my why. Now let’s get into the HOW of starting a blog…
Step 1: Figure Out Who Your Blog is For

If you’re thinking of starting a blog, you’ll most likely want to have people reading it eventually! Otherwise, what’s the point? I’ll be honest and state that If I could do it all over again, I would 100% make sure I did this step.
So ask yourself this question… WHO do you want to write to? Gardeners? Organization fanatics? Moms? Dads? Pet lovers? People who like hats? (Get as specific or broad as you want here.)
This is a pretty important question to answer as it will help you determine what topics you’re going to write about on your blog. This is also known as finding your niche.
So for example, here at Fabulessly Frugal, we’re speaking to parents (mostly moms) who want to improve their lives. To do that, we write about personal finance, easy and healthy recipes, DIY, family and household management, and of course all of our DEALS we share to help people save money.
And what do all of these things have in common? Well, at first glance, not much. But in reality, all of the things we write about lead back to our ultimate goal of helping YOU live healthy, wealthy, and wise.
The point? You don’t necessarily have to blog about one thing and one thing only. That’s an option, and it can work that way depending on your target audience, but it’s not the only way.
That being said, it is a good idea to stick to one topic for at least a short while after starting your blog. This way you can get a decent amount of content out around that topic before moving on to something new (more on this later).
Why is choosing a target audience so important?
Well, think about it: would you rather read a generic blog that doesn’t really speak to anyone in particular or would you rather read a blog that seems as though it’s speaking directly to YOU? Most of us would choose the latter, even if we don’t actually realize it.
Another reason this step is so important is that it will help you figure out what to write about on your blog. If you know WHO you’re writing for, it’s going to be easy to come up with blog post ideas.
How to determine your perfect audience:
Think about the type of audience you want to reach and the goals you want to help them achieve.
Do you want to help stay at home parents find ways to make extra money from home? Do you want to help disorganized people get organized? Who do you want to help, and what do you want to help them with?
To make this easier, think about your own interests, hobbies, and skills.
What are you good at? What do you love doing? Take a few minutes to brainstorm everything you can, and then take a look at your list. I guarantee you there will be a niche idea in there somewhere.
Topic/Niche ideas:
Still can’t think of anything? Here are some ideas to get your cogs turning:
- Sustainable living
- Gardening
- Frugal living
- Personal finance
- Budgeting
- Frugal living
- Couponing
- Making money
- Organization
- Fashion
- Women’s fashion
- Men’s fashion
- Shoes
- Travel
- Family Travel destinations and tips
- International
- How to fly for free
- Health
- Meditation
- Confidence
- Dieting
- Fitness
- Weight loss
- Muscle gain
- Yoga
- Camping
- RV living
- Tent camping
- Cooking
- Desserts
- Frugal food
- Keto meals
Note that these ideas are just scratching the surface! There are a ton more audience ideas and smaller topic ideas out there.
Step 2: Choose a Blogging Platform
Once you have a blog topic in mind, you’re past one of the hardest steps! The next thing you’ll need to do is choose a platform for your blog to live on.
Let me explain: every blog you see on the internet is typically running on a specific content management system (CMS). These are pieces of software that make managing web content easier. In other words, with a good CMS, you can run your blog without any coding knowledge or expert tech-savviness.
While that all may sound overwhelming and too technical, don’t worry. It’s a lot simpler than it seems!
Free vs. Paid vs. Self-Hosted Blogging Platforms
Now that you know what a CMS is, let me explain the different types:
- Free – Think Tumblr, Blogger.com, etc. These platforms allow you to start a blog for free, but they’re very limited. You won’t have many customization options, you won’t be able to monetize your site, and you’ll never fully own your blog either. If you’re serious about blogging, these types of platforms just won’t cut it.
- Paid – These platforms include services like Squarespace and Wix. With them, you don’t have to worry about hosting, but similarly to the free platforms, they have limits. You’ll have fewer customization options, you may be limited in how you can monetize your site, and you still never quite own your site. This option has a bit less of a learning curve, but it comes at a price.
- Self-hosted – This is where WordPress.org comes in, and it’s the CMS that powers a quarter of the entire internet. WordPress.org is a free software, but you have to host it yourself, which costs money. Still, it’s quite easy to set up, and with WordPress.org you have full control and ownership of your site, access to thousands of plugins and customization options, and the freedom to essentially do whatever you want with your blog. This is the path we recommend choosing.
WordPress.com vs. WordPress.org
You may have noticed above that I specified WordPress.org under the self-hosted category. This is very important.
WordPress.com and WordPress.org are both completely different things, with big differences:
- WordPress.com is a hosted-for-you option that is very limited, similarly to Squarespace and Wix.
- WordPress.org is self-hosted and offers a lot more flexibility.
WordPresss.org is what you want. It’s what Fabulessly Frugal is run on, and it’s one of the most popular content management systems in the world.
But, as we said above, it can seem a bit more complicated on the surface. Not to worry though! We’re going to break things down in the upcoming steps to show you how to start a WordPress blog from scratch, with no prior experience.
But first, there’s one more important thing to do:
Step 3: Brainstorm Domain Names
Your domain name is the thing that people will type into their address bar to get to your blog. For example, our domain name is fabulesslyfrugal.com.
When I picked this name back in 2008, I didn’t put too much thought into it. NOW I know that it’s actually a bit hard to roll off the tongue. AND it is always misspelled – ha! At the time, I thought the misspelling of fabuLESSly was “cute”, so I decided this would be a great way to show the purpose of my blog… that it’s possible to live a fabulous life on less!
Choosing a good domain name for your blog is a pretty important step as it’s basically the identity of your blog. You want it to be something short, memorable, and significant to YOU. Bonus points if you can relate it to your blog’s niche (e.g. happygardener.com for a gardening blog).
There’s also the option of using your name as your domain (e.g. cathyyoder.com) and this can be great for personal branding. Just keep in mind that if you ever want to sell your site in the future, it will be harder to sell with a domain name like this.
Tip: Use a thesaurus to come up with alternate domain name ideas! There are so many different combinations of words you could do.
With all that in mind, take some time right now to come up with some domain name ideas that you like. I always recommend going for a .com domain name as it’s the most memorable and well known, so stick to that.
Once you have a good list of ideas, move onto the next step!
PS – don’t purchase your domain name quite yet… I have a great way to save money on this step below!
Step 4. Get Your Blog Online
Ok, you have some ideas in mind for your domain name, now it’s time to check their availability and get your blog online!
Here’s where the techy stuff comes into play, but don’t worry. We’re going to break everything down step-by-step.
Head over to Bluehost.com:
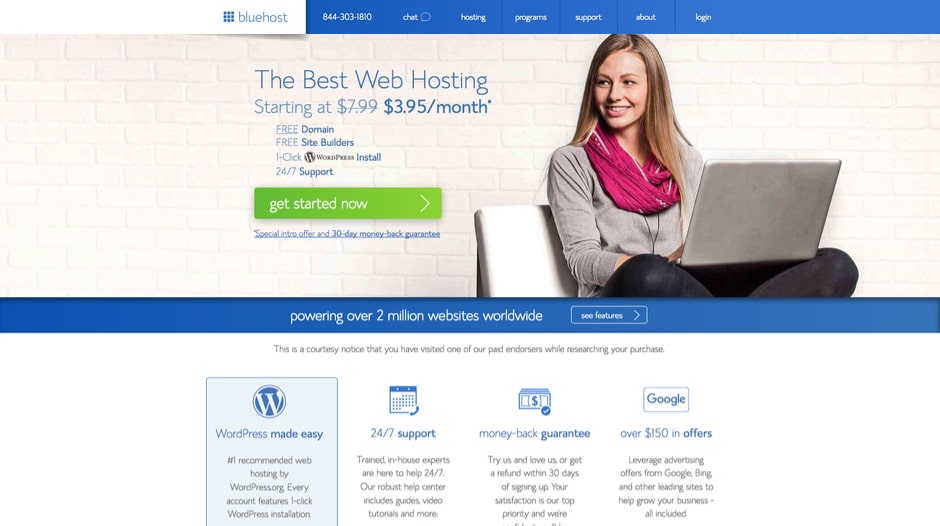
The first thing to do is head to Bluehost.com which is a super affordable and well-known hosting site. They’re also one of the top recommended web hosts from WordPress!
➡️You will purchase your domain name AND your website hosting HERE.
Once you’re on Bluehost, hit the green ‘get started now’ button.
Choose a hosting plan:
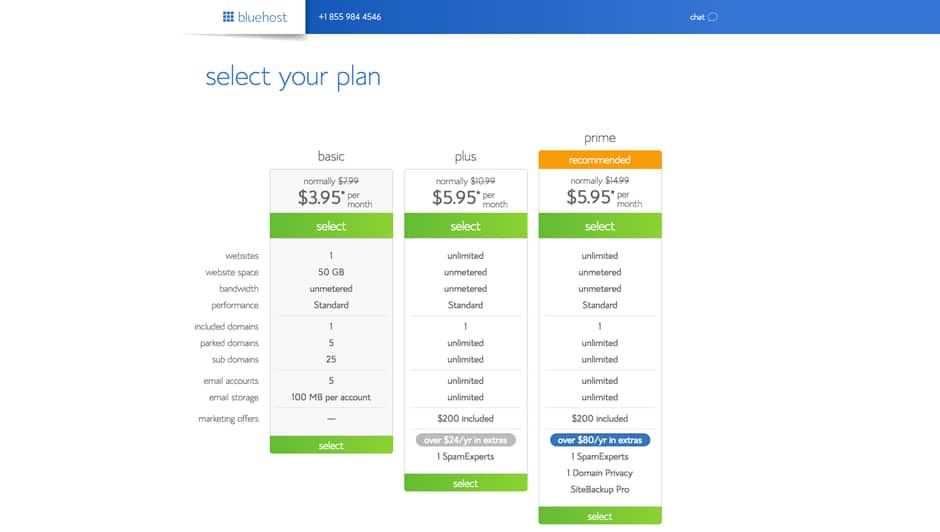
You should now see three different WordPress hosting plans. Since you’re just starting out, the basic plan should be just fine.
That being said, as a new customer you get exclusive introductory prices that are massively discounted.
Why is this important? Well, if you’re planning to be in this for the long haul (which you should be), you can buy one of the more feature-filled plans right now for dirt cheap.
You’ll never get the introductory prices again so if you’re planning on blogging for a while, I recommend going for the plus or prime plan right now.
Check your domain availability:

Ok, if you came up with your list of domain name ideas in step 3, now is the time to get that out! In the “new domain” box, start entering your desired domain names until you find one that is available.
With the millions of websites on the internet don’t be discouraged if your first couple of choices aren’t available.
Once you find something you like, lock it in and move onto the next section…
Fill out your account and package information:
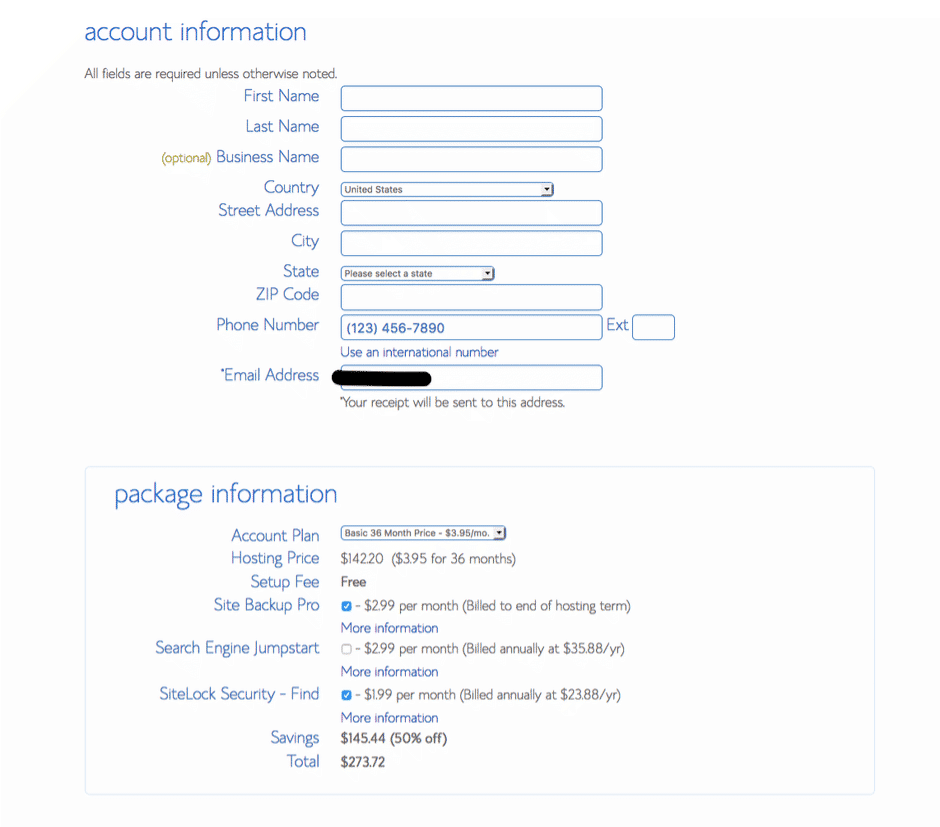
You’re almost at the fun stuff! Fill in the necessary account information, and then move on to the package information section.
This section is where you can find huge savings on your hosting. They allow you to choose up to a 36-month plan, with your special introductory price. That means a HUGE discount for you and you won’t have to worry about renewing your hosting for 3 years.
For the optional add-ons at the bottom, here’s an explanation of each:
- Site Backup Pro – Gives you more powerful backup features, but you probably won’t need them at the very beginning. Bluehost will still give you basic backup features for free.
- Search Engine Jumpstart – Helps with search engine optimization, but it’s not really necessary as you can learn how to do most things by yourself.
- SiteLock Security – This helps protect your website from malware and attacks which is actually quite useful.
Don’t feel pressured to buy any of these right away, you can always get them later!
Enter your payment info:
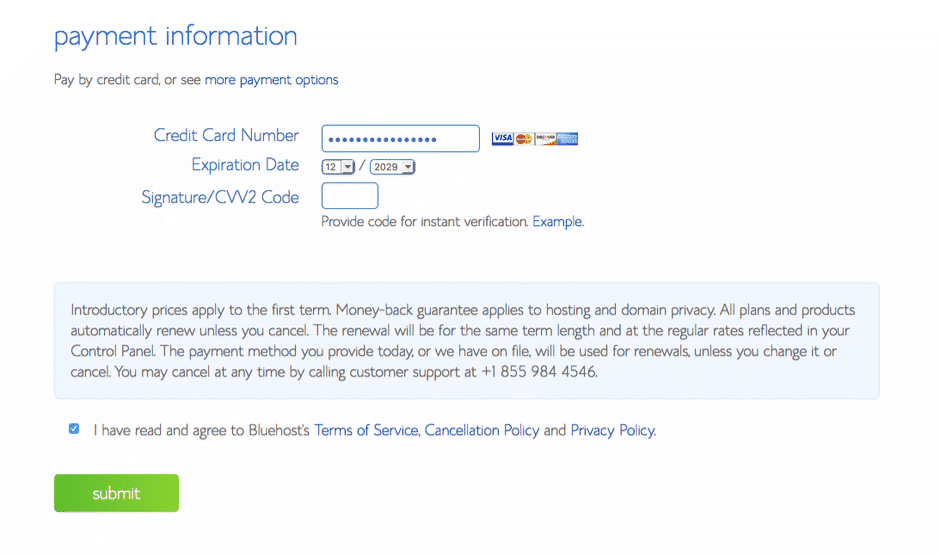
Easy peasy step here.
Set up a password:
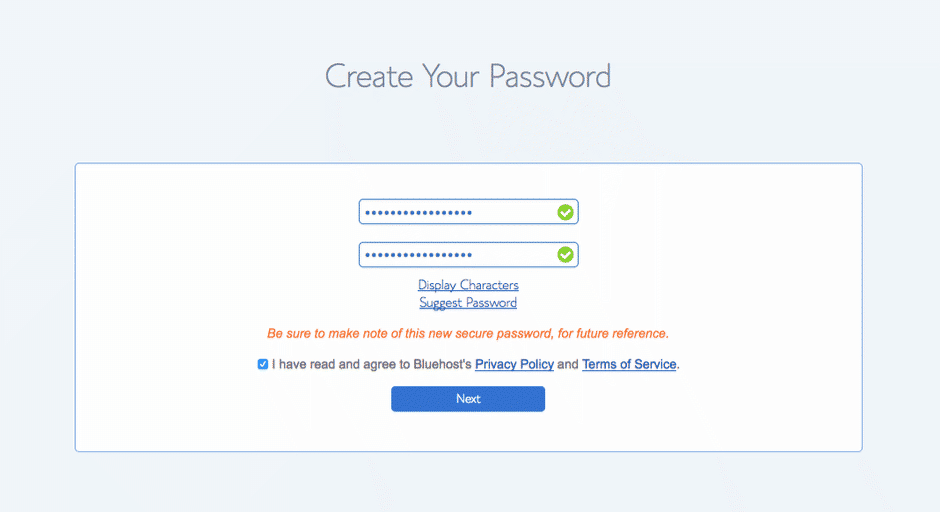
Be sure to create a strong password and write it down somewhere safe. This will allow you to access your hosting account, so you don’t want it to end up in the wrong hands!
Pick a starter theme:
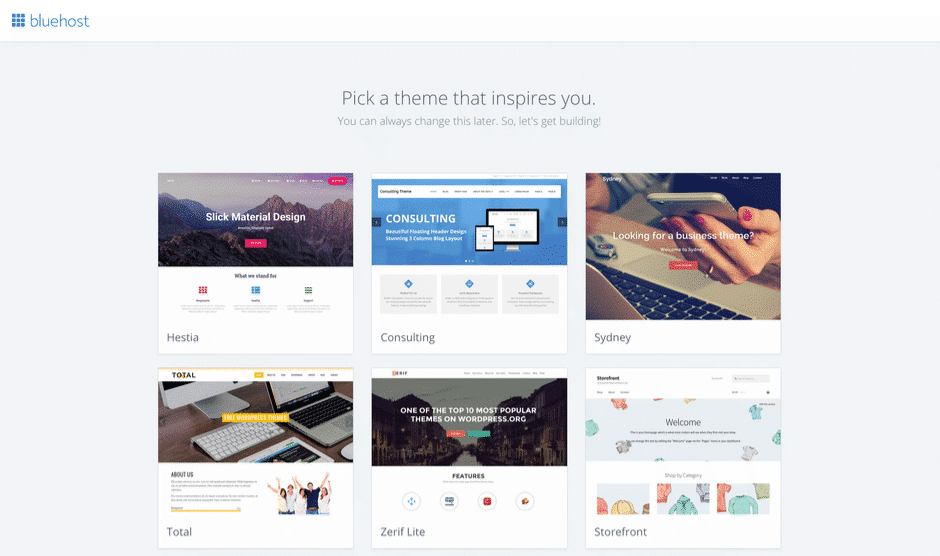
Upon logging in, Bluehost will help you setup your WordPress site right away. The first step is a fun one too: picking a theme! Your theme is what determines how your blog looks, and how you can customize it.
In the beginning, Bluehost will recommend several themes to start with, so go with the one you like most. You can change this in the future if you want, and I’ll show you how to do that below.
Log in to WordPress:
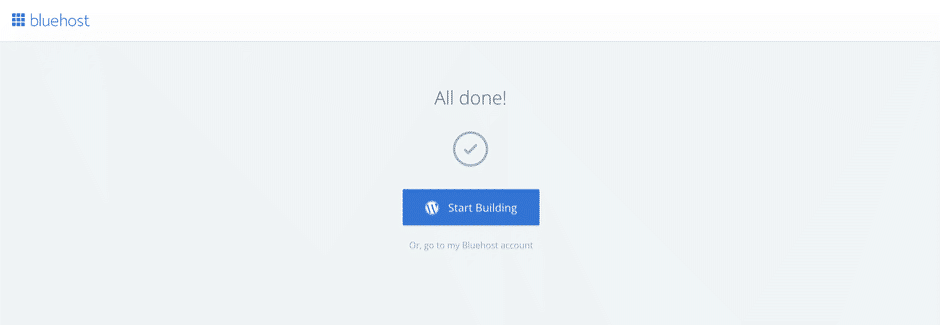
After choosing a theme, Bluehost should prompt you to “Start Building” on WordPress. Click that button and then you’re ready to start really setting up your blog!
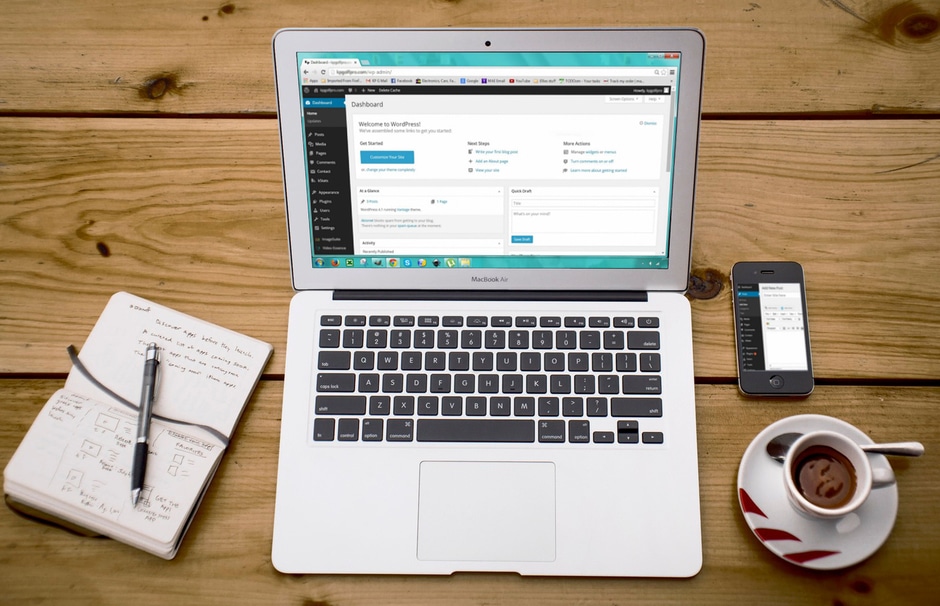
Step 5. Configure WordPress
Ok, now that your WordPress site is up and running, if you followed the previous steps you should be in your WordPress dashboard right now. For reference, here’s what that should look like:
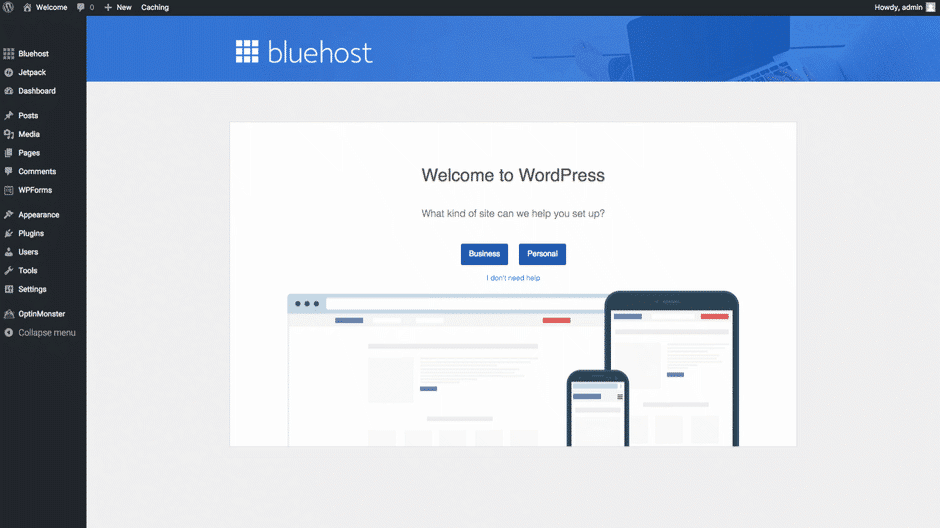
Looking good? Now it’s time to configure some basic settings! This is super easy and will set you up perfectly for the future.
Site information:
The first thing you should set up is your site title and description. To do this, click Settings > General on the left-hand bar in your WordPress dashboard. You should then see a “General settings” area where you can change your site title and tagline.
To give you an idea of what to put here,
- our site title is: Fabulessly Frugal
- our tagline is: Amazon Deals, Financial Tips, DIY, Recipes!
If you can’t think of anything good right now, feel free to come back to this later. The important thing is that you know where this setting is.
Feel free to modify some other things in this area too. Set up an admin email address, change the date format, etc.
Permalinks:
A permalink is URL people would type in their address bar to get to a certain page on your site. For example, the permalink for this post is www.fabulesslyfrugal.com/how-to-start-a-blog/.
There are different settings for permalinks, but you’ll want to keep yours simple. To do this:
- hover over ‘Settings’
- click ‘Permalinks’ on the left-hand WordPress menu
- from that page, select ‘Post name’ as your permalink setting
After that, you’re all set! You won’t ever have to touch this setting again.
Changing your theme:
Don’t like the original theme Bluehost started you off with? You can change it pretty easily. Just hover over the ‘Appearance’ tab on the left-hand menu, then select ‘Themes’. To browse your options, click the ‘Add New’ button at the top.
WordPress offers a ton of free themes so feel free to browse through them until you find something you like. There are also paid themes out there that offer different looks and features, but the free ones should be just fine for now.
Important note: Don’t get too hung up on your theme right at the start. The most important thing is that it’s functional and easy to navigate. If it’s not perfect, just wait until your blog is making some money and you can invest in something you love! It’s changeable at any time, which is one of the beautiful things about WordPress 🙂
Step 6. Download Plugins
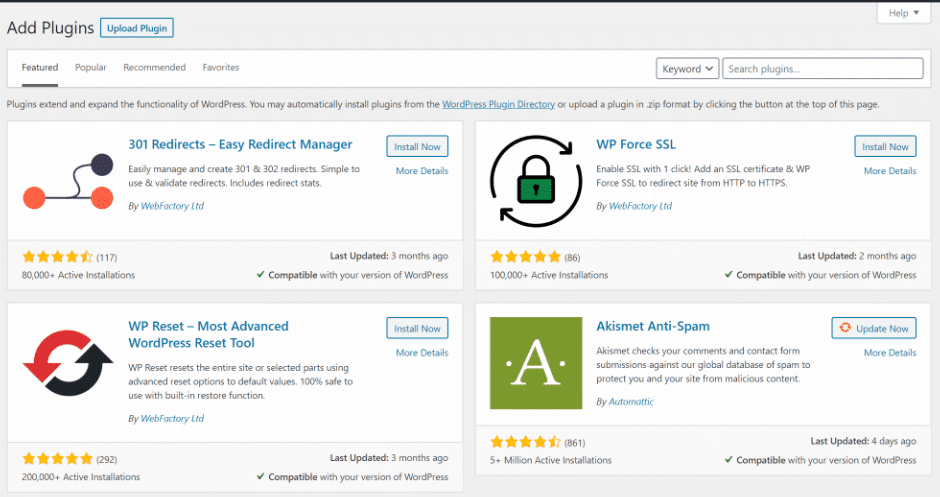
Plugins are little things that add functionality to your blog with the click of a button. You could almost think of them as “apps” that add different functions to your blog. They are one of the greatest things about WordPress, and there’s pretty much a plugin for almost any functionality you could imagine.
Be warned though: Don’t just go adding plugin after plugin to your blog. This will slow down your site and potentially create security vulnerabilities. Only add plugins when you need them, and be sure to read reviews before adding them to your site.
To start with, I recommend adding these two plugins:
- Yoast SEO – This will essentially help your site get along with Google better. Here’s a simple setup guide.
- WP Super Cache – This will speed up your site significantly by storing certain data on your hosting server and serving it more efficiently. It may sound complicated, but it’s easy to set up! Here’s a simple setup guide.
To add these plugins, just head to the “Plugins” section on the left-hand WordPress menu, and hit the “Add new” button. Then just search for the plugin, download, and activate it.
Step 7. Write Content
Ok, your blog is pretty much completely set up at this point. Congrats! Now it’s time for the fun part of actually blogging 🙂
Remember in step one how I said sticking to one topic for a bit is a good idea, even if you’re planning to eventually write about multiple things on your blog? There are a couple of reasons for this:
- It gives your readers more related content to jump around to – Your goal is to keep people on your blog for as long as possible. But, if someone comes to your site for gardening content and you only have one post on gardening, they’re going to leave pretty quickly.
- It’s good for SEO – SEO stands for Search Engine Optimization. You don’t have to worry about that too much right now, but basically the better your SEO, the better chance you have of ranking for certain search queries on Google. By having lots of similar content on your site and linking them together, you’ll have a better chance of ranking and getting your content seen.
Once again, if all of this seems overly complicated right now, don’t worry. Just focus on writing at least 5 blog posts around one topic before moving on to another.
How to figure out what type of content to write:
Going back (again) to step one, you should already have an idea of the people you want to read your blog, which should give you ideas on what type of content to write.
To brainstorm some solid ideas, think of things that you and your target audience would search for on Google.
For example, if you have a fitness blog, people might search for “morning stretches“. That’s just one example though. Keep coming up with ideas like this, and write them down as you go.
Once you have a good list, head over to Ubersuggest.com and start entering your ideas into the search box.
As you search, Ubersuggest will give you even more suggestions for related searches, and you’ll also be able to see the search volume of each query. Use all of this information to come up with potential blog post ideas, and be sure to record them in a spreadsheet for future use!
After half an hour or so of researching, you should have TONS of ideas. Now it’s time to get writing…

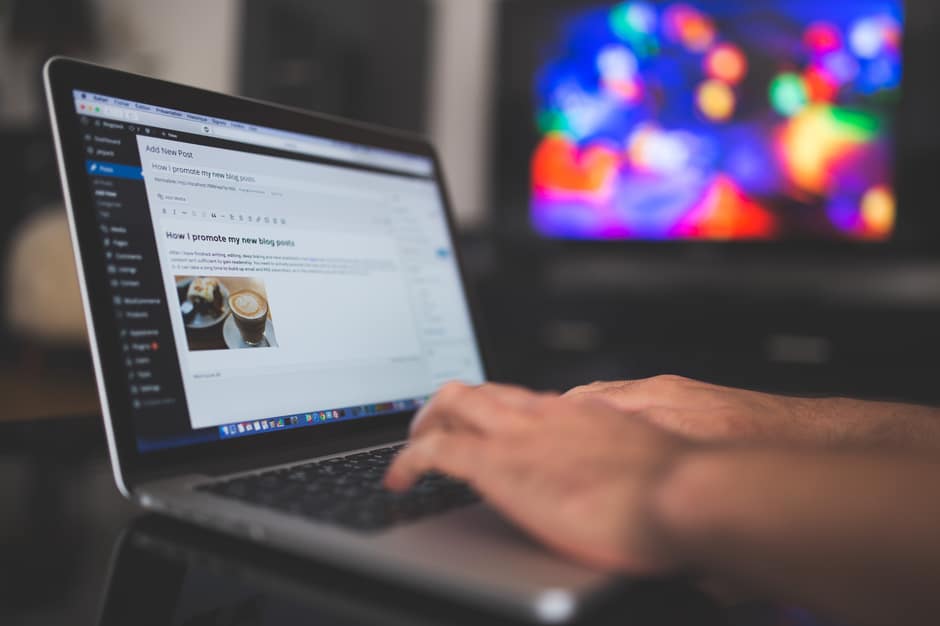
How to create a post:
Once you’re ready to start writing your first blog post, head back to your WordPress dashboard, and click the ‘Posts’ tab on the left-hand menu. To create a new post, click “Add New” and you’re ready to start writing!
At this point, think about writing a blog post as a mix of a story and a very informal essay. Keep it conversational, engaging, and put your personality into it!
You probably won’t be a pro blog writer at the very start, but don’t get discouraged. You’ll get better and better the more you practice.
One other key tip: answer all your reader’s questions related to the topic you’re writing about. The more in-depth and valuable you can make your content, the better.
And that’s pretty much all there is to it. Once you finish a post, I recommend adding some relevant images in, and then you can hit publish!
Another tip: don’t worry about trying to make things perfect the first time around. You can always go back later and update your posts. That’s another one of the great things about blogging.
Step 8. Launch and Promote Yourself!

In the early days of your blog, you’re probably not going to have any visitors reading your posts. That’s okay though!
In fact, there are some things I recommend doing before you launch your blog to the public:
- Write at least 5 posts – Remember, these first five posts should all be surrounding a single topic. Having five posts gives your visitors multiple things to read once they land on your site.
- Get your theme fully setup – Add a logo, get your homepage set up how you like it, and make things easy to navigate. User experience is very important!
Once you’ve done those two things, then you’re ready to start promoting your blog posts to bring in visitors.
Where to promote your blog:
There are many potential places to promote your blog on. The obvious places are social networks, like:
- Facebook – Not the easiest to grow on, but everyone is on here! If you want to share your blog with family and friends, this is a great place to do it. Start a page AND a group with your brand.
- Pinterest – Great for DIY, recipes, home decor, and lifestyle-related blogs. Pinterest is still one of our main sources of traffic and we love it!
- Instagram – this is a great place to connect with followers and show them the REAL you. Once you get 10,000 followers, you can use the swipe up feature in your IG stories, and send traffic to your blog directly from instagram. In the meantime, include your blog URL in your instagram profile!
- Twitter – Good for becoming a part of a community in your blog niche but don’t expect a ton of traffic from here.
- Linkedin – If you write about business-related topics, they could do really well here!
Another great place to promote your blog is on forums. And, there are forums on almost every topic out there, so there’s a good chance there will be one (or multiple) centered around your blog topic.
To find a few, just do a Google search with your blog topic + forums (e.g. “gardening forums”). That should pop up a lot of results. You can also check on Reddit for subreddits related to your blog topic.
Note: You have to be careful when promoting your blog on forums. No one likes when people just spam their website all over the place.
Instead, to promote your blog on forums in a safe and ethical way, add value to conversations and only mention your blog when it makes sense. If you’re new to a forum, wait at least a couple of weeks before mentioning your blog.
Try to make it a habit to promote one of your posts somewhere new every single day. That could mean pinning a new pin on Pinterest, commenting on a new forum post, or even answering a question on Quora.
Step 9. Monetize Your Blog

Once you’ve launched your blog and began promoting it, you should start to see a trickle of users slowly discovering and visiting your site. Congrats! Getting those first visitors is a very exciting feeling and a huge accomplishment.
At this point, you should also have a fair amount of content on your site, and everything should flow nicely in terms of user experience and design. People should be able to navigate your site easily on any device, and your blog posts should be easy to find.
This is the perfect time to start looking into monetization opportunities. Technically, you could have started monetizing your site right after you began writing content, but with the methods below, it’s better to be a bit established before you start trying to make money.
And that reminds me of a key tip: always prioritize your users over money! That should be obvious but it’s important to remember.
Ok, let’s look at 5 of the main ways you can start making money with your new blog:
1. Affiliate marketing
Affiliate marketing is when you promote someone else’s product or service for a commission. For example, Amazon has an affiliate program, and each time you click one of our Amazon affiliate links and make a purchase, we get a small cut of that sale. Pretty cool right?
This is one of the best ways to begin monetizing your blog because it doesn’t require a ton of traffic to work well, and it’s pretty low effort. In theory, all you have to do is apply to an affiliate program, slap a link on your site, and watch the earnings roll in.
In reality, it will take some work and practice before you’re able to actually make those affiliate links translate into money, but the fundamentals are simple.
To get started, you can find affiliate programs related to your blog topic by doing a simple Google search. For example, if you’re running a gardening blog, search “Gardening affiliate programs” and see what you find!
Note: Most affiliate programs will check out your site and socials before approving you, which is why it’s important to be officially launched before getting started.
2. Ads
Ads are an easy, straightforward way to monetize your site, but I don’t recommend jumping in too quickly! You need a lot of traffic to make good money with ads, so wait it out for a bit, build your audience, and then look into different ad networks.
To give you an idea of how many users you might need before you can join a good ad network, we’ll use our site as an example: Fabulessly Frugal is in the AdThrive network which requires a minimum of 100,000 pageviews a month!
Other networks will let you in with less, but I wouldn’t consider putting ads on your site until you have at least 10,000 pageviews a month.

3. Sponsors
This is another monetization method that takes getting established first. Once your site is getting a good amount of traffic, you can partner up with other brands to promote products you love. For example, if you start a recipe blog, a company like KitchenAid might approach you to try one of their products on your blog.
To give you an example of what a sponsored post looks like, check out this one we did with Fleischmann’s: Light but Just Right Pizza (plus 30 Minute Pizza Crust!). We were paid to create the recipe, take pictures and publish the post. Pretty cool, right?
4. Products
If you started a blog around a previous business idea you’ve had that involves one of your own products, using your blog to make sales is a no-brainer! Not only do you get to keep 100% of the money your product sales generate, but you also build trust with your audience.
The only downside is that developing a product can take a long time. If you’re willing to put in the work though, here are some ideas of products you could develop:
- eBook (e.g. a recipe book)
- Printables (e.g. budgeting worksheets)
- Physical products (e.g. shirts, mugs, handmade jewelry, etc.)
- Digital courses (e.g. how to grow tomatoes)
- Software (e.g. a fitness app)
5. Services
Similarly to selling a product, if you have a valuable service to offer to others, use your blog to increase your sales! For example, if you’re a freelance writer, you could use your blog to market your freelance writing services.
This is a really great way to find new clients as your blog will be working in the background at all times.
Step 10. Start Building an Email List
Ok, you know how to research and write posts, you’re officially launched, AND you’ve monetized your blog. What’s next?
Some will tell you that this is an optional step, but I will tell you over and over…. start building an email list for your blog IMMEDIATELY. Many bloggers neglect this and end up regretting it later on, which is why I recommend starting this ASAP!
Unlike social media, and even google, an email list is the one thing you really can control. It’s a way to stay connected with the people who like your content. You’ll create a more loyal fanbase, help more people, and make more money. I love writing emails to my list… they are my most loyal followers!
So, what is an email list?
Put simply, it’s a collection of email addresses. More specifically, your blog’s email list would be a collection of email addresses that you’ve gathered from your most loyal readers.
This is super useful because having these email addresses means you can easily reach your biggest fans, whenever you want. Post a new blog post? Send out an email. Have a new product that you want some feedback on? Send an email!
Many people check their email inboxes every single day so your email list is like the most powerful social network ever for your blog!

How are you supposed to collect these email addresses?
This is a great question. Having an email list sounds wonderful and all, but how do you actually get someone to hand over their email address?
Well, it’s not easy, but in the end, it all comes down to value. If you can offer your reader something valuable in exchange for their email address, you’ve got a much better chance of converting.
So what can you offer? Well, that largely depends on your niche and audience, but here are a few ideas:
- Exclusive content (e.g. subscriber-only recipes)
- A free mini-product (e.g. a one page eBook or printable)
- A short email course (e.g. a free 5-day email course on how to use a Cricut)
As you blog and interact with your audience more, you’ll get a better idea of what they find valuable, but these ideas are a good start.
Once you have an idea, you can begin to offer it to your readers using something called an opt-in form.
Huh? What’s an opt-in form?
An opt-in form is a thing that readers see when they visit your site. It allows you to offer them something in return for their email address. For example, here’s one that we have:
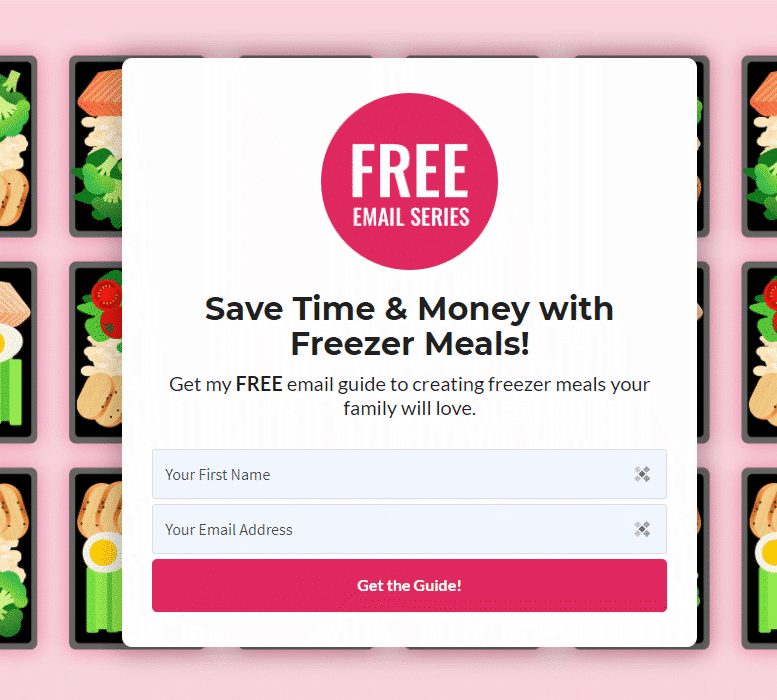
That opt-in hits the two main things we talked about above:
- It offers something valuable – Save time and money with an email guide to creating freezer meals.
- It asks for information – The reader has to submit their first name and email to get the guide.
It’s simple, but it works!
We use a service called OptinMonster and it’s fully customizable! I’d recommend inviting your readers to join your email list in every single blog post as well.
Wait, where am I supposed to store these email addresses?
This is a pretty important detail! Don’t worry, you’re not going to be collecting email addresses by hand or sending out one email at a time. That would be painstakingly slow and tedious.
Instead, you’ll want to sign up for an E.S.P. or Email Service Provider. There are plenty of these out there. Here at Fabulessly Frugal, we use Feedblitz (use code FABFRUGAL to get a free 45 day trial). There are other options like MailChimp and MadMimi (plus a slew of others).
Your email service provider will hold all the email addresses you collect and allow you to send out messages to all your subscribers at once.
Most ESPs also have form builders that allow you to quickly and easily make opt-ins like the one we shared above. It’s pretty awesome.
Final Thoughts
All that’s left to do now is rinse and repeat. Continue to go through steps 8-10 of creating content, launching and promoting it to the public, and then monetizing it. And don’t forget to build an email list while you’re at it!

Now let’s address the elephant in the room:
There’s a good chance you scrolled through this long guide on how to start a blog and you’re feeling a bit overwhelmed. Talk about information overload!
Some of you may even be having thoughts of doubt that you can even do any of this. Let me tell you now: that’s completely normal.
YOU CAN DO THIS!
We all start somewhere and it may be challenging doing something so out of your comfort zone at first, but in the end, it will get easier and it will be very well worth it.
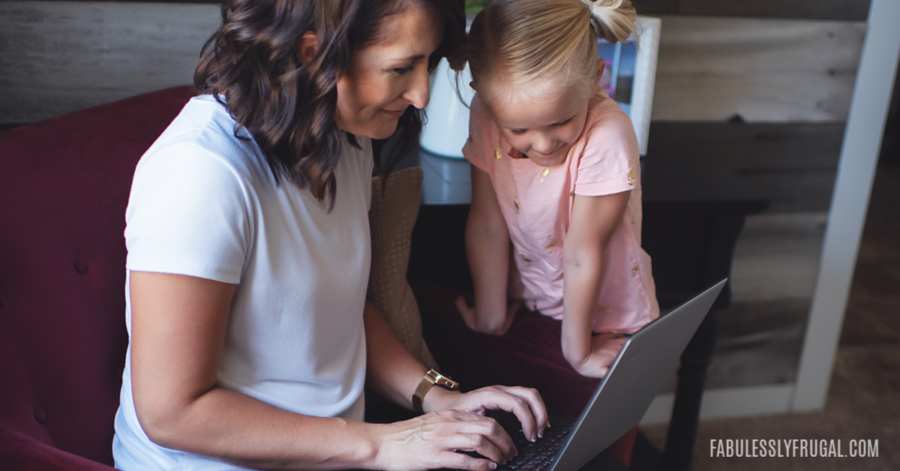
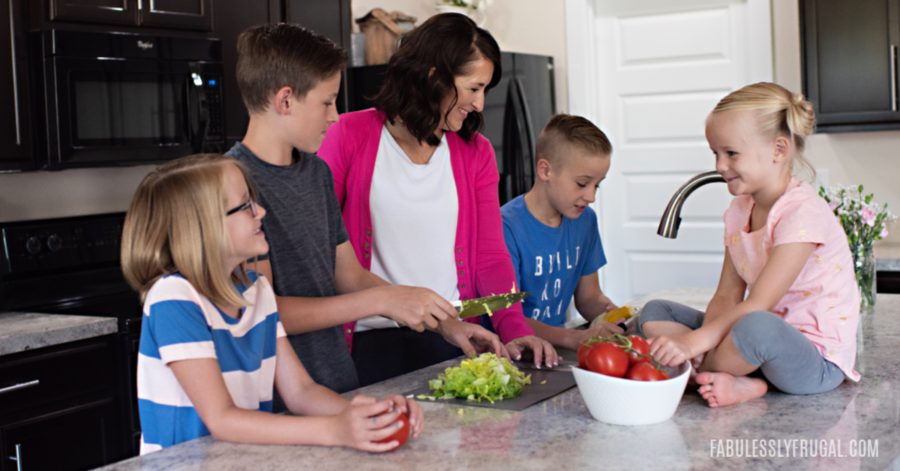
Like I shared in the beginning, I started without even fully understanding what I was doing. But it was sooo much fun. I loved learning it and figuring things out! In the early days I was younger and had smaller children. I worked on the blog when they were napping and also late at night. I stuck with it because what I was doing was really helping people… it fulfilled my WHY.
It can be overwhelming at times, and there were times that I felt like giving up. But I’m glad I stuck with it. I’ve learned so much and love providing an income stream for the people on my team.
It took some time to make money on the blog, but I can tell you that it now makes 6 figures every year. Of course, my expenses are a lot higher than they were in the beginning, but I am able to provide myself a steady income. It’s been a LOT of work, but it’s been worth it!
And I LOVE working from home!
What I recommend doing:
If you’re really feeling overwhelmed right now… you’re NORMAL.
- take a break
- bookmark this post
- let the information absorb
- come back tomorrow with a fresh brain and GET STARTED!!!
You may have to read this guide a couple of times before everything starts making sense.
In the end, this is your chance to learn and try something new, and the extra income and other benefits that come from it could be potentially life-changing.
It was for me.
You can do it!!
Let me know in the comments if you have any questions about starting a blog and I’ll get back to you as soon as I can.

Trending Posts

Comments
Leave a Reply
More Related Posts


Trending Blog Posts
- Blog
- Recipes
- DIY
- Deals


Report a Problem
Please select the problem you are facing with this deal:
- Price Increased
- Price Decreased
- No longer available
- Expired
- Link doesn't work
- Suggestion
- Compliment
- Other
Add more details:
Thank you for your feedback. We really appreciate it.
Enter your email address if you would like to receive a follow up.
Please Try Again
Thanks for providing the email address.
We will reach out to you as soon as possible.


Popular
Recommended
About Us

At Fabulessly Frugal, our goal is to help you live HEALTHY, WEALTHY, and WISE! My team and I work hard to bring you the best, online deals, clean eating, DIY's, freezer meal recipes, and more! I LOVE coaching and inspiring people to improve their health in my fitness challenge! You should also check out my favorite cleanse! Learn more about me and the rest of my team.


Copyright © 2008–2026
Fabulessly Frugal: A Coupon Blog Sharing Gift Ideas, Amazon Deals, Printable Coupons, DIY, How to Extreme Coupon, and Make Ahead Meals. All rights reserved
This is probably that most useful and actionable free “how to start a blog” post I’ve read after going through DOZENS. Thank you.
Hi Grace! I’m so glad you found it useful and actionable! THat was the goal and it sounds like we met it! 🙂 Thanks for taking the time to share your thoughts!
Thank you, thank you, thank you! I have wanted to do this for years but was too afraid! lacking the knowledge of how to get started! I have looked into it several time but would get overwhelmed and would run from it but your post here got me excited again!!
Good luck!
Blogging in 2022 is in so deep trend which everyone is following. Most of the writers have their personal blog site so do I. If you love writing or writing is your passion you must have a blog site or if you want to experiment then you can try a free sub domain from any site providing free sub domain like wix or wordpress !