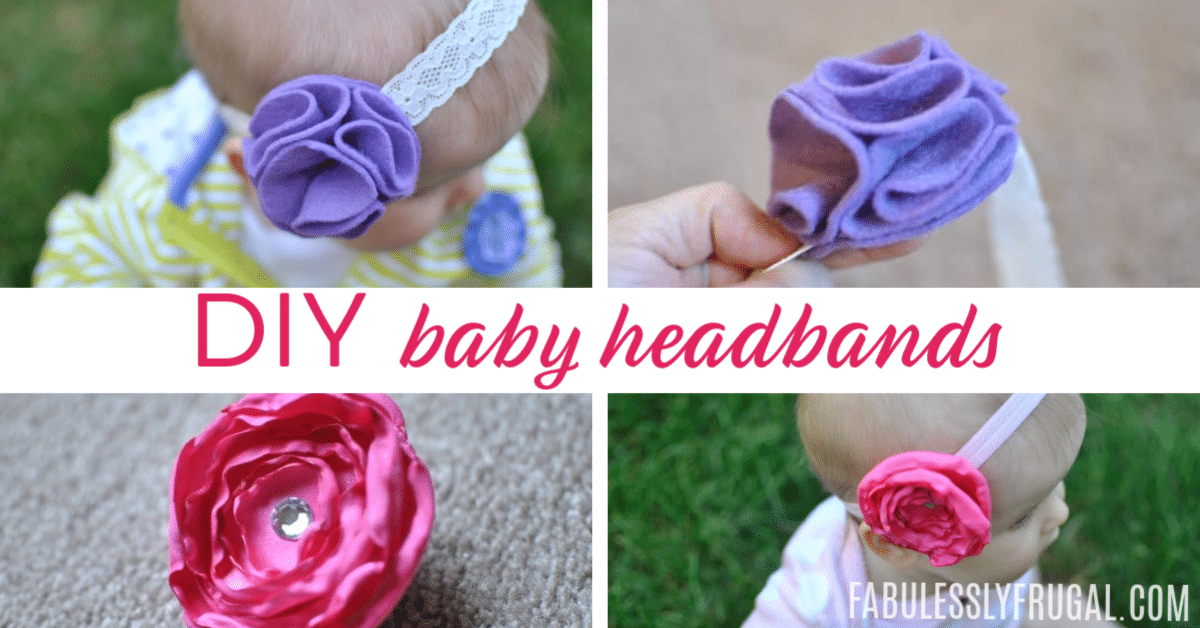
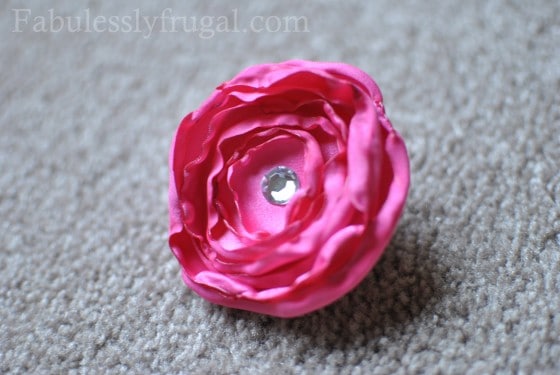
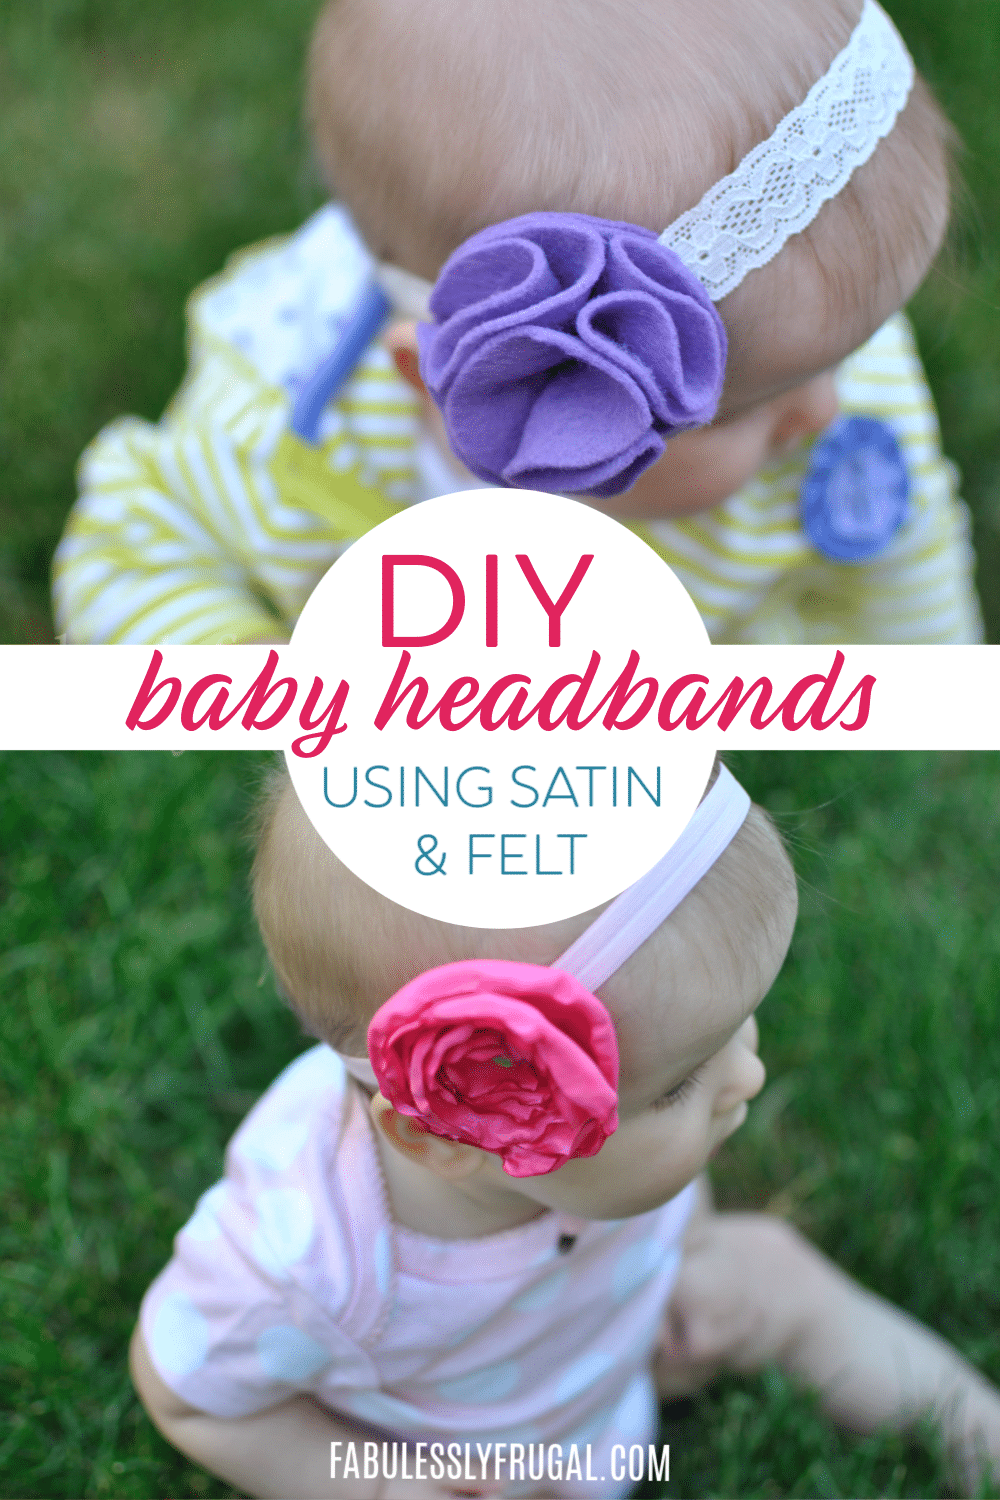
DIY: How to Make Baby Headbands {Satin and Felt Flowers}
I love to make baby headbands. Before I had my little girl I made a TON of headbands. One night my husband asked me to count how many I had made for our unborn baby.. I told him there weren’t that many. After I was still counting I had a total of 45! I have made many more since, I’m sure she has over 75. I love making them; in fact, I use to sell what I made at a local boutique shop. Its my passion! They are so fun to make, I get to use my creativity. Lately I have had a lot of people ask me where I have bought my headbands. I quickly tell them I make all of them, so I decided to make a tutorial for two of my favorite headbands so you all can make your own for a few dollars a piece!
Felt Flower Headband:
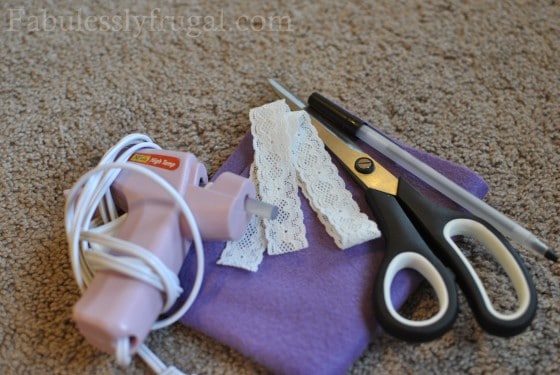
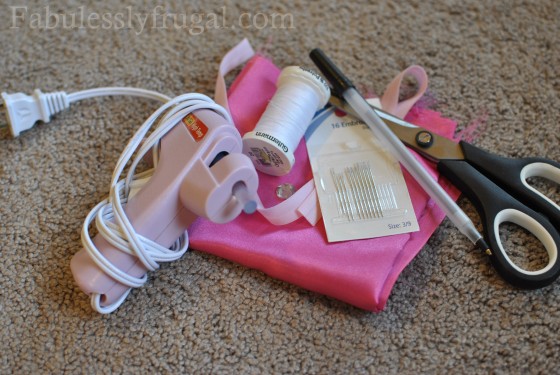
{Supplies}
- Felt ($.20 at Walmart-found in the kids craft section)
- Stretchy elastic (most local craft stores carry stretchy elastic. Etsy is also a good place if you want unique elastic usually. Some are $1.50-$2.00 for 5 yards. I buy a few different kinds and then I have plenty of elastic when I need to make more headbands to fit my babes growing head)
- Hot glue gun
- Pen
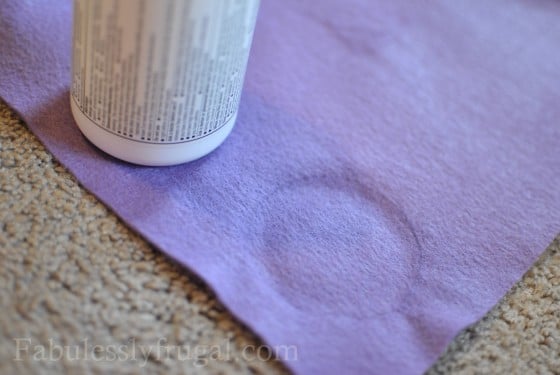
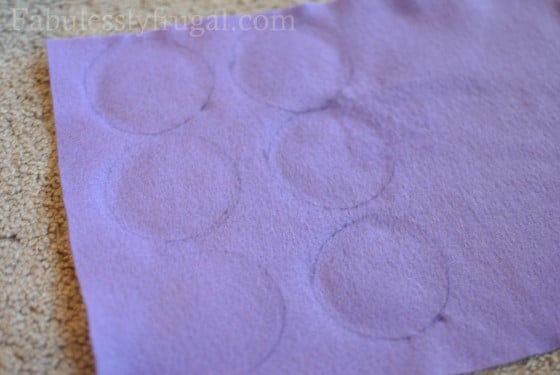
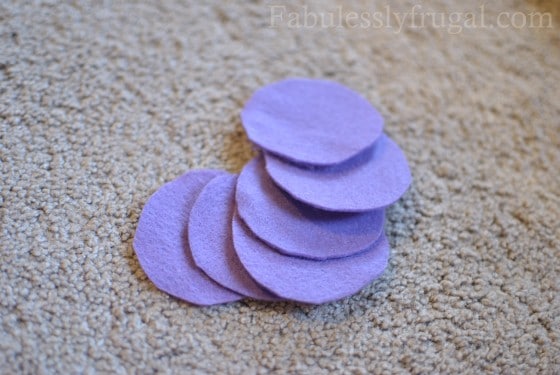
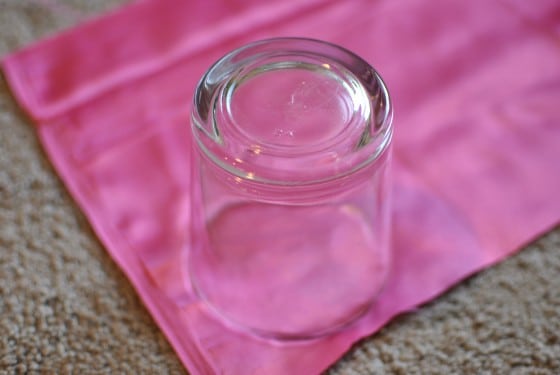
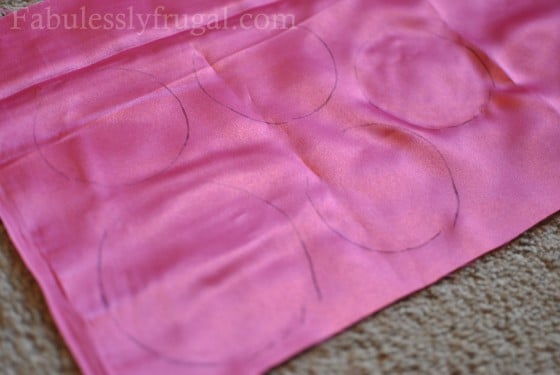
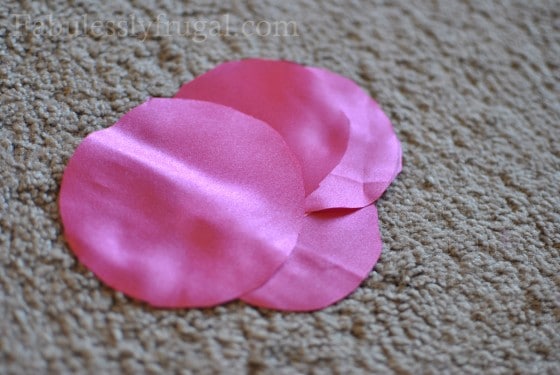
First begin by making tracing a circle (I use the bottom of an ibuprofen bottle-its the perfect size). You will want to make 7 circle all the same size, cut them out
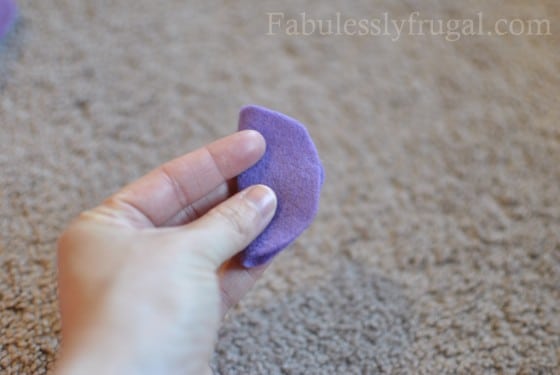
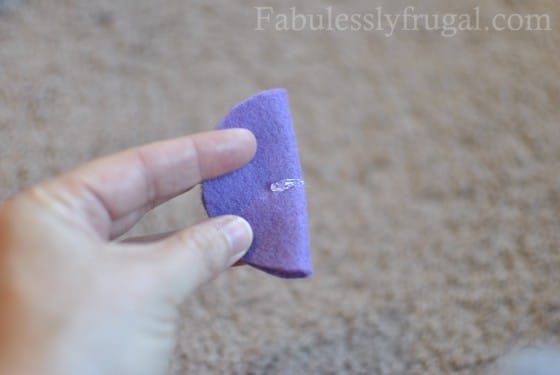
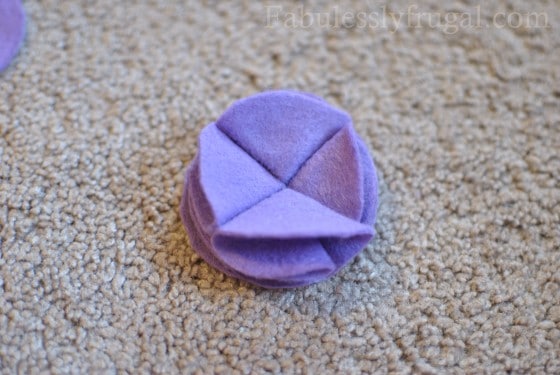
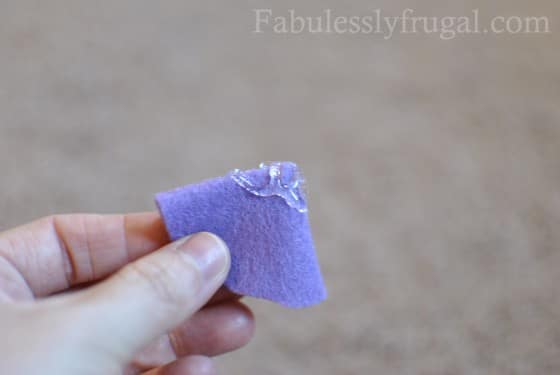
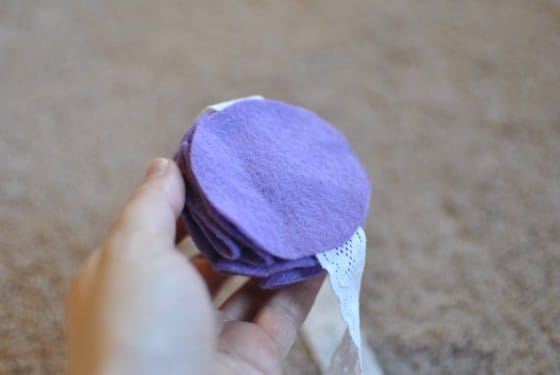
Fold one of the circle in half and then half again. Out a dot of glue in the fold. Repeat this until you have 5 of them
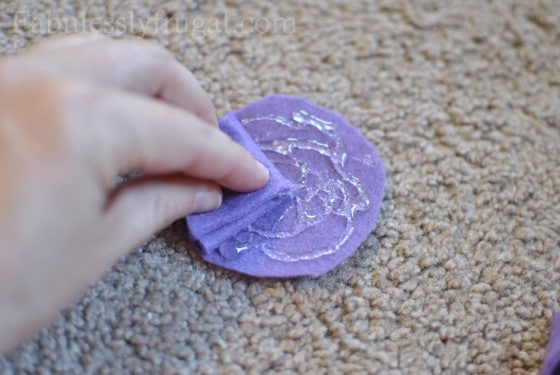
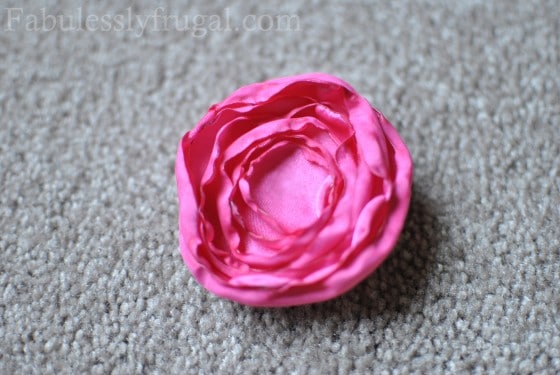
Put glue all over one of the circles. Begin placing the folded and glued “flowers” onto the flat piece of felt. You will lay four down around the circle
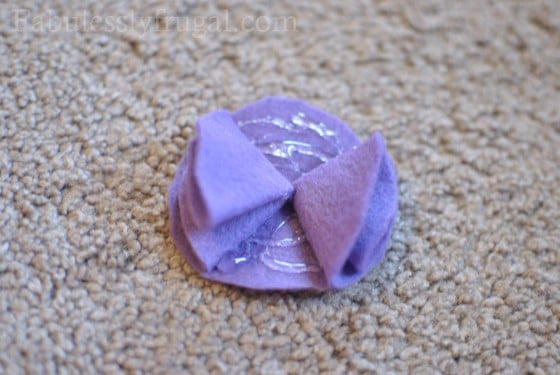
You can carefully trim off around the outside of the flower any felt that is not even or hanging over the side
The last piece you will glue at the folded tip and place in the center of the flower
Now you will want to measure your baby’s head to determine the size you want to cut your elastic. Make sure the headband is snug. Cut and glue the headband together
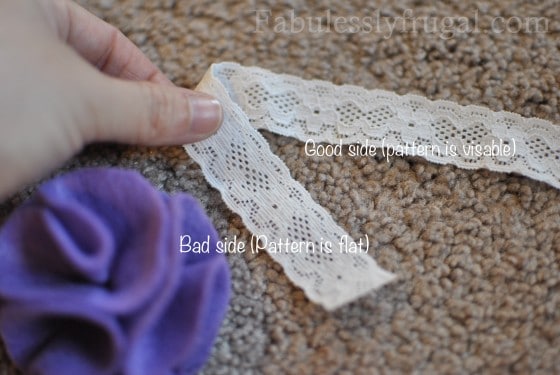
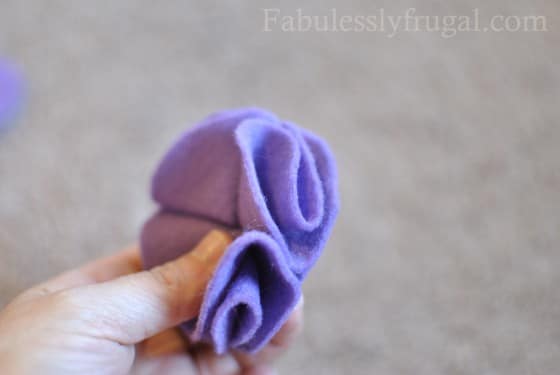
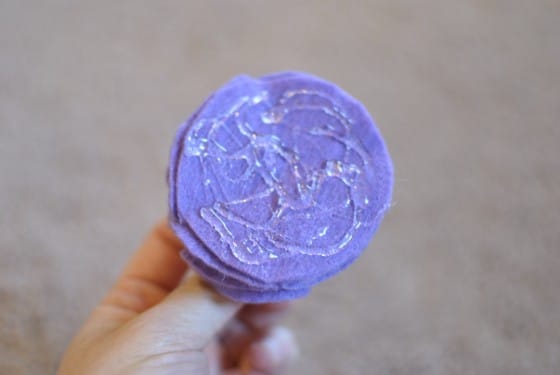
Take your made flower and glue the bottom. Place your headband (good side up) onto the glued bottom
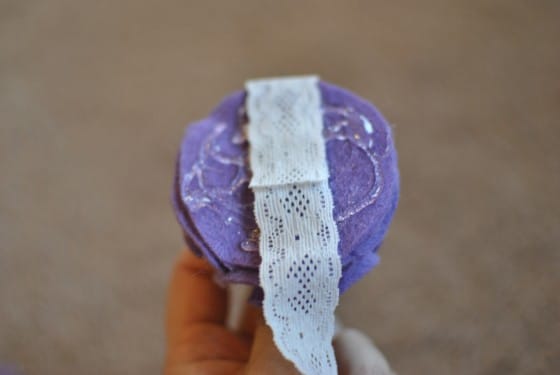
Place your seventh piece of felt over the glue and headband-sandwich it all together
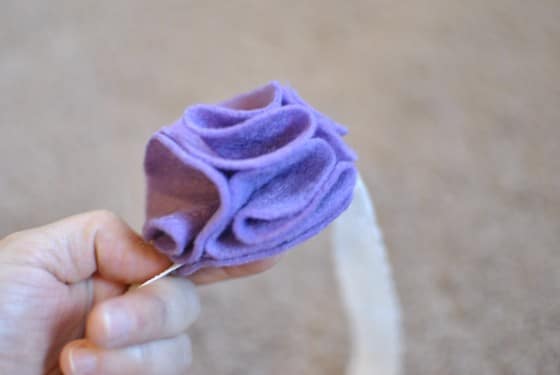
Place your seventh piece of felt over the glue and headband-sandwich it all together. Thats it! Its so simple.
Now for something a little more advanced…
Satin Flowers:
{Supplies}
- 1/4 of a yard of Satin Fabric (You can find this at Walmart for very inexpensive. I paid .28 for what I bought, it was about 1/2 a yard)
- Hot Glue
- Lighter
- Beads/embellishment (.99 for a stand of beads at Michaels. The jewel I used were also found at Michaels)
- Thread
- Needle
- Stretchy elastic
- pen
- Felt
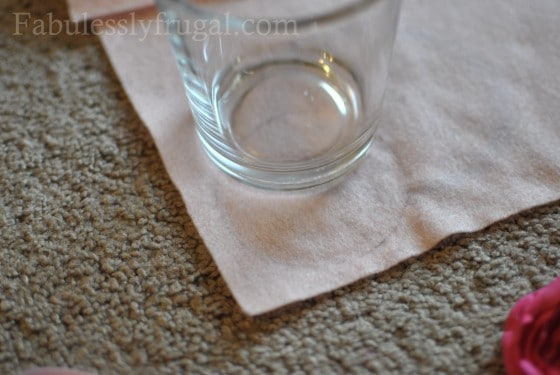
First you will want to cut 6 different sizes of circle (I find things in my kitchen such as cups to measure) trace your circle with your pen and cut out
Once you have your 6 circles you will light your lighter and lightly place the fabric over the flame (its important you have satin fabric, so that your fabric will not catch on file) warning: PLEASE BE CAREFUL NOT TO BURN YOURSELF

One you have lightly burned the edge of the fabric repeat with all 6 circles. Place your largest to smallest circles onto of each other
Thread your needle and hand stitch your circle together from the bottom up. After you have gone through the flower a few times loop and knot at the bottom. Next, you will glue your embellishment and place it in the center of your flower over your stitches
Measure your baby’s head to determine the size you want to cut your elastic. Make sure the headband is snug. Cut and glue the headband together

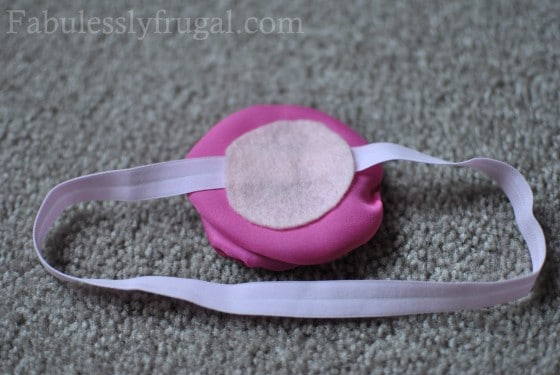
Place your headband (good side up-see above tutorial on what the “good side” is) onto the glued flower

Measure a piece of felt the size of your flower and place glue on the bottom of your flower. Make sure the felt piece is not larger than your flower. When it is on the babies head you don’t want to see the felt
Place your felt piece on the bottom and sandwich it all together!
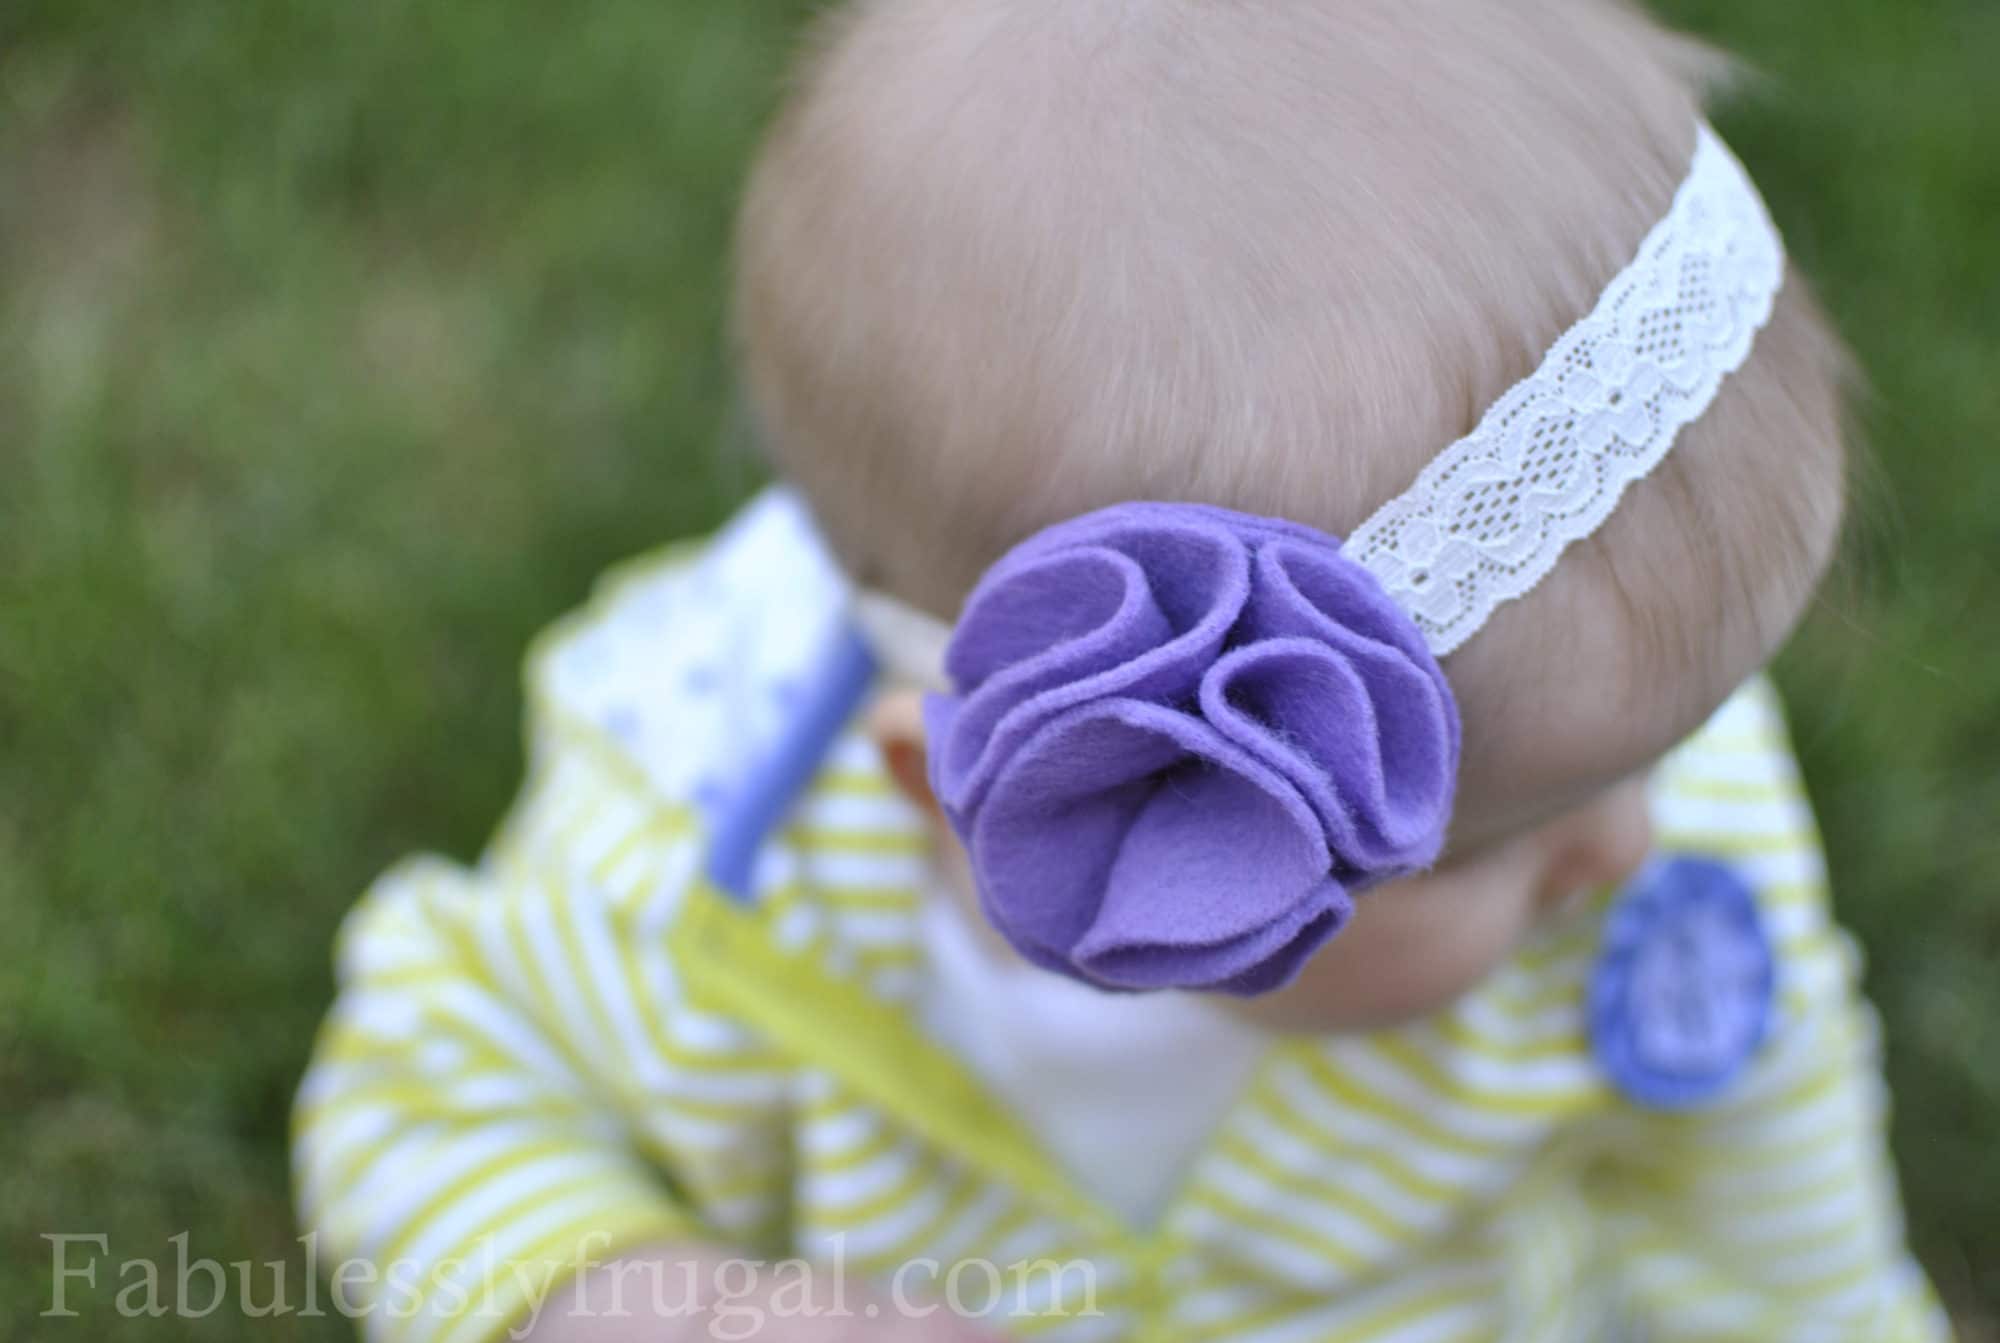
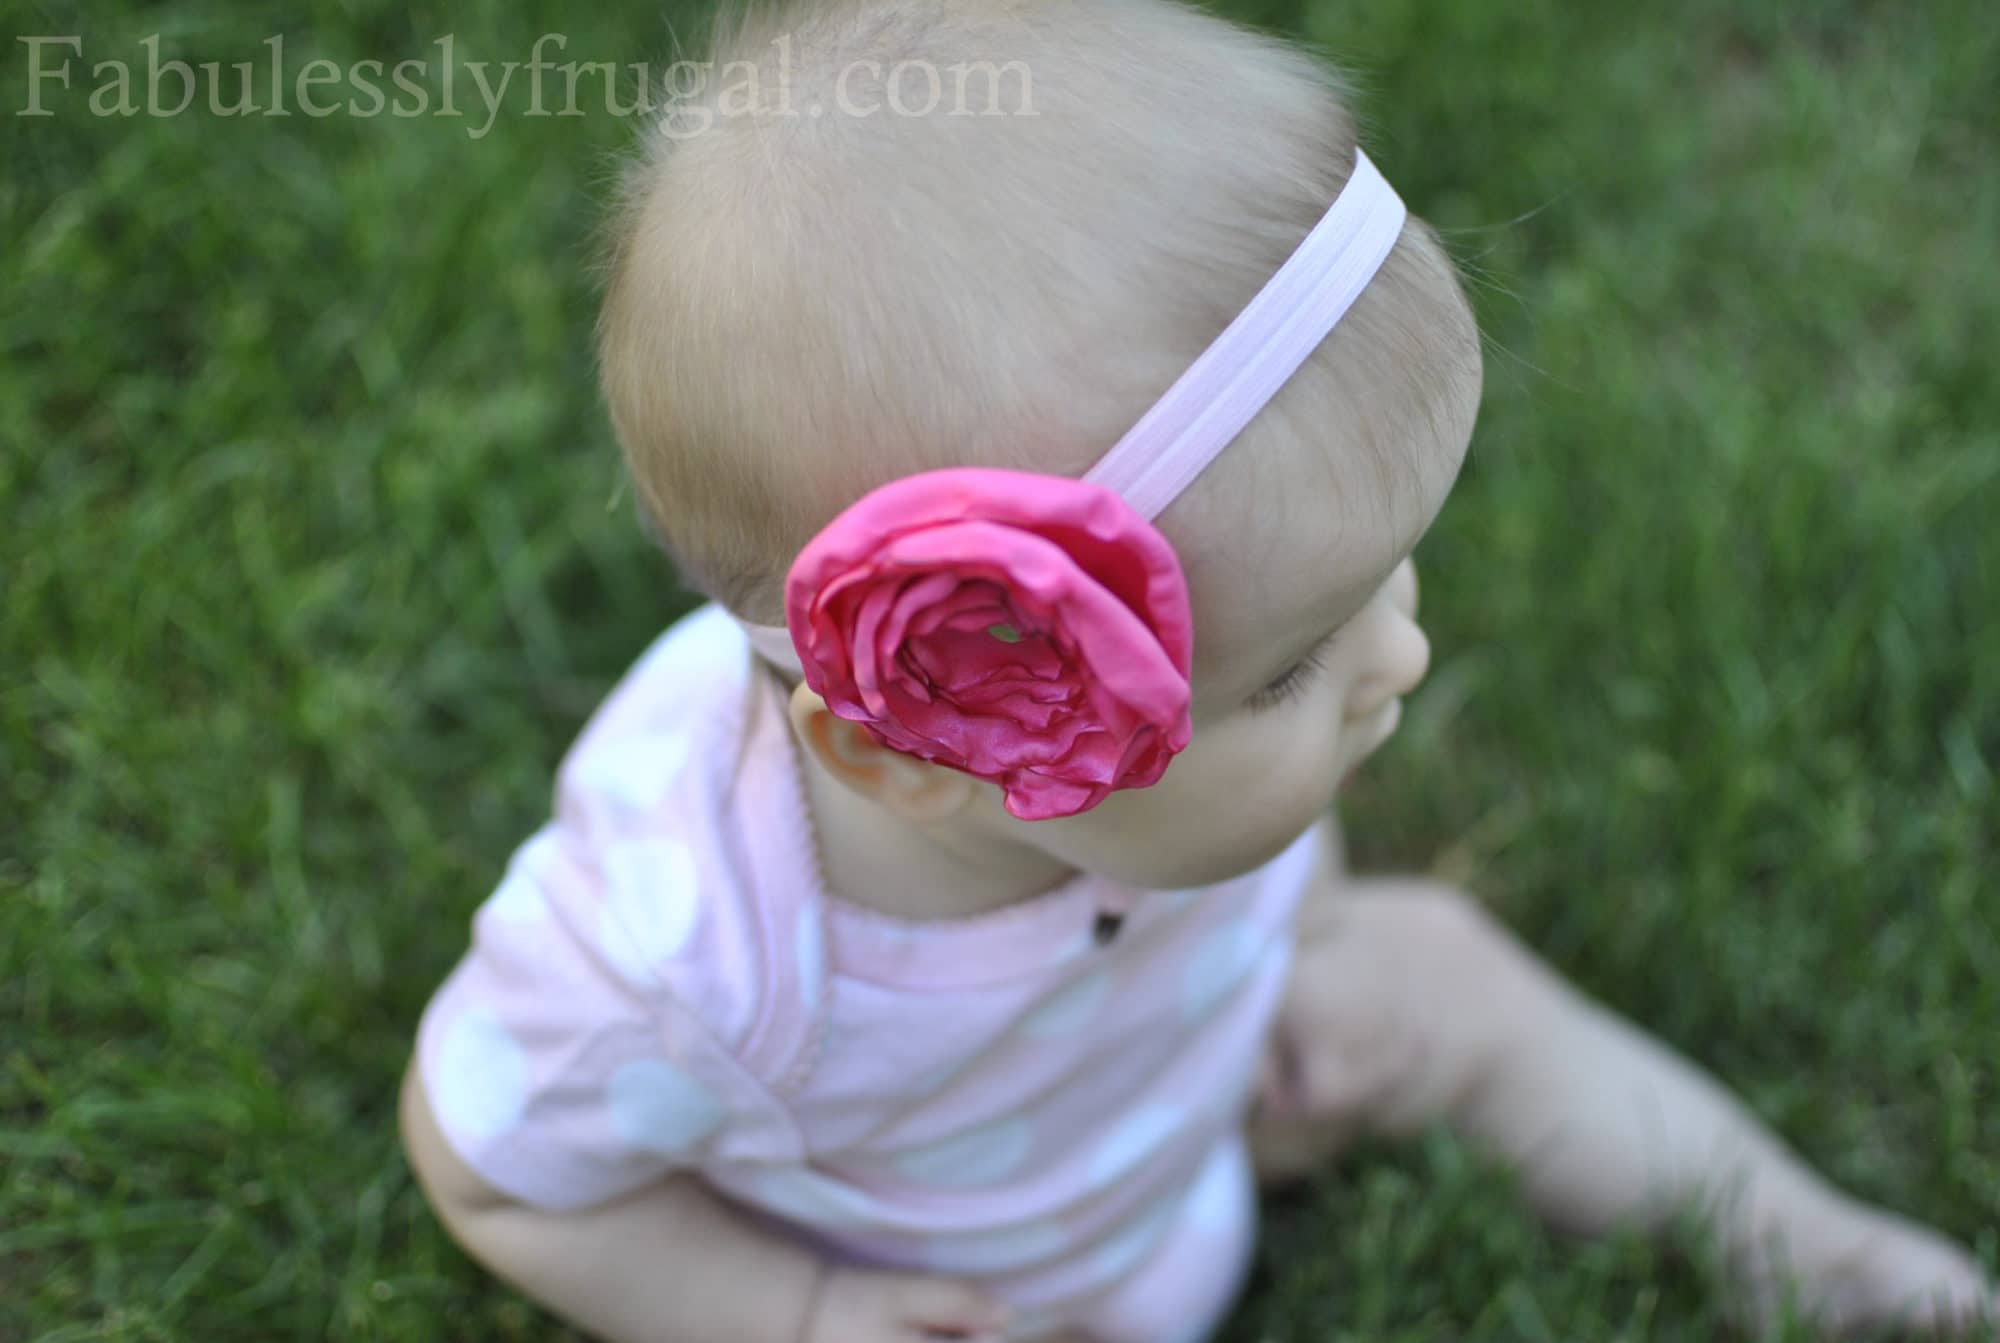
There you have it! Two simple headbands for WAY less than you can buy!
Trending Diys

Comments
Leave a Reply
More Related Diys


Trending DIY Projects
- DIY
- Recipes
- Deals
- Blog


Report a Problem
Please select the problem you are facing with this deal:
- Price Increased
- Price Decreased
- No longer available
- Expired
- Link doesn't work
- Suggestion
- Compliment
- Other
Add more details:
Thank you for your feedback. We really appreciate it.
Enter your email address if you would like
to receive a follow up.
Please Try Again
Thanks for providing the email address.
We will reach out to you as soon as possible.


Popular
Recommended
About Us

At Fabulessly Frugal, our goal is to help you live HEALTHY, WEALTHY, and WISE! My team and I work hard to bring you the best, online deals, clean eating, DIY's, freezer meal recipes, and more! I LOVE coaching and inspiring people to improve their health in my fitness challenge! You should also check out my favorite cleanse! Learn more about me and the rest of my team.

Copyright © 2008–2026
Fabulessly Frugal: A Coupon Blog Sharing Gift Ideas, Amazon Deals, Printable Coupons, DIY, How to Extreme Coupon, and Make Ahead Meals. All rights reserved
I am too a busy new mother of twins. I had a boy and a girl. My daughter is always wearing a flower head bang. They call her flower head. Lol. I want to thank you so much for sharing your amazing work. I look forward to many more. I want wait to do this awesome crafts and show it off 🙂 Have a bless day!!!
LOL. Sure, I wouldn’t put it on MY head either, but they are ADORABLE on my daughter’s head and she LOVED wearing them! The season your munchkin can wear things like this is pretty short, so why not? Especially when you can make them for pennies on the dollar!
I was unable to find any Halloween headbands to match my daughters outfit. I found this and am so happy I did. It was so cheap and extremely easy to make. I made the felt one with Tull pedals instead and it’s so cute my husband even loves it. I just folded up 4 layers per pedal. 🙂
Why would she have to go without when she has this awesome easy way to make something she loves?!
Do you have something against cuteness? Why go without when you can make something so easily and inexpensively?? A baby girl will only let you put them in for a few months and then she’ll start pulling them out, so take advantage of it while you can.
PS. If all you have are rude comments about someone else’s creativity or what they want to do with their kid’s hair, maybe you should keep your comments to yourself.
These are adorable. I am having a baby girl in March and am going to start making these ASAP. I only wish you had some more easy designs and or wintery ones, but that is just because your instructions are so easy and I don’t want to look anywhere else 😛
How do you get the edges that crumpled without turning them black? I love these but the edges of mine keep turning black and I can’t figure out what i’m doing wrong 🙁 When I just go over them lightly they don’t turn black but they don’t crumple either.
You have to keep the fabric further from the flame. I use tweezers so I don’t burn my fingers. You can also use a tea light instead of a lighter and just keep the fabric further away from the flame. The heat that the tea light generates is what curls the fabric, not the direct flame. Good luck!
I’m making these for a friend but I don’t know how long to cut the elastic. Could you give me a general idea of how long it should be? Thanks! These are very cute!
https://craftsnob.com/2010/12/head-circumference-chart/
Sorry this is so late, but you can visit this site for a some size chart that should help determin what size to cut the elastic. Hope this helps!
You could use velcro to make it adjustable.
Great idea Robin!
You are awesome and your family is beautiful!! Thanks for this you rock!!
I’ve recently just started my own little bow business and haven’t seen a simpler tutorial for these! Thanks for sharing 🙂
I was wondering if you use 1 inch or 2 inch lace fabric for the headband?
I use 1″ but you can use any size! The elastics may scrunch when on baby’s head, but it’s sill very cute!
I’m sorry, but obviously zorro4949 does not have a daughter and is stuck in the 90s! I mean… Who DOESN’T have these on their babies heads?!? Especially for portraits!… I dunno, but as for me I just finished the felt one and it turned out perfect! Thanks for the easy tutorial “)
I am a grand mother of 2 beautiful girls. One is 9 and baby sister is 2 months old, I can’t wait to start making their own headbands!! Thanks for the crafty ideas!!
everyone has god given talents….but when you share it with others..it makes you a good human being…thanks for sharing how to make headbands..you truly are blessed..
Thank you so much for this great tutorial. I have a granddaughter on the way and I can’t wait to begin making these for her. You’ve made my day!
Thanks for this post. All to often directions on the internet are too vague but this was very easily understandable! My 8th month old will be so happy when I make her some of these lovely headbands!
I’m so glad you found it helpful!!
This was very helpful, I always enjoy others sharing their great Ideas. Thanks again. My grand baby has hundreds and we always have room for another. Thank you,very helpful!!
Yay! I’m glad you liked it! They are so fun! Makes me wish my babies were small again!
thanks to technology im able to find and make these for my nieces (we stay in southern Africa). love them!! thank you so much xx
So glad!!! Enjoy!