DIY Post-It Note Holder and Washi Tape Pen
How to Make a Post-It Note Holder
There’s a dedicated day to teacher appreciation, but I truly think teachers should be appreciated all year round! They do a lot for our children and they put up with a lot too. I like to do a few small gifts for my kids’ teachers for the holidays, end of the school year, and teacher appreciation week. I taught for a few years and know how much time they put into their jobs.
When I was teaching I got some crazy gifts so I try to do practical gifts that they can use in the classroom. This DIY post-it note holder is something that I learned how to make years ago and I thought it was a perfect (inexpensive) gift idea to share with all the Fab Frugal readers. I made 3 in less than 15-minutes!
P.S. Check out some of our other Teacher Appreciation Gift Ideas

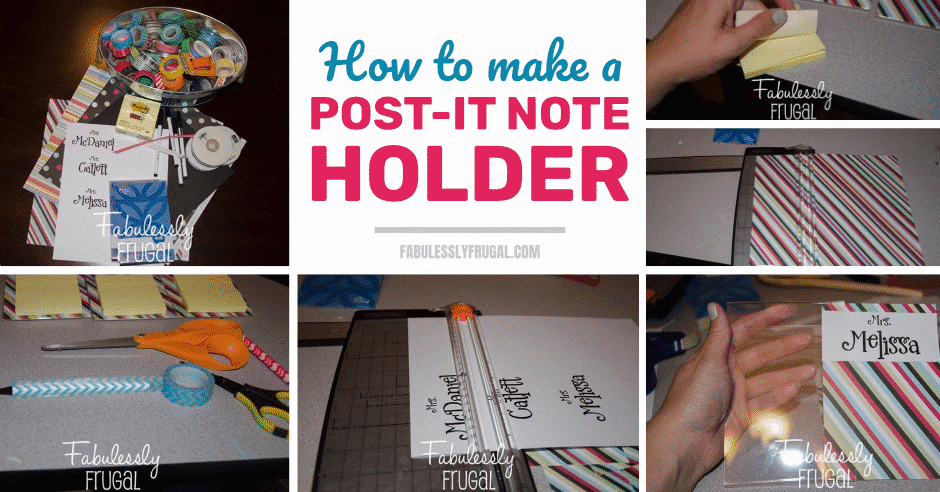
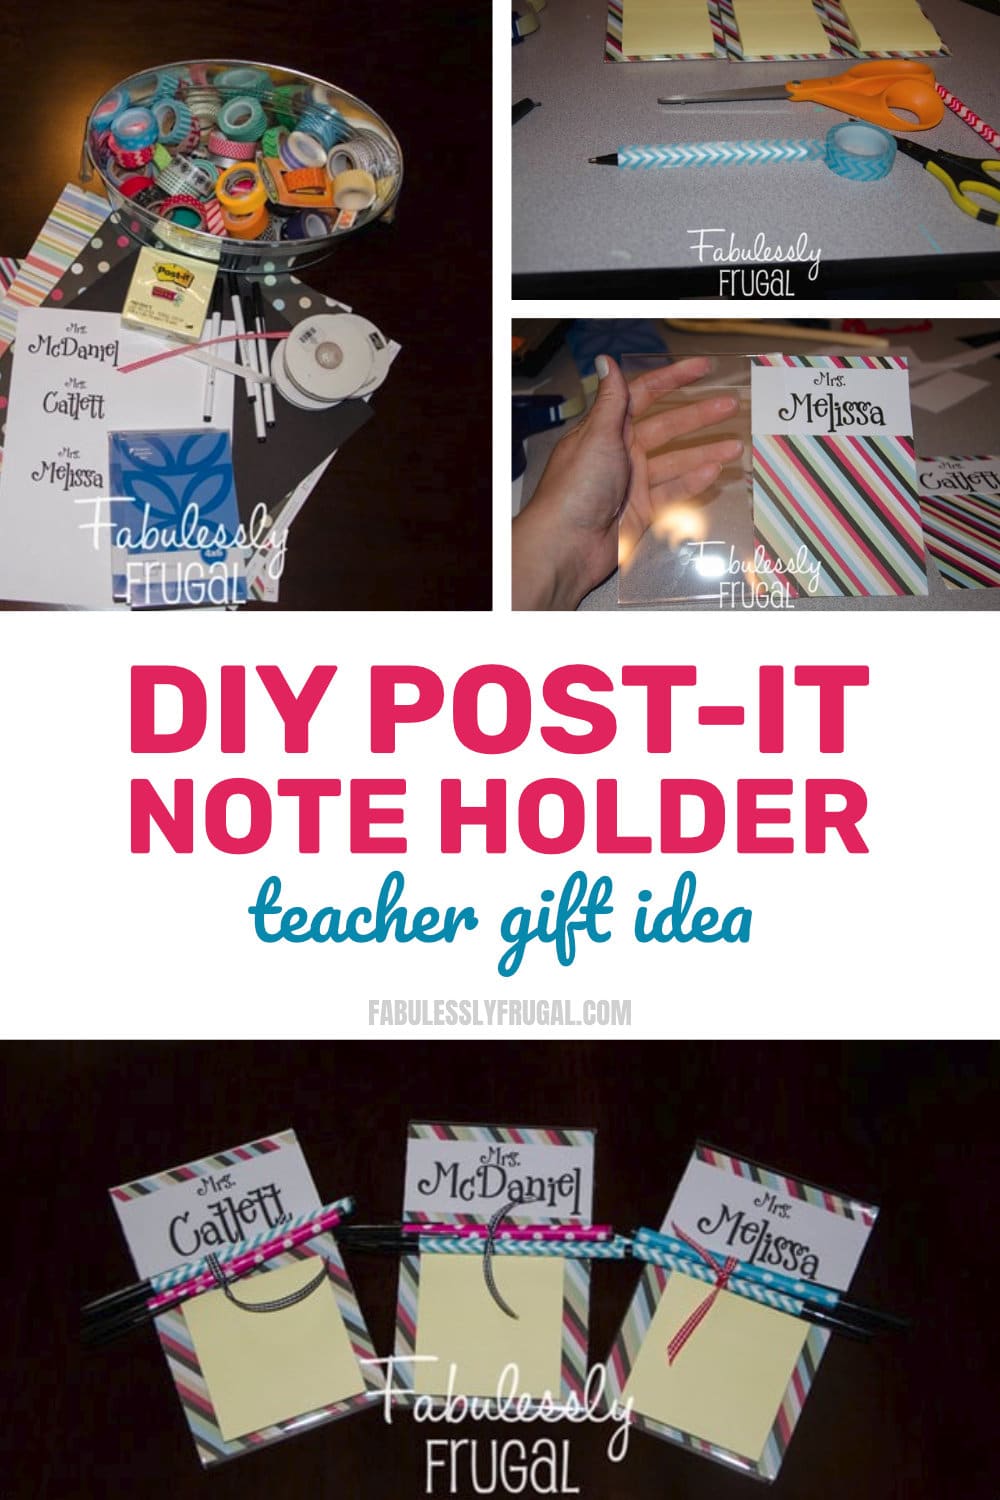
Supplies Needed for DIY Post-It Note Holder & Washi Tape Pens
Here’s what you need to make this cute and personalized post-it note holder and fun washi tape pens for your children’s teachers:
- Clear Acrylic 4×6 frames
- Post-It Notes
- Ink Pens
- Washi Tape
- Decorative Scrapbook paper
- Ribbon
- Paper trimmer
Step 1.
I used Microsoft Publisher to make the nameplates for the DIY post-it note holder. (I have been using publisher since I was in Jr. High and love it for quick projects like this. You can use Word, but I think it is a little more restrictive with designing. PicMonkey is FREE and very easy to run as well!)
I always spend the longest time going through my fonts trying to decide which one to use (I have over 2,000 on my computer, I think I have a problem!) I decided on 2Peas Mr. Giggles Font (you can download it for FREE here) Font size for Mrs. I made it a 30 pt and for the last name I did a 60 pt size. I printed them out on white cardstock. I trimmed them to about 2X4 inches.

Step 2.
Next, trim your scrapbook paper. I cut a 4-inch strip first

Step 3.
Then I cut it in half to make a 4×6 size. I decided to just use the same paper for each teacher to make it go faster!

Step 4.
Glue the nameplates on the top of the scrapbook paper.

Step 5.
And slide them into the frames. I grabbed my frames from Wal-Mart. The dollar store sometimes has them, or you can order them from Amazon.
You can do whatever you want on this part. I’ve used rubber stamps in the past and stamped a cute message. I love that you can personalize this to your hearts content.

Step 6.
Now you take the post-it pad and pull off the backing and just stick it on the frame. (Don’t go for the generic post-it pads, they really don’t work as well!!)

Step 7.
I love how they look and am so excited to have my kids take them to their teachers!

How to Make a Washi Tape Pen
Now I’m going to show you an easy way to dress up a cheap pen. I grabbed a box of pens from the store and decided to add some Washi tape to them. I love figuring out new ways to use some of my tapes from my washi tape collection because it gives me an excuse to buy more!
To spice my generic pens up a bit I just ran the tape down the side of the pen and cut it off at the top. The tape wasn’t wide enough to go around the whole pen so I ran another strip down the opposite side. I love how they turned out and I think I’m going to washi tape my whole pen collection!

I tied 2 pens together and now the gift is ready to go!

Tell Me What You Think!
I think my DIY post-it note holders turned out pretty well! For less than $2 dollars a frame I was able to make my kids’ teachers a unique personalized gift (that hopefully, they will love)!
What gifts do you like to give your children’s teachers?
Trending Diys


Comments
Leave a Reply
More Related Diys


Trending DIY Projects
- DIY
- Recipes
- Deals
- Blog


Report a Problem
Please select the problem you are facing with this deal:
- Price Increased
- Price Decreased
- No longer available
- Expired
- Link doesn't work
- Suggestion
- Compliment
- Other
Add more details:
Thank you for your feedback. We really appreciate it.
Enter your email address if you would like
to receive a follow up.
Please Try Again
Thanks for providing the email address.
We will reach out to you as soon as possible.


Popular
Recommended
About Us

At Fabulessly Frugal, our goal is to help you live HEALTHY, WEALTHY, and WISE! My team and I work hard to bring you the best, online deals, clean eating, DIY's, freezer meal recipes, and more! I LOVE coaching and inspiring people to improve their health in my fitness challenge! You should also check out my favorite cleanse! Learn more about me and the rest of my team.

Copyright © 2008–2026
Fabulessly Frugal: A Coupon Blog Sharing Gift Ideas, Amazon Deals, Printable Coupons, DIY, How to Extreme Coupon, and Make Ahead Meals. All rights reserved
LOVE this idea!!! I will be making this for sure!!! Thank you!!!
I’m so glad you liked it! Thanks!!
I just made these yesterday and they turned out so cute!! Can’t wait to give them! Thanks for the idea.
Did you use the slant back frames or the flat ones? Hard to tell from the pictures. Thanks
I used the slant backed frames
I’m doing this tonight for tomorrow 🙂 You are so clever Marji!
Thanks Melissa! I’m glad like it!!
Love these. Made them the other night for our teachers! Used a pen holder that you just stick on that I got at Walmart to secure the pens to the frame. ( called pen pal)
Jenn, what a great idea! I will have to look for those the next time I’m at Wal-Mart. Thanks!
I made these tonight for my kids’ teachers. They turned out so cute! I had to hot glue the post it note to the frame, and I used the name brand super sticky ones. I bought Scotch brand expressions tape on the pens because it was on clearance for 99c at Michael’s, as opposed to $4.99 for a small roll of Washi tape. Thanks for the great idea!
I always buy my washi tape on clearance too! When I see it on sale I always grab it. I love the scotch expressions tape. Way to bargain shop!
These are so cute! I’m making them for my staff as a back to school gift. I shared an example with other principals and they loved the idea too! Thank you for posting all the materials and directions so clearly.
Victoria
I’m so glad Victoria!!! We love them too! 😀