Automatic Can Rotating Shelving System {How To Picture Tutorial}
{Pin This}
My family is getting ready to move into a bigger place, but there is one issue… it has ZERO room for food storage. So, we’re having to get creative. A friend sent me something similar, and my husband and Father-in-Law (FIL) lovingly said they would build me one. I searched all over the web, and couldn’t find written plans, so we had to make them up. Combining several different plans, throwing out a LOT of ideas, and living with the “Build it once, RIGHT” mentality the men have, we ended up with this.
It’s probably overbuilt, (I’ll point out where they said they would have changed it) but this thing is SOLID and would support 4-5x the weight we plan on putting in it. With the plans, keep in mind we built it to hid behind our particular sofa, so you’ll have to adjust them to fit yours. Our sofa is 80″ long, and 33″ high. We could have easily added another shelf, but didn’t want the extra $15 for the one sheet of hardboard we would be using a quarter of. It would also be easy to make this fit 3 cans wide, instead of just two, you would simply need a wider “table top”.
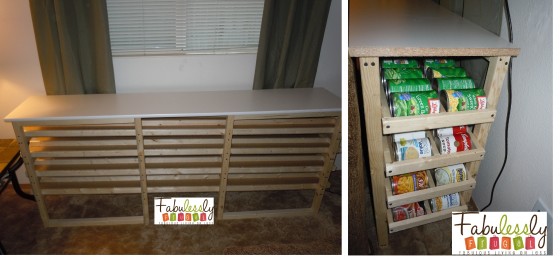
Each shelf is 80″ long (the exact length of our couch) and holds 52 cans per shelf (26 per row, one can every 3″). We have 4 shelves, so it holds 208 cans total.
Supplies
- (12) 1″x2″x8′ Furring Strips ($.92 each)
- (8) 2″x2″x8′ Furring Strips ($1.52 each)
(could have been made out of 1″x2″, but these fit better) - (1) 3/16″x4’x8′ Hardboard (aka Masonite) ($13.48 each)
- (1) 3/4″x15 1/4″x8″ Melamine Shelf ($16.73)
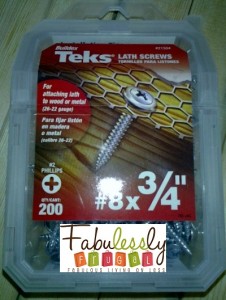
- (2) 200 ct. #8×3/4″ Sharp Point Lath Screws ($5.24)
(It’s important that these are the ones you use) - (1) 90 ct. #8×2″ Dry Wall Screws ($6.47)
Tools
My FIL builds stuff all the time, so we were blessed to have all of the tools we needed on hand, and didn’t have to buy anything.
- (2) Power Drills
#2 Phillips Bit loaded in one
5/64″ Drill bit in the other (pilot holes)
It’s not necessary to have 2 drills, but each screw has to be pre-drilled with a pilot hole, so it would have taken 3 times as long if we had to switch the bits every time. - Chop Saw
- Circular Saw
- Power Sander (in case your cuts are off) (optional)
- Rasp (or file, sander, etc) (optional)
- Clamps (we used 5-(3) bar clamps and (2) C Clamps)
- Pencil/Sharpie
- Square
- Measuring Tape
Construction
Because we used the 1″x2″ Furring strips as the center divider and edges, we had our Home Center Store cut the Hardboard Sheet into 11.5″x8′ strips. They will usually cut boards you are buying at no charge, but don’t guarantee exact cuts (usually they will come within 1/8″)
Cutting the Wood
- Measure and cut the Hardboard sheets to the length (80″) you need. We clamped them together and cut them all at once with the circular saw.
- Measure and cut the (12) 1″x2″ to the length (80″) you need.
- Measure and cut (4) 1″x2″ strips to the width of your shelf from the 16″ strips that are left over.
- Measure and cut 2 of the 2″x2″x8′ uprights (legs) to the total height, minus the thickness of the table top (32 1/4″). Make 8 total.
- Measure and cut (16) 2″x2″ the width of your shelf (11.5″).
- Measure and cut (8) 2″x2″x25 1/2″
- Measure and cut (3) 4 5/8″x2″x2″
- Measure and cut the melamine shelf to the length (80″) you need.
Assembling the Shelves
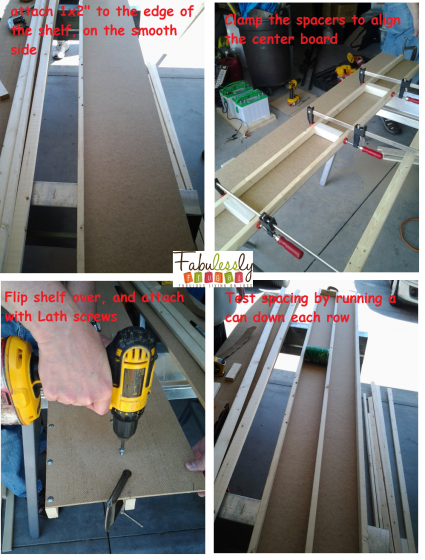
- On one Hardboard sheet, measure and mark the locations you are going to drill holes on both sides and the center of the shelf. We did them every 4″, but it could have easily been done every 6″ or 8″
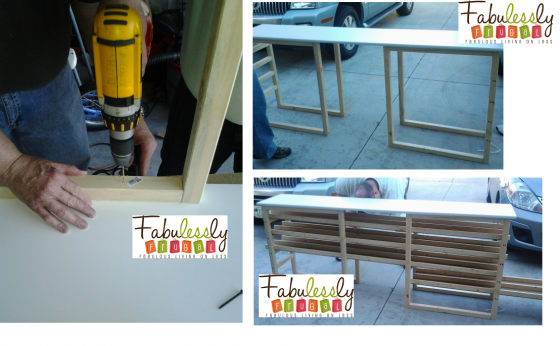
- Clamp all 4 sheets of Hardboard together, and pre-drill the pilot holes through all 4 sheets at once. This saves you from having to measure, mark and drill each shelf individually.
- Take 1 hardboard sheet, and clamp (1) 1″x”2×80″ strip flush to an outside edge. (We clamped in 5 spots, the ends, and about thirds).
- Using the pre-drilled holes, drill pilot holes into the 1″x2″. Once they are drilled, screw the board together using the Lath screws. It really helps to have 2 people (but it’s not necessary), one can drill the pilot holes, the other can follow a few holes behind, screwing the boards together.
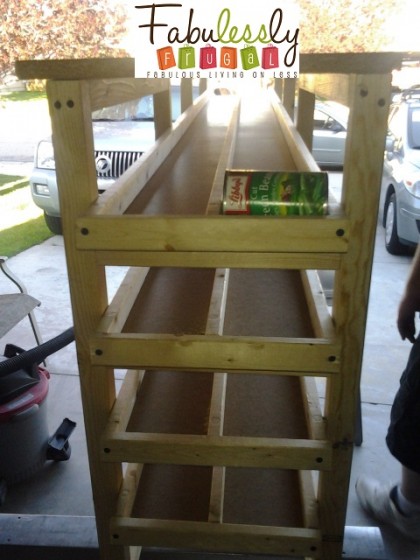
- Clamp the middle strip, centered on the pre-drilled holes. Using the 4 5/8″ spacers, clamp them between the 1″x2″ at aprox thirds. Drill and screw the center strip. Roll a can down to make sure there aren’t any tight spots.
- Clamp the last 1″x2″ to the last side of the shelf. Pre-drill pilot holes and screw together.
- Repeat process for remaining shelves.
Making the Upright Frames
- Take 2 of the 32 1/4″x2″x2″ and mark where you will drill the holes for the cross supports. Because we did 4 shelves, and we used a 5″ space between shelves (we could have done 4″) we marked them at 5″, 10″, 15″, 20″ from the top down. We marked both boards at the same time, using the square, to ensure they were exact. These will be the “Back” where you put the cans in. Make sure to mark ends to indicate which side is the top.
- Take 2 of the 32 1/4″x2″x2″and mark them with a 2″ drop (7″, 12″, 17″, 22″). Make sure to keep them separate from the “back” boards
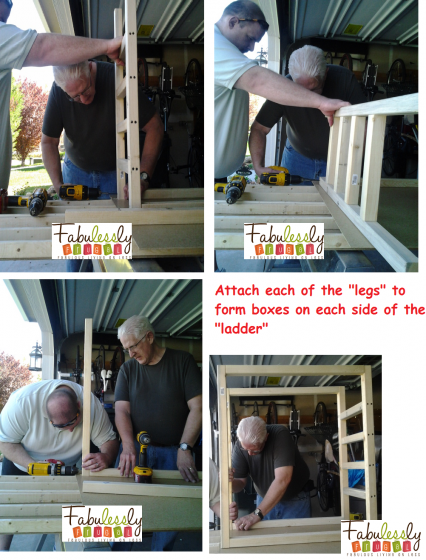
- Pre-drill pilot holes and use the Dry Wall screws to attach the 11 1/2″x2″x2″. We off-set the screws, so we could use 2 screws, but if you choose to use longer screws, one would be sufficient. Attach all 4 “rungs” and then flip, and attach the other upright. Repeat for the other end. You are essentially making 2 ladders.
- For added support, we attached the center legs to the end, essentially making 2 boxes, using the 25 1/2″x2″x2″ attached with 2 screws at the top and bottom of each leg.
- Pre-drill a pilot hole 6″ from each end of each “box” (8 holes total) all the way through the 2″x2″ to make attaching the table top easy.
Putting it All Together
- Put the Table Top upside down on your work surface. Flip the upright frames you just built upside down so the pre-drilled holes are against the table top.
- Make the back flush with the Upright frames, and inset 1 1/2″ from the end of the shelf.
- Screw the frames to the back of the table top, using the 2″ Dry wall screws.
- Use a 2″x2″x11 1/2″ support rung as a spacer to make sure the front leg of the upright frame is positioned properly. Attach with drywall screws.
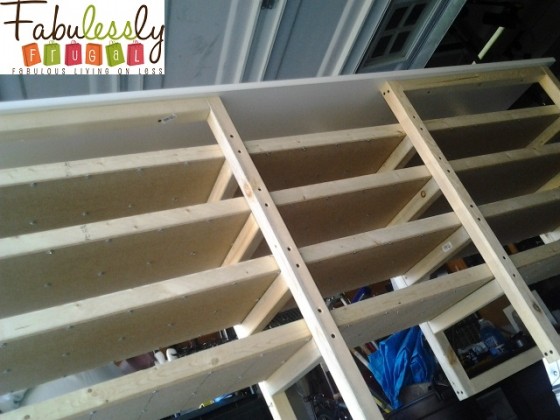
- Flip the whole unit right side up, and place all 4 shelves, resting on the rungs.
- Make sure the screws heads aren’t sitting on the rungs.
- Because the shelves bowed a bit, we chose to pre-drill and attach the 2″x2″ support to the outside furring strip with a drywall screw. Do both sides of one shelf, doing all the shelves on one end. Repeat process on the other end, so all the shelves are flat against the supports.
- Take your 8 remaining 11 1/2″x2″x2″ supports and attach them to the center set of uprights underneath each shelf. If needed attach the 2″x2″ to the furring strip to control bowing, just like you did on both ends.
- Attach the (4) 11 1/2″x1″x2″ strips to the front of the shelf (the lower side) using drywall screws into pre-drilled holes on the outside edges.
Extra Pictures
View from the Bottom
Looking at the Front
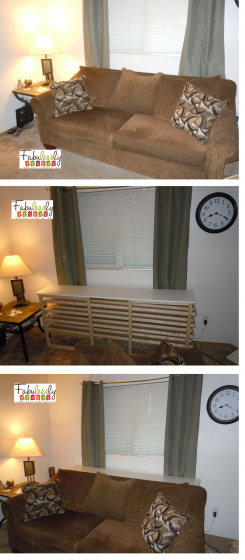
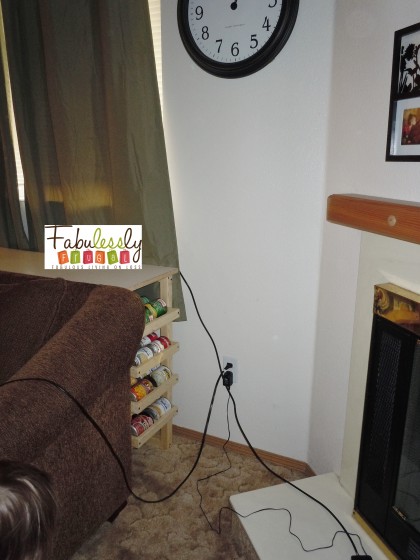
Installed in our Home
Accessing the cans (ignore our cords) 🙂
I lean over the corner of the couch to put the cans in, but getting them out is super easy!
{Pin This}
Trending Diys
Comments
Leave a Reply
Report a Problem
Please select the problem you are facing with this deal:
- Price Increased
- Price Decreased
- No longer available
- Expired
- Link doesn't work
- Suggestion
- Compliment
- Other
Add more details:
Thank you for your feedback. We really appreciate it.
Enter your email address if you would like
to receive a follow up.
Please Try Again
Thanks for providing the email address.
We will reach out to you as soon as possible.















Good idea to work off of, very creative. Wonder if there is a way to make it a little less bulking and not so wasteful on space.
One idea my dad had was using a book case… the long side could be the top, you can rip the other side to be the legs, the shelves could be the supports. It would cost a LOT less, you’d just have to be very careful drilling into the chip board of the book case (I found a couple on craigslist for $10 or $20).
Most bookcases are 12″ deep, and you only need 4″ per can “row”. So if you use a smaller “divider” it could easily work.
Another option is it use all 1×2 instead of 2×2… you just have to be more careful when putting it together (so the boards don’t split)… It really only needs to be 10″ wide…
And using metal strips on the sides and down the middle would make it skinnier too… It doesn’t have to be pretty, because you are putting it behind your couch 🙂
This is amazing! I love it! Fortunately, where we live now has a lot of cabinet space, so much so, if I didn’t have a stockpile… it would look like we had no food in our home, lol. But I will definitely keep this in mind, you never know where the army will send you
This is sooo awesome and it turned out very professional looking. I LOVE that it hides behind a couch and is long instead of wide. Great job and thank you for sharing!
Thanks! It’s really going to help a lot! Now I just have to find something cute to go on top of it!
Love your idea!!!!
As for decorating the top, how about some nice plant? Right in front of that widow they would be super happy! 🙂
Awesome! I love it! Tell your handy men great job!
Thanks! Will do!
This is awesome Becky, and I’m glad you found a good solution that works for you. But I’m a little confused about how you access the cans. It looks like the table is sandwiched between the sofa and the wall. Would you have to move the sofa every time you need to open a can?
How neat to have such a handy hubby and FIL. Is this what the key lime pie was for? 🙂
I’ll post a picture! Yep, this is what it was for. We almost never splurge on dessert, and Key Lime is one of his favorites. 🙂 He was a happy man!
There you go Susan! Hope that helps! You can see the Bee’s head as she heads in. 🙂
Thanks so much for sharing! I’ve got to find some great storage ideas. Sadly (for this project) our couch has recliners on the ends so it would make it very tricky. But maybe we can adapt it. Love the idea!
The shelf is great….the Tide offer however is not. Beware…you will start getting a massive amount of phone calls. ugh!
how many cans will it hold? and are the shelves slanted?
Each shelf is 80″ long (the exact length of our couch) and holds 52 cans per shelf (26 per row, one can every 3″). We have 4 shelves, so it holds 208 cans total.
Yes, the shelves are slanted down, so the cans roll out.