
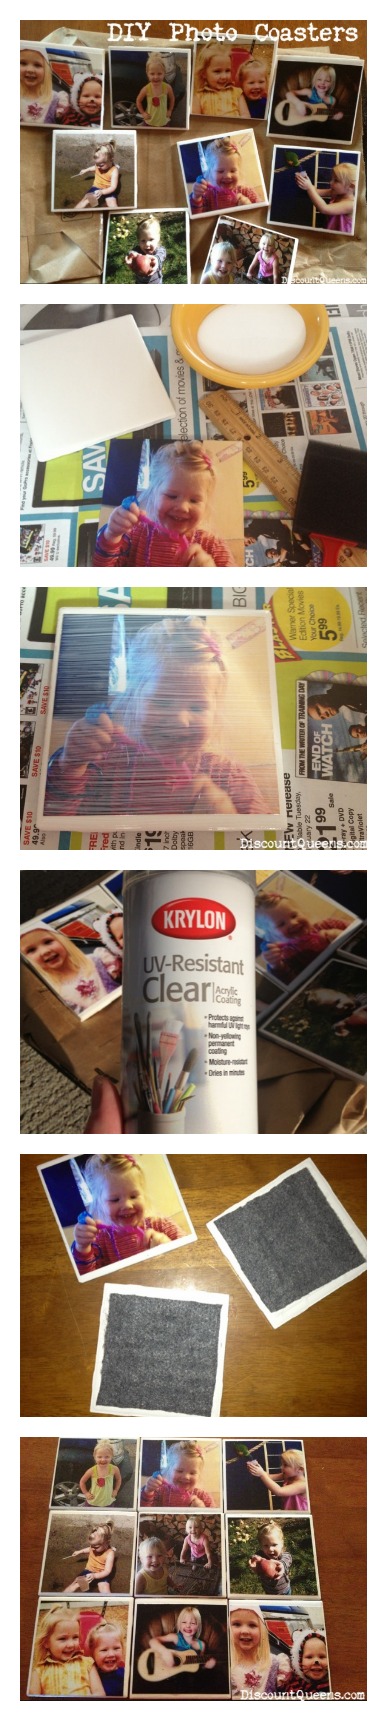
52 Weeks of Pinterest: Week 7 – DIY Photo Coasters
This year I wanted to go with a resolution I would have no problem sticking to! Then as I was pinning an item on Pinterest, a light bulb flashed on above my head. Ok, maybe not literally, but this great idea popped into my head. Those of us who are Pinterest users know that we pin hundreds of things a week, but do we ever do them? So I decided this year I would do one of my pins every week. At the moment, 52 weeks of Pinterest was born. Each week I will do something I found on Pinterest rather it be a craft, new recipe, organizing technique, or whatever!
This week, I went with a pin from our DIY Crafts Board - Photo Drink Coasters.
First off, let me just say this crafty little project is extremely budget friendly and I had a blast doing it.
Items you will need:
Ceramic Tiles (I picked these up at Lowe’s for $.16 each)
Mod Podge
Pictures
Felt or Fabric
Hot Glue Gun
Clear Coat Spray or Paint
Sponge Applicator or Paint brush
First thing I did was go through a pile of pictures and pulled out a few of my favorites to make a grandparents gift. Â Next, cut the photo down to fit the square. I cut the photos a little extra just so you could see some of the white tile around it to look like a frame.
Once you have all of your pictures cut, apply some Mod Podge to the back of the photos and lay them flat onto the tile. Apply a little pressures to get them secrured to the tile. Allow time to dry.
Once they have dried, apply Mod Podge to the top of photo and tile. Remember with Mod Podge, when it dries, you will still see some lines, but it will be clear. Let dry again. You will want to repeat this process until you have 3 layers of Mod Podge on top of your photo, letting it fully dry between each layer.
After you have completed the Mod Podge layers, now comes the most important part of the project. The clear coat which will be the sealant. You can use any brand here but I am a big fan of Krylon products. You can pick this up at Michaels, Walmart, and a ton of other places.
I wanted to make sure my creation was completely secure – I did 5 coats of clear coat, again letting dry each time. The amount is up to you , but remember wet cups will be sitting on these so better be safe than sorry.
Once dry, get that hot glue gun plugged in and grab your fabric or felt pieces. I just grabbed a few sheets of felt at Michaels. One sheet cost $.29 at Michaels or $.23 at Walmart. One sheet will give you enough for 6 tiles. I cut my squares out and glued them to the bottom of the tile. Doing this will protect the table or surface you will using these on.
That’s it. It was quick, easy, and an extremely budget friendly gift idea. The whole craft took me about 1 ½ hours to complete, including dry time in between.
Make sure to pin this to Pinterest to save for later! If you are not following us on Pinterest, make sure to do so now so you don’t miss out on some great pins!
Hope you enjoyed Week 7 of 52 Weeks of Pinterest, come back next Saturday for another attempted pin!If you don’t want to wait a week for a new pin idea, checkout our DIY posts, there are some great ideas there as well!
Trending Diys


Comments
Leave a Reply
More Related Diys


Trending DIY Projects
- DIY
- Recipes
- Deals
- Blog


Report a Problem
Please select the problem you are facing with this deal:
- Price Increased
- Price Decreased
- No longer available
- Expired
- Link doesn't work
- Suggestion
- Compliment
- Other
Add more details:
Thank you for your feedback. We really appreciate it.
Enter your email address if you would like to receive a follow up.
Please Try Again
Thanks for providing the email address.
We will reach out to you as soon as possible.


Popular
Recommended
About Us

At Fabulessly Frugal, our goal is to help you live HEALTHY, WEALTHY, and WISE! My team and I work hard to bring you the best, online deals, clean eating, DIY's, freezer meal recipes, and more! I LOVE coaching and inspiring people to improve their health in my fitness challenge! You should also check out my favorite cleanse! Learn more about me and the rest of my team.


Copyright © 2008–2026
Fabulessly Frugal: A Coupon Blog Sharing Gift Ideas, Amazon Deals, Printable Coupons, DIY, How to Extreme Coupon, and Make Ahead Meals. All rights reserved
what is in the yellow bowl?It looks like a bar of soap is why I’m asking
Brittany it is Mod Podge
Hello! I am curious about the tiles that you used. I went to Lowes and couldn’t find ceramic tiles without the glossy top, is that what you used? I ended up buying some slate tiles and will be making these coasters today! I can’t wait. Also, I know the photo will be protected from getting wet, but will the tile still absorb water after its been sealed? Just curious.
Thanks again!
Jess