Smashing Cotton Balls Fun Kids Activity
Smashing Cotton Balls Activity (Color, Bake & Smash!)

A Fun, Frugal, and Seriously Satisfying Kids Craft
If you need an easy activity that keeps little hands busy, smashing cotton balls is a winner. One cheap bag of cotton balls, a bit of flour and water, and food coloring are all you need to create colorful, crunchy “shells” that kids love to smash with cups, toy hammers, or even their hands. I grabbed a bag from the dollar store and didn’t even use half—yet it entertained my crew for around 30 minutes. After the smashing session, you can also glue the broken pieces together to build simple shapes, letters, or mosaics for extra learning-through-play.
Materials You’ll Need to Make Smashing Cotton Balls
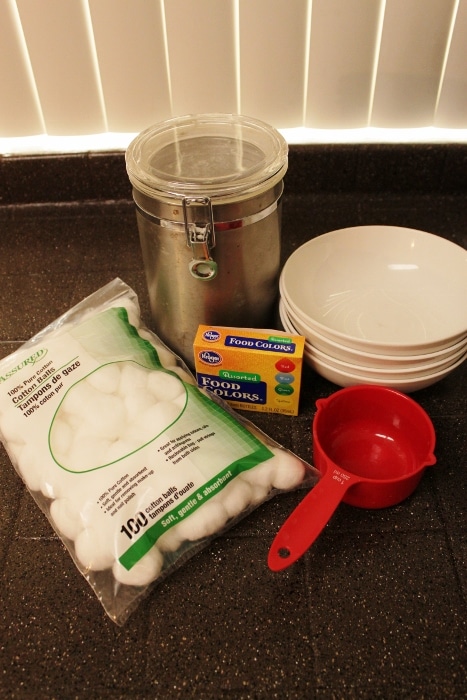
- Cotton balls
- 1 cup flour
- 1 cup water
- Food coloring
- Large bowl and spoon
- Foil-lined baking sheet
- Cups or (kid-safe) toy hammers for smashing
- Optional: white school glue and cardstock for building
Step-by-Step Directions
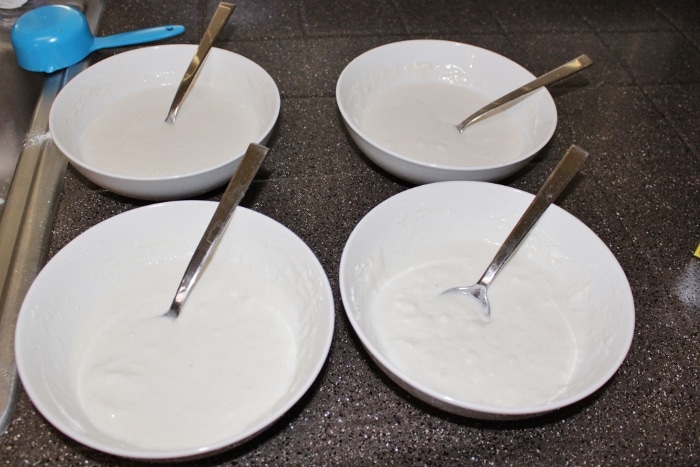
In a bowl, combine 1 cup flour and 1 cup water until smooth.
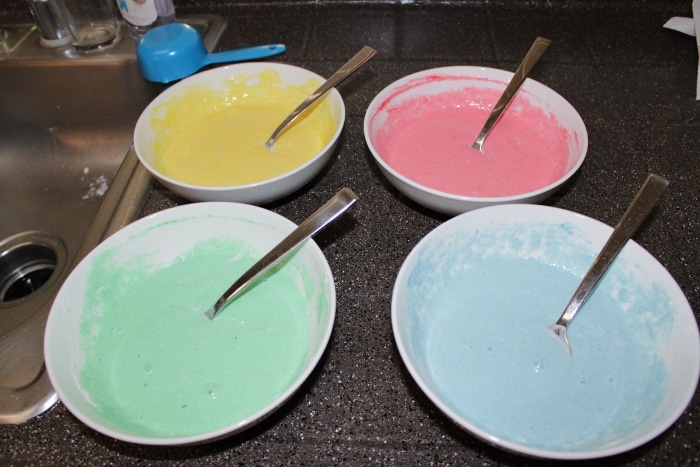
Add a few drops of food coloring and stir to evenly tint. Make multiple bowls for different colors if you’d like.
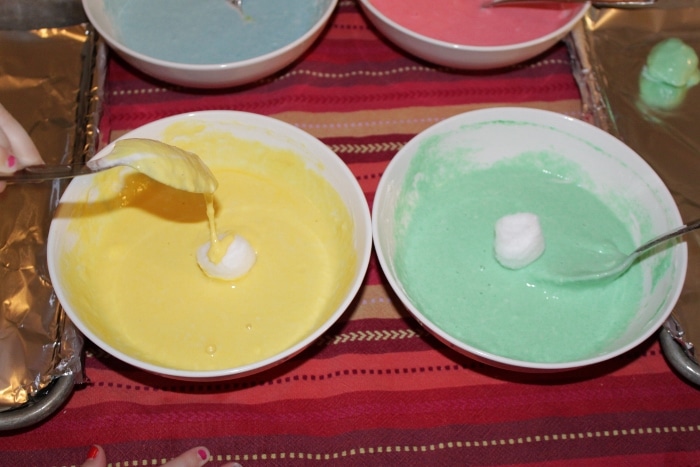
Dip cotton balls into the mixture to coat. Gently squeeze out excess so they aren’t drippy.
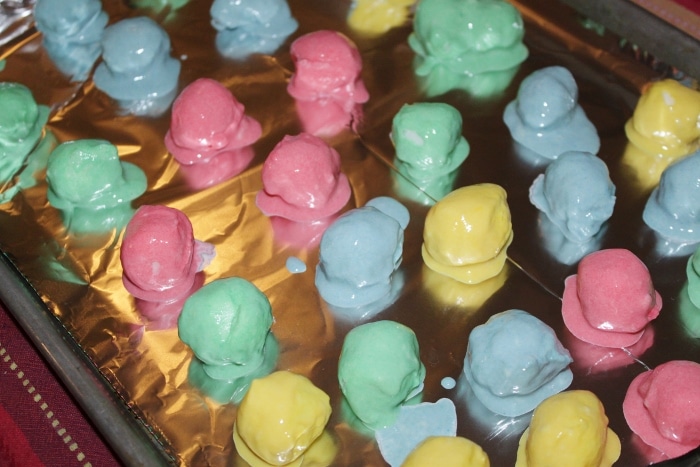
Place coated cotton balls on a foil-lined baking sheet. Bake at 300°F for about 45 minutes until the outer shell feels firm and dry. Let cool completely.
- It’s smashing time! Set the cooled cotton balls on a tray and let the kids smash using cups, hands, or toy hammers.
Safety Tips & Notes
- Supervise closely. If using any kind of hammer, choose kid-safe, lightweight options and demonstrate gentle taps. Cups work great for little hands.
- Protect your work surface. Smash on a tray or cutting board to contain crumbs and protect tables.
- Mind the edges: If the bottoms seem a bit sharp edged. Trim those edges with scissors. You can also place the cotton balls on a fresh sheet of foil halfway through baking to minimize sharp edges.
- Allergy/skin note. Food coloring can lightly stain skin; wash hands promptly or use gloves if preferred.
- Not for eating. These look colorful and candy-like, but they are not edible.
Fun Variations & Learning Ideas
- Rainbow challenge: Make one of each rainbow color and sort/smash by color for younger kids.
- Letter builders: After smashing, glue pieces into alphabet letters or numbers on cardstock—great for preschool practice.
- STEM talk: Compare soft cotton vs. the crunchy shell. Ask, “What changed in the oven?” (Evaporation + starch drying!)
- Texture art: Use the baked pieces as collage material to create simple landscapes or patterns.
- Glitter glow: Stir a pinch of glitter into the mixture for sparkly shells (optional, and best for bigger kids who won’t put hands near eyes).
Clean-Up & Storage Tips
- Tray first. Smash on a rimmed tray so crumbs don’t scatter.
- Quick sweep. A handheld vacuum or brush-and-pan makes clean-up fast.
- Reuse the tray. If you want to build after smashing, leave pieces on the tray and pass out glue and cardstock.
- Short-term storage. If saving un-smashed cotton balls, store in an airtight container; humidity can soften the shells.
Frequently Asked Questions
Do I have to bake at 300°F for 45 minutes?
That timing reliably dries the outer shell without scorching. Ovens vary—check at 35 minutes and continue until the surface feels dry and firm.
Can I air-dry instead of baking?
Air-drying works but takes many hours (or overnight) and may not create as crunchy of a shell. Baking gives the most satisfying smash.
What if the bottoms feel sharp?
Let them cool fully, then snip any sharp or flat edges with scissors. Lining with fresh foil halfway through baking can also help prevent hard edges from forming.
Is there a gluten-free option?
Yes—use a cup-for-cup gluten-free flour blend. The goal is a starchy coating that dries hard; consistency may vary slightly.
Final Thoughts
Smashing cotton balls is simple, budget-friendly, and endlessly entertaining. It’s perfect for rainy afternoons, playdates, or as a quick add-on to a craft day. I love that the fun doesn’t end after the smashing—you can extend the activity by sorting colors, counting pieces, or gluing them into creative art. With basic supervision and the trimming tip for any sharp bottoms, this is a craft you’ll pull out again and again.
Inspiration credit: 4 Herreras
Trending Diys


Comments
Leave a Reply
More Related Diys


Trending DIY Projects
- DIY
- Recipes
- Deals
- Blog


Report a Problem
Please select the problem you are facing with this deal:
- Price Increased
- Price Decreased
- No longer available
- Expired
- Link doesn't work
- Suggestion
- Compliment
- Other
Add more details:
Thank you for your feedback. We really appreciate it.
Enter your email address if you would like
to receive a follow up.
Please Try Again
Thanks for providing the email address.
We will reach out to you as soon as possible.


Popular
Recommended
About Us

At Fabulessly Frugal, our goal is to help you live HEALTHY, WEALTHY, and WISE! My team and I work hard to bring you the best, online deals, clean eating, DIY's, freezer meal recipes, and more! I LOVE coaching and inspiring people to improve their health in my fitness challenge! You should also check out my favorite cleanse! Learn more about me and the rest of my team.

Copyright © 2008–2025
Fabulessly Frugal: A Coupon Blog Sharing Gift Ideas, Amazon Deals, Printable Coupons, DIY, How to Extreme Coupon, and Make Ahead Meals. All rights reserved
Might just be me, but, I do t see the recipe, as in amounts of flour and water.
Can not wait to try this one!
Me neither