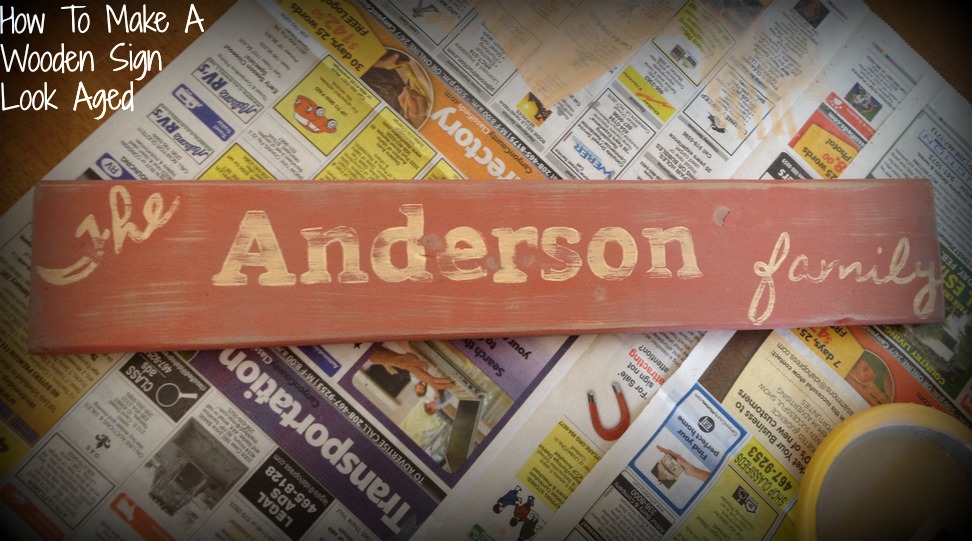
52 Weeks of Pinterest: Week 9 – Make A Wooden Sign Look Aged!
This year I wanted to go with a resolution I would have no problem sticking to! Then as I was pinning an item on Pinterest, a light bulb flashed on above my head. Ok, maybe not literally, but this great idea popped into my head. Those of us who are Pinterest users know that we pin hundreds of things a week, but do we ever do them? So I decided this year I would do one of my pins every week. At the moment, 52 weeks of Pinterest was born. Each week I will do something I found on Pinterest rather it be a craft, new recipe, organizing technique, or whatever!
This week I wanted to go with a pin from our DIY Crafts Board: How to Make A Wooden Sign Look Aged!
What you will need:
Piece of wood (I broke a piece of wood off a pallet for this and then cut it to the size I wanted.)
Acrylic Paint
Water
Old Wash Rag
Sponge Applicator
Paint Brush
Clear Coat Spray
First thing I did was sand down the dirty old pallet wood and made it smooth so I could paint on in it.
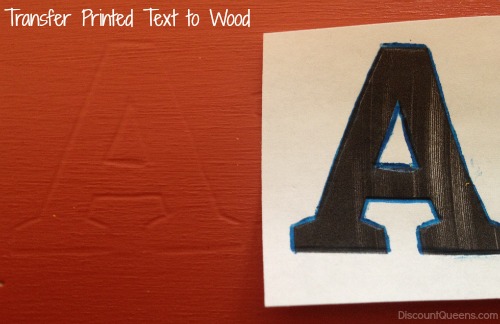
I then painted the piece of wood with a “rare sienna” color. I let this dry and then did my text on there. I have terrible handwriting so I decided to print my text from the computer and trace it on to the wood. To do this just print your text you want, lay it on the wood where you would like it, get a ball point pen and trace the letters. This will create an indent into the wood like a stencil. Not only does this give you the outline to paint in but the little indent also creates a mini dam keeping the paint where you want it and not allowing it to spread.
Here is an example of a traced letter from this sign:
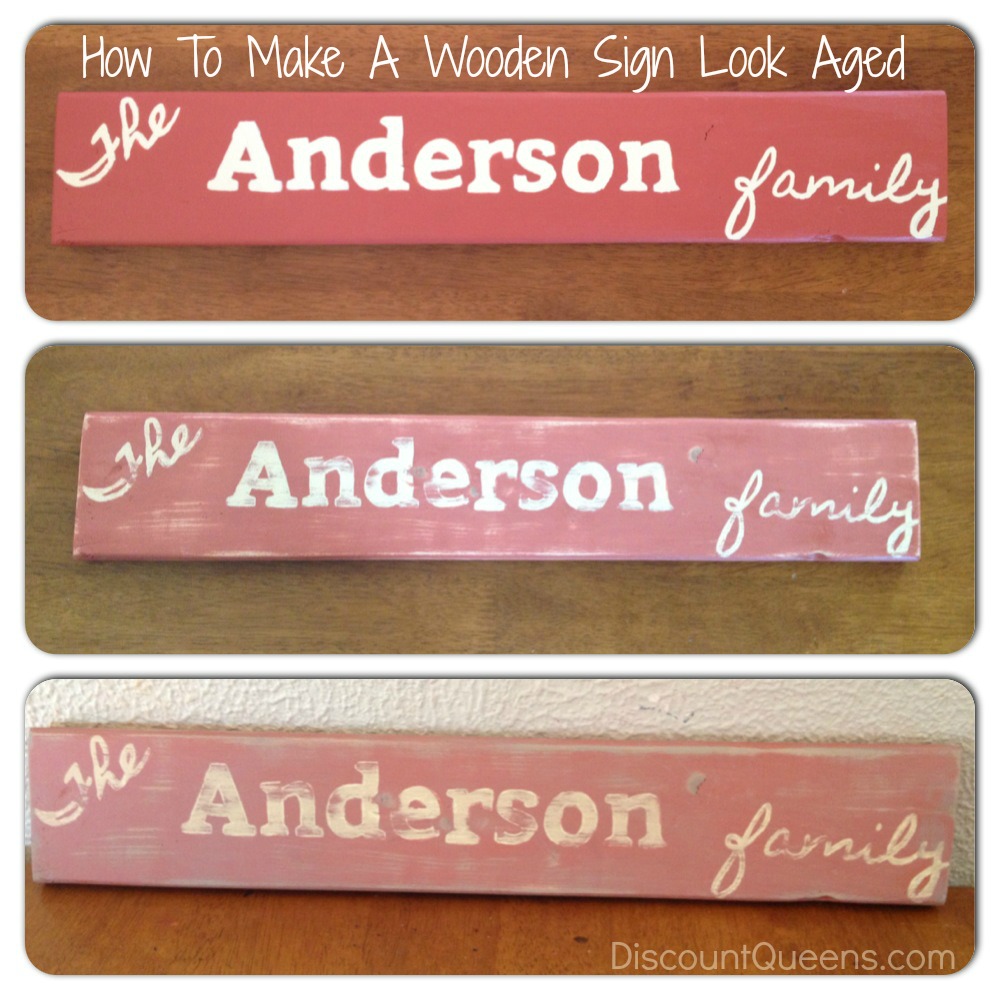
Once I got all of my words painted, it looked like a beautiful new sign. I wanted it to look like a beautiful aged sign! This is photo number 1 below.
After it is dry, grab some sand paper. Yes, I destroyed all that hard work I had just done. 🙂 Sand it down, trying to get the wood to show through in areas. I used 60 grit sandpaper which is fairly rough. Through the text area I used 120 grit sand paper so I didn’t destroy all of my text because I still wanted to be sure it was readable. Save “knotty” areas on the wood for last because they sand off the quickest. I sanded over my text as well. I wanted the whole sign to look aged. This is photo number 2 below. At this point it already has the aged look, but I wanted a little more.
To get that “really aged” look I was looking for, I made a stain. You can make a stain with whatever color you like. Just grab some acrylic paint of your choice, put some in a dish and water it down. Ratio wise I put about ½ as much water in as I did paint.
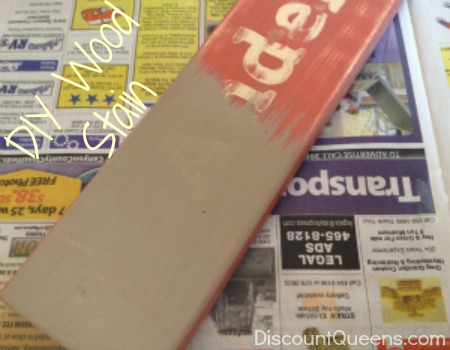
Mix colors up until you find what you like. You can practice your choices on spare wood or on the back of your sign like I did since it would be on the wall anyhow. I mixed some brown, white, black, and yellow. This gave me a funky dark clay color but I liked it! Take your sponge applicator and paint your wood. Right away, take your old wash cloth or whatever and wipe the stain back off. Painting it on and removing it quickly only allows it to sink into the grainy part of the wood (the part exposed by the sandpaper.) The remainder of the sign will only lightly be tinted by the color. This is photo number 3 below.
Once you are content with the way it looks, give it a coat or two of clear coat spray. You can even get a gloss one to give it that shine back. This just protects your hard work.
Though it seems like a lot of steps here, it really is a fairlyquick little project and fun way to give your wall some character. You could also make some for friends or family for gifts!
Make sure to pin this to Pinterest to save for later! If you are not following us on Pinterest, make sure to do so now so you don’t miss out on some great pins!
Hope you enjoyed Week 9 of 52 Weeks of Pinterest, come back next Saturday for another attempted pin!If you don’t want to wait a week for a new pin idea, checkout our DIY posts, there are some great ideas there as well!
Trending Diys


More Related Diys


Trending DIY Projects
- DIY
- Recipes
- Deals
- Blog


Report a Problem
Please select the problem you are facing with this deal:
- Price Increased
- Price Decreased
- No longer available
- Expired
- Link doesn't work
- Suggestion
- Compliment
- Other
Add more details:
Thank you for your feedback. We really appreciate it.
Enter your email address if you would like
to receive a follow up.
Please Try Again
Thanks for providing the email address.
We will reach out to you as soon as possible.


Popular
Recommended
About Us

At Fabulessly Frugal, our goal is to help you live HEALTHY, WEALTHY, and WISE! My team and I work hard to bring you the best, online deals, clean eating, DIY's, freezer meal recipes, and more! I LOVE coaching and inspiring people to improve their health in my fitness challenge! You should also check out my favorite cleanse! Learn more about me and the rest of my team.

Copyright © 2008–2026
Fabulessly Frugal: A Coupon Blog Sharing Gift Ideas, Amazon Deals, Printable Coupons, DIY, How to Extreme Coupon, and Make Ahead Meals. All rights reserved