
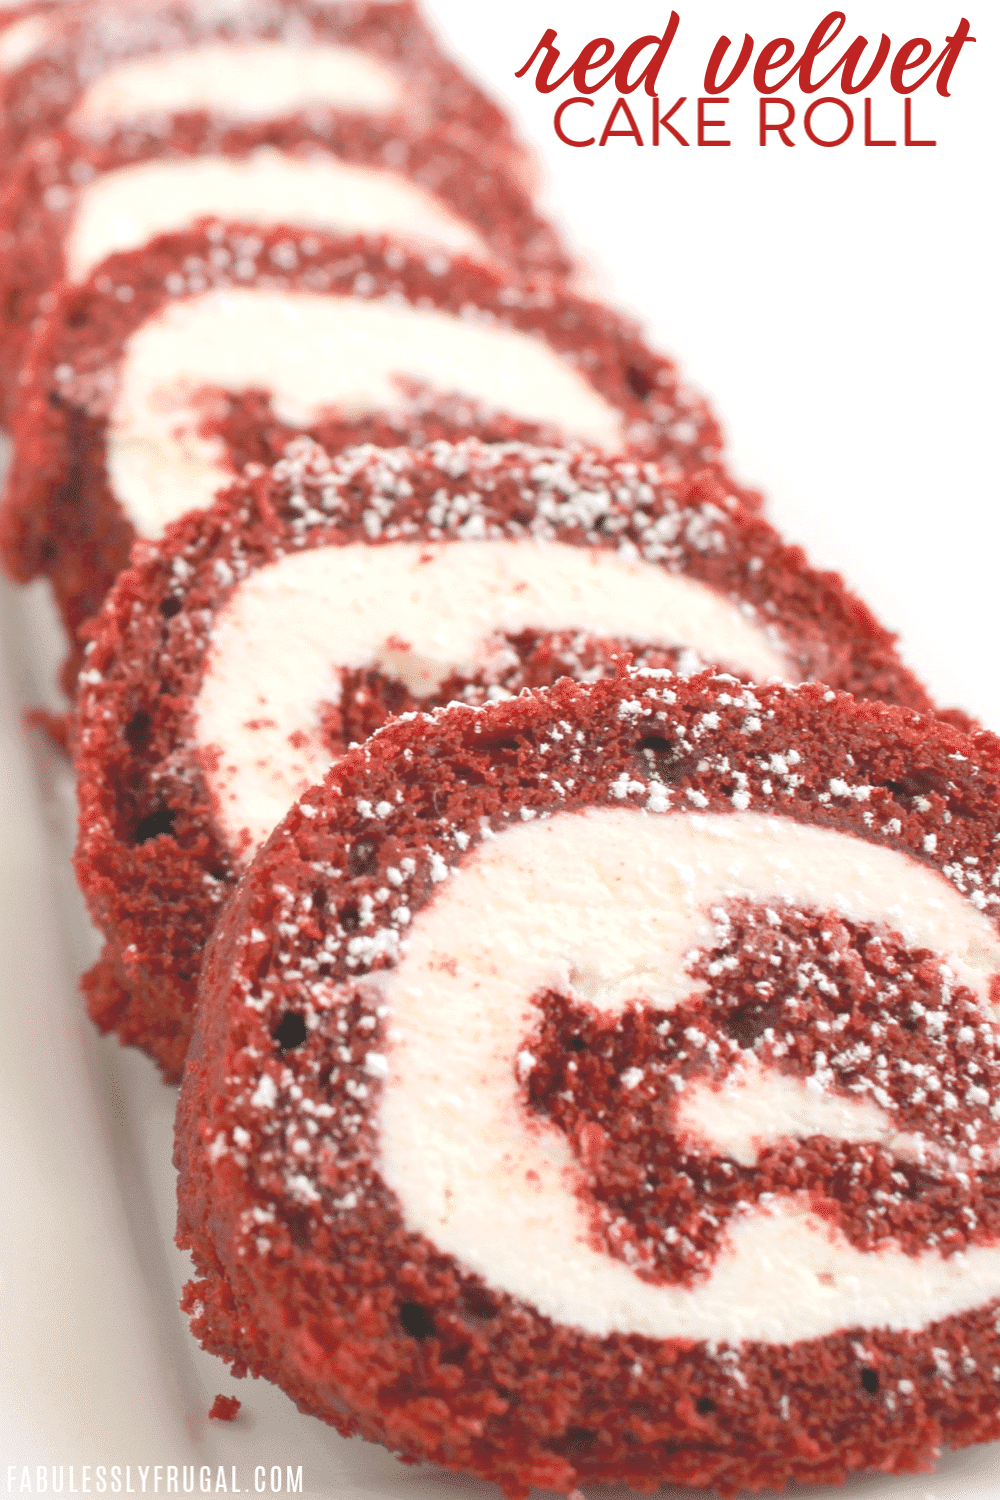
Luxurious Red Velvet Cake Roll Recipe
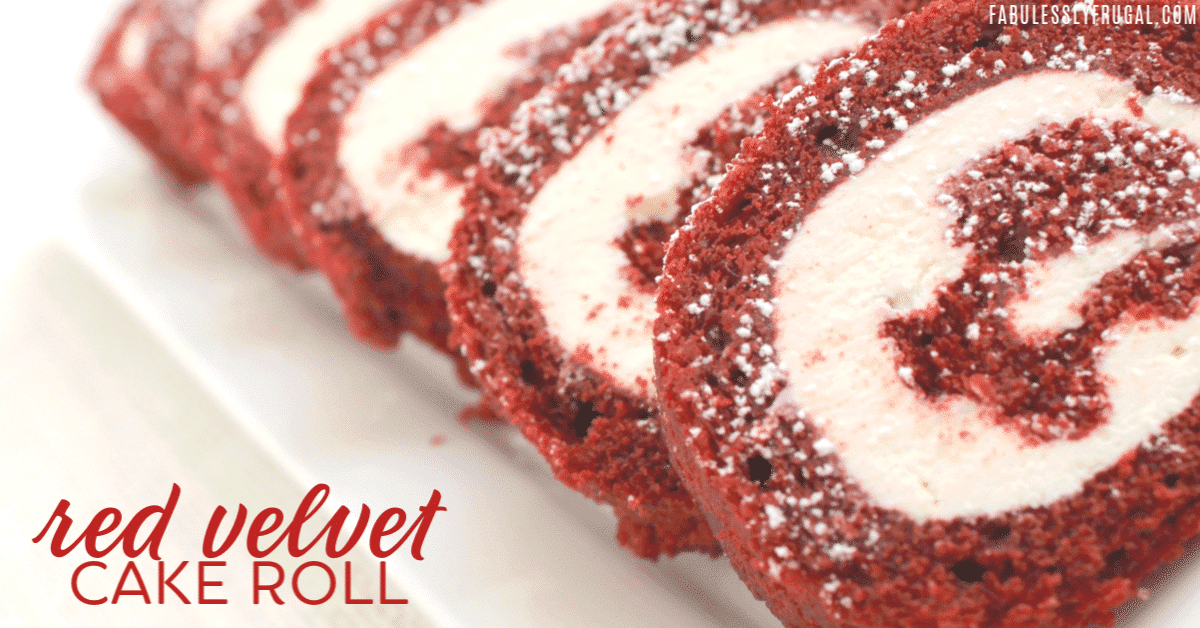
The Best Red Velvet Cake Roll Recipe
Anything red velvet makes a fantastic Valentine’s Day treat! You get the festive red color, plus velvety texture with a hint of cocoa. When it is done right, Red Velvet is a tasty, luxurious dessert. Check out our other Valentine’s Day Recipes too!
This particular red velvet cake roll recipe is especially luxurious and delicious because the filling is white chocolate AND cream cheese. Yes! By the way, this dessert is well-loved by all of my family and friends, even those that didn’t think they liked Red Velvet. 😉

Red Velvet Cake Roll Ingredients
This red velvet cake roll is more than just a cake with red food coloring. The special way of combining the ingredients and reactions of the ingredients all add to the unique texture. You can sub the red food coloring for green food coloring if you prefer “green velvet.”
Note: Some of the ingredients should be at room temperature, so plan ahead for that!
Choosing the Right Pan
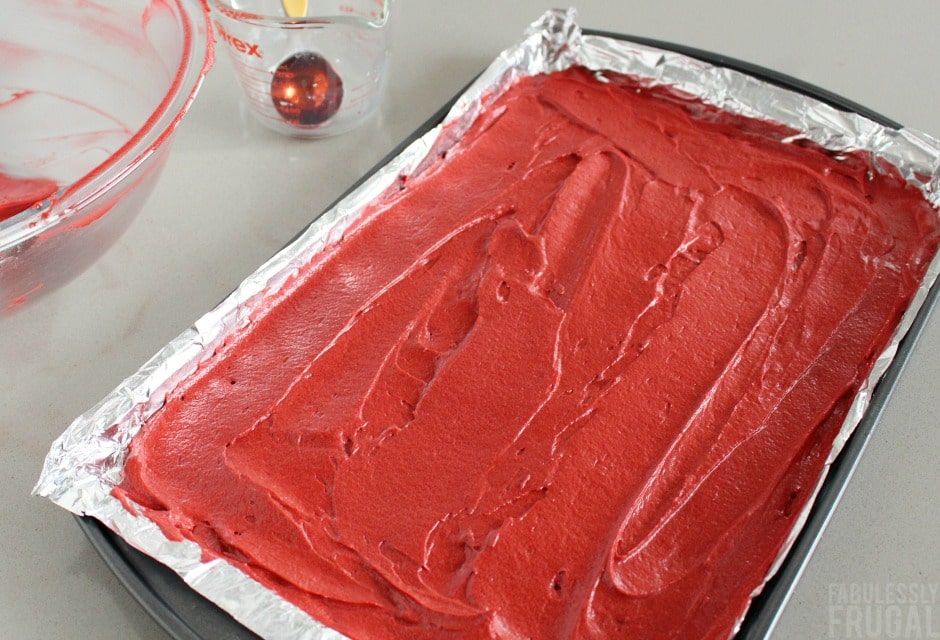
For this recipe, you will want to use a jelly roll pan that is about 15 to 15.5 inches by 10 to 10.5 inches in size. If you don’t have one, ask a neighbor or consider purchasing one for yourself since they are not too expensive, may come in handy for other recipes, and should last for years.
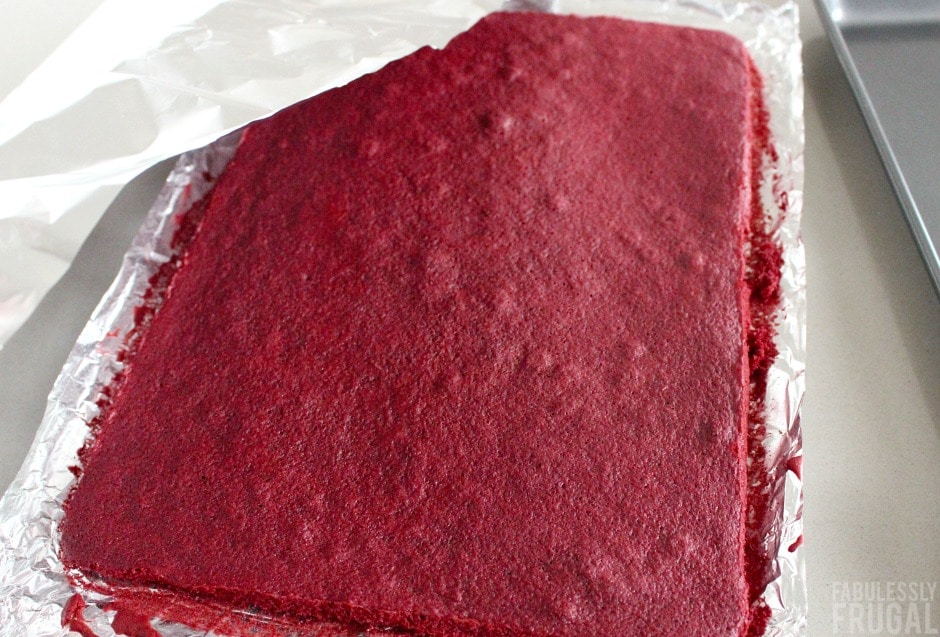
Baking Tip
Tenting the foil over the cake as it cools helps keep the cake moist, and because it is “tented” it won’t stick to the surface of the cake.
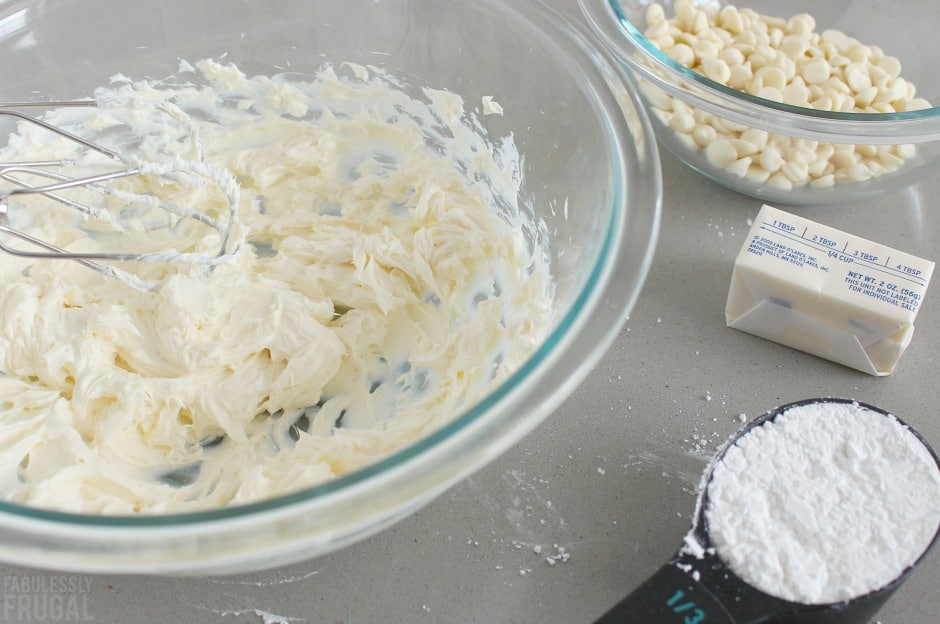
Red Velvet Cake Roll Filling
The filling is really the best part. A perfect blend of white chocolate and cream cheese! And it goes so perfectly with the red velvet cake!
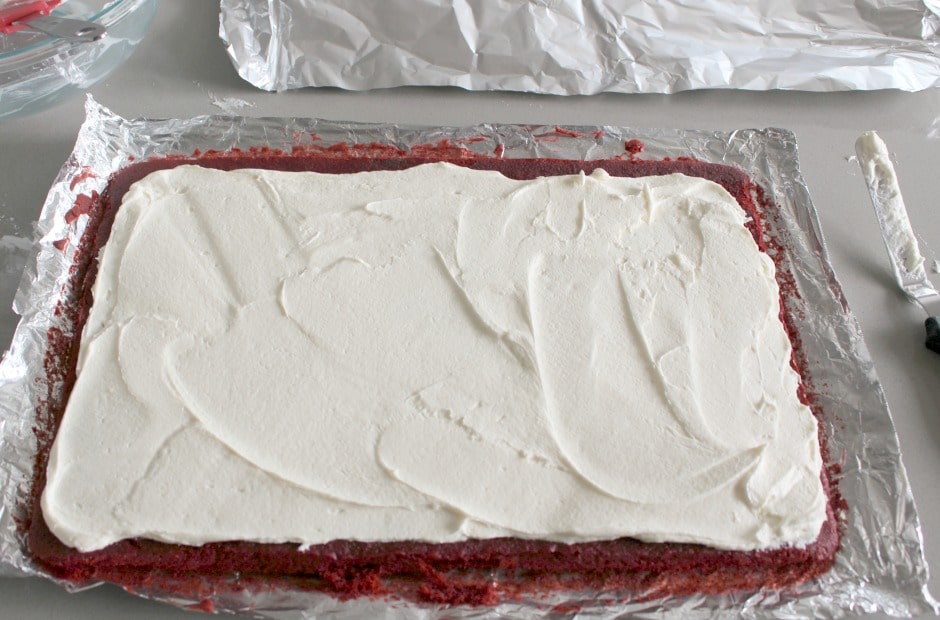
Spreading the Filling
Once the cake has cooled for a bit, it is time to spread on the creamy filling. Spread it nice and evenly over the surface of the cake, except for a 1/2 inch or so along the furthest long edge of the cake.
P.S. If you do a lot of baking and spread icing a lot, I highly recommend investing in an angled spatula! Makes spreading icing a breeze.
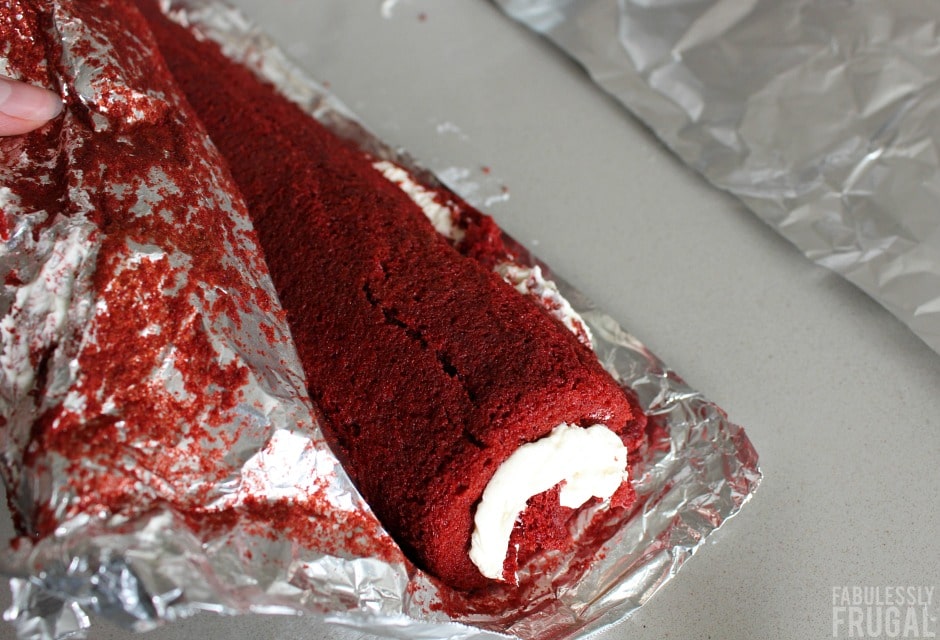
How to Avoid Cracking Your Red Velvet Cake Roll
I had some major cracking as I rolled my cake this time. I think part of that was because I didn’t roll the cake the same day that I baked it, so it dried out a bit by the time I got around to rolling. Still tastes awesome, but for the best results, you will want to assemble the cake roll soon after the cake has cooled.
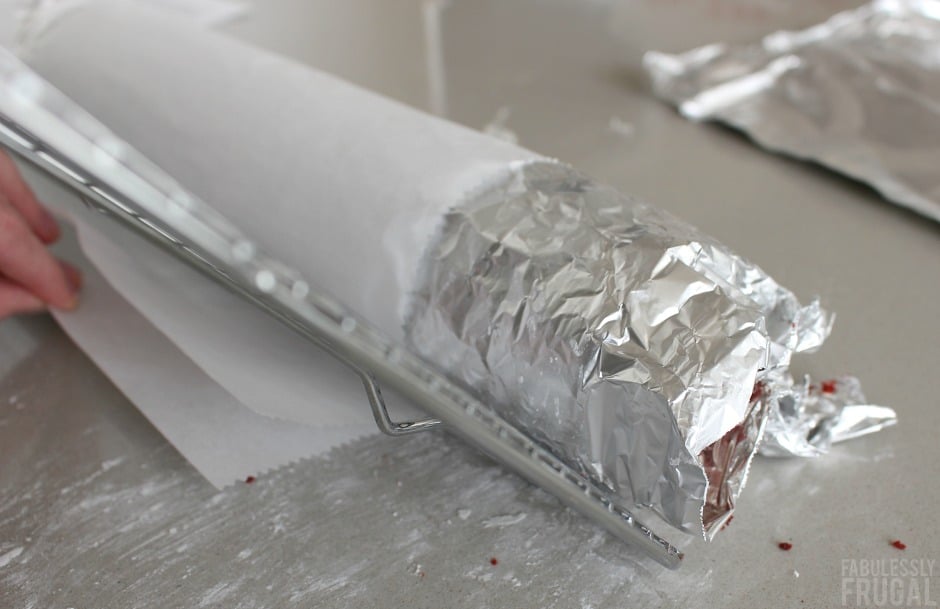
Compressing the Cake Roll
This method of compressing the red velvet cake roll is amazing. Say goodbye to cracked cake rolls and hello to a uniform, compact, and lovely roll of deliciousness.
Conclusion
The recipe may seem a bit lengthy, but don’t be alarmed. You basically see all of the steps in the photos above. The hands-on time is not bad at all and the cake only takes 10 minutes to bake. I hope you try it out and love it as much as I do!
More Cake Roll Recipes:
Would you like to see more of our favorite recipes? Subscribe to our weekly recipe email.


Luxurious Red Velvet Cake Roll Recipe
Equipment
- 15x10-inch jelly-roll pan
- Medium bowl
- Large bowl
- Electric mixer
Ingredients
Cake
- 1 cup all-purpose flour 4 1/2 ounces
- 2 tablespoons unsweetened natural cocoa powder
- ½ teaspoon baking soda
- ⅛ teaspoon salt
- ½ cup milk 4 fluid ounces
- 1 teaspoon pure vanilla extract
- 1 teaspoon apple cider or white vinegar
- 8 tablespoons butter room temperature
- ¾ cup granulated sugar 5 1/4 ounces
- 1 large egg
- 1 tablespoon liquid red food coloring 1/2 fluid ounce
- powdered sugar for dusting
Filling
- 8 ounces cream cheese room temperature
- 5 ounces white chocolate melted
- 4 tablespoons butter room temperature
- ⅓ cup powdered sugar, sifted 1 1/4 ounces
Instructions
- Preheat oven to 350°F/175°C. Coat a 15 x 10-inch jelly-roll pan with non-stick cooking spray (to keep the foil in place). Then line the pan with foil, leaving about a 2-inch overhang at each short end of the pan. Butter and flour the foil, tapping out the excess flour, or use Baker's Joy cooking spray.
- In a medium bowl, whisk together flour, cocoa, baking soda, and salt. Set aside. In a small bowl or liquid measuring cup, stir together milk, vanilla, and vinegar. Set aside.
- In a large bowl, beat the butter with an electric mixer on medium-low speed for about 1 minute. Increase mixer speed to medium and add the sugar in a steady stream. Beat until light and fluffy, about 2 minutes. Scrape down the sides of the bowl as needed.
- With mixer at medium speed, add the egg and mix until combined. At low speed, add 1/3 of the flour mixture, then 1/2 of the milk mixture, mixing after each addition. Add another 1/3 of the flour mixture, the last 1/2 of the milk, then the last 1/3 of the flour, mixing after each addition. Scrape down the sides of the bowl as needed. Add the food coloring at low speed until combined. Without delay, spoon the batter into the prepared pan, spreading evenly with a spatula.
- Bake until cake is set and springs back when lightly pressed in the center, about 10 minutes. Remove the cake from the pan by lifting the foil and transfer to a cooling rack. Quickly use a sheet of foil to make a shallow tent over the cake. Let cool for about 45 minutes.
- In a medium bowl, beat the cream cheese on medium-low speed until smooth. Mix in 1/2 of the melted chocolate and beat until smooth, then mix in the remaining chocolate until smooth. Add the butter, then the sugar, and beat until smooth and creamy.
- Remove the foil tent and transfer the cake to a work surface. Place the cake so one long side is parallel to the edge of the surface nearest you. Using an offset spatula, spread the filling evenly over the cake, leaving a 1/2-inch border along the long edge furthest from you. Begin rolling the cake by gently flipping the edge nearest you over onto itself. Then continue to roll the cake up with gentle pressure. Use the foil to touch the cake as you roll to keep the cake from sticking to your hands.
- Place the rolled up cake in its foil across the bottom 1/3 of a long sheet of parchment paper. Bring the top edge of the parchment paper toward you and over the cake roll. Place the edge of a rimless baking sheet, cooling rack, or other long edge at a 45-degree angle to the roll and your surface. Apply pressure to the roll, trapping the edges of the parchment paper. Push the long edge, while pulling the bottom end of the parchment paper toward you to compress the cake roll. This will help eliminate any cracks in the cake.
- Carefully lift the cake roll in its foil and set it, seam side down, on a fresh sheet of foil. Wrap the cake in this second piece of foil and place it on a baking sheet or shallow tray. Refrigerate for about 30 minutes.
- Remove cake from refrigerator, peel off and discard the foil. Carefully lift the cake onto a serving plate and dust with powdered sugar. Use a serrated knife and sawing motion to cut the cake roll into 1/2- or 1-inch-thick slices. Refrigerate leftovers and cover loosely with plastic wrap to keep cake from drying out.
Recipe Notes
Nutrition
Recipe Source: Mel's Kitchen Cafe
Trending Recipes


Comments & Reviews
Leave a Review/Reply
More Related Recipes


Trending Recipes
- Recipes
- DIY
- Deals
- Blog


Popular
Recommended
About Us

At Fabulessly Frugal, our goal is to help you live HEALTHY, WEALTHY, and WISE! My team and I work hard to bring you the best, online deals, clean eating, DIY's, freezer meal recipes, and more! I LOVE coaching and inspiring people to improve their health in my fitness challenge! You should also check out my favorite cleanse! Learn more about me and the rest of my team.


Copyright © 2008–2024
Fabulessly Frugal: A Coupon Blog Sharing Gift Ideas, Amazon Deals, Printable Coupons, DIY, How to Extreme Coupon, and Make Ahead Meals. All rights reserved
This looks delicious ! I’ve made many cake rolls before and have always turned them out from the oven onto a powdered sugar covered dish towel then rolled them while still warm. After it cools you unroll and fill then reroll and I usually don’t have issues with the cake cracking. I can’t wait to try your recipe!
Great tip, Susan! Thank you for sharing it with us! I hope you try and love this red velvet cake roll recipe. 🙂