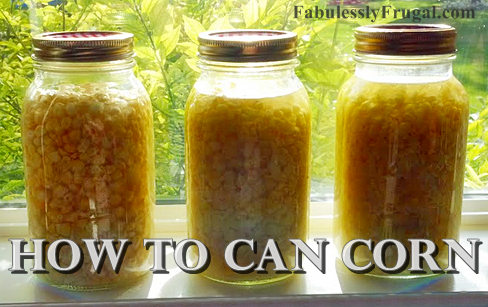
The Easy Way to Can Corn

Did you grow corn in your garden this spring and summer? Well, harvesting your crop at just the right time is important to maintaining flavor and crispness of the corn. According to the National Gardening Association, “Corn is ready to be picked as soon as the ears have completely filled out. This goes for sweet corn and roasting ears. You can tell when this happens by feeling the end of an ear. If it’s rounded or blunt rather than pointed, the ears are ready. The silks also dry up when the ears are almost ready to be picked.” So, if your corn is showing these signs, you can also pull back the husks just a bit to see the kernel for even better judgement.
After you have picked all of your ears, what to do with it all?! If you don’t have room in your freezer, but you want to be able to enjoy it all year, then canning your corn is an easy solution! This corn tastes MUCH better than the canned corn you’ve had from the store! Check this out and get ready for your own harvest!!
Supplies Needed
- Pressure cooker
- Canning Jars
- Canning lids and rings
- Jar lifter
- Canning funnel
- large pot
of boiling water
- Sharp knife or Kernal Stripper
- large cookie sheet
- Tongs
- Towels and dishclothes
Directions
Step 1- Start with Fresh Corn on the Cob.

The ideal ear of corn is ripe but not bloated. The kernels are still tender which means you can easily punctured them with your fingernail and the juice is milky not clear. White, yellow or bicolor varieties of corn are all fine!
Step 2 – Remove the husk and silk from the corn.

Using a soft vegetable brush very gently, helps to easily remove the silks from the corn.
Step 3 – Cut the Kernals From the Corn.

Simply cut kernels from cob about 2/3 to 3/4 the depth of the kernels. I hold the ear by the small end, and slide the knife down the ear. I do this over a cookie sheet or shallow pan. You could also use a corn stripper to remove the kernals (my Mom has a corn stripper and it does make life easier). You can also use a bunt cake pan with the ear of corn balancing on the center and the corn falling into the pan. I’m not a big fan of the bunt cake pan method, for me it is a little clumsy, but many people like it.
I use the raw pack method of canning corn- Raw pack means it is placed into the jars without heating, and then the jars are processed in the canner. You could blanch it first and then cut it and put it in the jars (Hot Pack Method) but I figure it is getting so hot in the canner that it will kill everything so why not skip a step!
Step 4 – Fill the Jars with Corn.

Fill jars with corn leaving 1 inch headspace (corn expands as you cook it).
Step 5- Fill the Jars with Boiling Water.

Add enough boiling water to cover the corn. Jiggle the jar to release any trapped air bubbles. Be sure to still leave 1 inch headspace. Add salt to the jars ½ tsp. per pint, 1 tsp. per quart. Salt is for seasoning purposes only so it is optional.
Step 6 – Put the Lids and Rings on the Jars.
Wipe the rims of the jars and make sure they are clean and not cracked. Place the sealing lid and ring on securely.
Step 7 – Process the jars

Pints – process for 55 minutes
Quarts – process for 1 hour 25 minutes
This chart shows how many lbs of pressure you need to can at according to your elevation. (this the the number on the gauge that your pressure cooker needs to reach when you start timing).

Canning low-acid foods like many vegetables such as corn — requires pressure canning to kill microorganisms that are harmful if not destroyed before ingesting the food. Pressure canning at 240 degrees kills the botulism bacteria. If this temperature isn’t achieved and the bacteria isn’t destroyed, one taste of this spoiled food can kill you. Simply boiling food on the stovetop will not kill any botulism and should not be considered a safety step.
Follow the pressure canning operation instructions that come with your canner.
Step 8- Finish

When the processing time is up turn off the heat. Wait for the pressure gauge to return to zero before opening the canner. Use a bottle lifter to lift the bottles out of the canner and place in a draft free location where the bottles will not be bumped. When the bottles are cooled check the seals. If the lids pop when touched then they are not sealed. On the sealed bottles write what the contents are and the date bottled. Wash them off if necessary and place them on the shelf where you will be storing them! ENJOY!
Thanks National Gardening Association!
The Easy Way to Can Corn
Ingredients
- 32 pounds Corn 32 pounds in husk of sweet corn is needed per canner load of 7 quarts; an average of 20 pounds is needed per canner load of 9 pints.
- Canning salt non iodized salt- 1/2 tsp per pint, 1 tsp per quart
Instructions
- Start with Fresh Corn on the Cob.
- Remove the husk and silk from the corn.
- Using a soft vegetable brush very gently, helps to easily remove the silks from the corn.
- Cut kernels from cob about 2/3 to 3/4 the depth of the kernels.
- Fill jars with corn leaving 1 inch headspace (corn expands as you cook it).
- Add enough boiling water to cover the corn.
- Jiggle the jar to release any trapped air bubbles.
- Be sure to still leave 1 inch headspace.
- Add salt to the jars ½ tsp. per pint, 1 tsp. per quart.
- Salt is for seasoning purposes only so it is optional.
- Wipe the rims of the jars and make sure they are clean and not cracked.
- Place the sealing lid and ring on securely.
- Process the jars
- Pints - process for 55 minutes
- Quarts - process for 1 hour 25 minutes
- Follow the pressure canning operation instructions that come with your canner.
- When the processing time is up turn off the heat.
- Wait for the pressure gauge to return to zero before opening the canner.
- Use a bottle lifter to lift the bottles out of the canner and place in a draft free location where the bottles will not be bumped.
- When the bottles are cooled check the seals.
- If the lids pop when touched then they are not sealed.
- On the sealed bottles write what the contents are and the date bottled.
- Wash them off if necessary and place them on the shelf where you will be storing them!
Nutrition
Recipe Source: National Gardening Association
Trending Recipes


Comments & Reviews
Leave a Review/Reply
More Related Recipes


Trending Recipes
- Recipes
- DIY
- Deals
- Blog


Popular
Recommended
About Us

At Fabulessly Frugal, our goal is to help you live HEALTHY, WEALTHY, and WISE! My team and I work hard to bring you the best, online deals, clean eating, DIY's, freezer meal recipes, and more! I LOVE coaching and inspiring people to improve their health in my fitness challenge! You should also check out my favorite cleanse! Learn more about me and the rest of my team.

Copyright © 2008–2024
Fabulessly Frugal: A Coupon Blog Sharing Gift Ideas, Amazon Deals, Printable Coupons, DIY, How to Extreme Coupon, and Make Ahead Meals. All rights reserved
Which pressure cooker do you use? 😉
I’m not sure what Kearna uses, but if I were going to buy one, I’d see what’s most popular on Amazon. You can see that right here.
I have found that Presto makes a really good inexpensive pressure cooker. its has the steam vent and also a pressure gauge.
I’m canning corn. Can I use pint 1/2 jars an can them same as quarts?
Yes.
Sure you can. You must use same timing as a pint. 55 minutes. Enjoy !
My pressure cooker doesn’t have an insert. Is it safe for the jars to rest directly on the bottom of the pan?
We would say, generally, no. Not worth the risk..
Well, ok… MAYBE… but you increase your chances at problems. If bottles touch they will break, that goes for the sides as well. Plus, the pressure and temperature on your food would fluctuate with the food being 1/2 submerged in the water, could lead to burning or overcooked food. The pressure is what you need to seal the bottles so if it is not done correctly you increase the risk of dangerous food bacteria…not to mention the time and potential food waste if you do it wrong.
I have tried to can corn in the past . The color of the corn changed during the pressure cooking time. What can I do?
Can you use water bath, to can this, instead of a pressure canner.I had 2 and gave them away. Now all I have is the water canner….
Donna I have only used a pressure canner so I honestly cannot tell you. But, please give it a try and let us know how it goes! We would love to hear!
Absolutely you CANNOT use the water bath canner for corn!
What is a water bath canner
I. Cooked my corn on top of stove and added butter salt and pepper to taste. Can I still putcorn in jars and canned. If so how long because. It is ready to eat or should I freeze.
Since you’ve already buttered and s&p it, I’d just eat it right away. I’m not sure the butter is going to can or freeze well.
Your corn, you can definitely freeze it. You might see the Frozen butter on the outside of the bag you put it in but it’s all good.
Thanks for the tip!
I love canning corn. But I haven’t seen the stripping method i use. I use a bundt cake pan. The pan catches the kernels and stabilizes the corn as I strip it.
Oh, that is a great tip!! Thanks Katherine!
once you do this how long will the corn be good for?
Hi Teressa, according to the National Center for Home Food Preservation, properly canned food will retain optimum eating quality for at least 2 year. I’ve also read that it won’t be spoiled after this point, it just might not taste quite as flavorful. You can learn more on their website: https://nchfp.uga.edu/questions/FAQ_canning.html#5
Hope that helps!
Do you cover the pack jars with water before putting the lid on the pot?
According to this article, yes. 🙂
That is for a water bath. You do not cover jars in a pressure canner.