
How to Build a Lean-to Greenhouse for Under $100
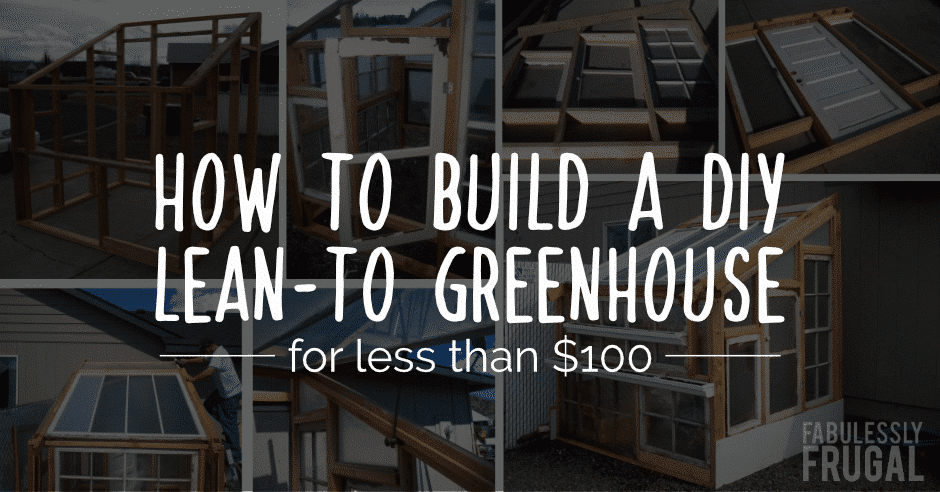
How to Build a Lean-to Greenhouse Under $100

This winter, I decided that I wanted to try to build a greenhouse for our garden. The growing season here in central Oregon is very short (we generally get our last freeze in mid-June) and I wanted somewhere other than my bedroom window to start plants from seed.
Since I am frugally minded and like to upcycle as much as I can, I decided that we (my husband and I) would attempt to build a greenhouse using as many on-hand materials as possible, for less than $100. One. Hundred. Bucks.
So I went on over to Pinterest and found this little build that spoke to me: I love how this builder used what he had on hand to make something he wanted…and that’s precisely what I specialize in. That’s weird to say…I rarely feel like I specialize in anything.
But, regardless, I identified with this guy because I had a lot of what he had: old windows, extra lumber, and creativity. So I want to share with you, step by step, how my husband and I successfully built our own greenhouse for less than $100, and encourage you to try to do the same. This is what we started with:

DIY Greenhouse Materials
- A bunch of old windows. Pre-kids, my husband and I were avid garage sale shoppers. Now, our window collection is pretty extensive, and we even had quite a few that come in perfect sets of two, excellent for making matching side walls. You may not have access to this kind of collection, but keep in mind that there are other ways you can make your walls (think greenhouse plastic and some 2x4s). We also had a considerably large window, 5 feet tall and 5 feet wide that made our rooftop.
- A bunch of spare lumber. We had about seven 8 foot 2×4′s from a prior project that we got started with. The 2×4′s, both on hand and then purchased, were used to make the majority of the framework. We also had a lot of hemlock wall trim from a house we used to live in, and used nearly all of that to frame out windows in the walls (more on that later).
- A box of 3″ exterior decking screws and a box of exterior framing nails. The Hubs likes screws with a Torx bit because they are great if you don’t want to predrill. The screws and nails together cost about $20.
So, now onto the build…and instructions for you.
Step 1: Determine the design.
I didn’t draw it out, but I knew that the plan was to build a “lean-to” greenhouse design. This worked best with the materials we had on hand, especially the large roof-top window.
Step 2: Build the walls.
We knew that the best way to build the greenhouse using our materials was to build the frame around the windows we had on hand. For each wall, we set the windows or doors on the ground and fitted 2×4′s around them until we had the shape that we wanted.
Here’s what the back wall and two identical side walls looked like:

We had to make sure that the height of the back wall matched the highest part of the side wall, as well as the front wall matched the lowest part of the sidewalls. This was tricky using old windows, but we kept the design fluid and flexible and were able to figure it out.
To keep it together, we used a combination of screws and nails (nails were cheaper, but screws were stronger). I will say this… It helps to have someone who has done some framing before. Had I been on my own, I would have been lost. My husband knows his way around a hammer and a box of nails, that’s for sure.
Step 3: Secure the 4 walls together.
We used our Torx screws to secure the walls together and came up with this basic framework. I love this lean-to shape because it allows me to stand up straight inside and have plenty of space for shelves.

Step 4: Insert the windows.
Our design incorporated some fixed windows and some hinged windows (to allow proper ventilation). I used our pin nailer and air compressor, as well as the old fashioned hammer and nails to do most of the work on this step.
Each opening needed to have a frame built into it to tack the antique window in place (kind of like a window sill or a door jamb). Yeah, like a jamb. That’s what I’ll call it.
So I measured each opening and cut 4 pieces of scrap hemlock to use as a jamb in each space. However, they did need to be ripped down to approximately ¾”x ¾” strips. So, once the length for each piece was cut, I ripped them down on the table saw.
I framed out each opening, using my hammer and nails. I set the jams far enough back in each opening to ensure that the window’s depth would fit onto the 2”x4” framing it. Basically, I made sure the window didn’t stick out but was encased.

Once the jamb was in place, I tacked each window to the jamb using my pin nailer and 2” nails.
We decided to have 2 side windows that open for venting, as well as the back door and the roof. And that meant that each of those windows or doors needed to be set on hinges instead of nailed into place. To do this, I created the same kind of jamb for the opening but set it back just enough for the front of the window (when hung) to be flush with the outside wall of the greenhouse.
The jamb allowed the door to open outward but not inward. This is good because we have built-in shelving inside the greenhouse and I don’t want that window to bang into shelving and potentially break the glass.
Once I placed the jamb, I pre-drilled holes for the reclaimed hinges I had on hand and then screwed the hinges into place.

Step 5: Fill in the gaps.
As you can see in the picture above, there are spaces in the wall where there are no windows. There are also a few window frames that were broken out that my husband replaced. He used to be a window glazer and we had some extra glass on hand, so we didn’t need to pay anyone money to replace anything. Score!
If you are using windows and don’t have the manpower to cut and replace glass, you can simply use greenhouse plastic and a staple gun and get the same effect. For our holes, we created jambs in the openings, cut some plastic, and then stapled it into place, making sure it was nice and tight in the process.
 And because the force of the staple gun would have torn through the plastic, we cut and measured the 2nd jamb for each opening and stapled the plastic in between the 2. Worked perfectly.
Using greenhouse plastic is a very cost-effective way of building your entire greenhouse quite honestly. The whole roll was only $8.00 and there is a TON of it in each package.
Step 6: Build the roof.
The roof was a little tricky. For ours, we wanted to use the large 5’x5’ antique window we had on hand, so my husband built a fixed frame around it and securely attached it to the structure.
Then, he added the window, using hinges, so we could open it for ventilation. The hinges used to keep the window popped up were salvaged from one of the windows in the greenhouse. They work perfectly!
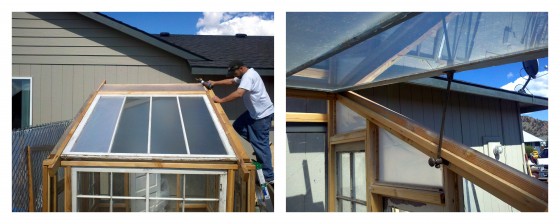
You can probably see in the picture above the fact that 3 of the panels had glass in them and the one on the far left has plastic. See, this right here proves the point that the greenhouse wasn’t all about looking good. It was more about functionality and using what we had on hand. We just couldn’t find another piece of glass large enough to finish the roof, so we used plastic. No big dealie-o.
So, with that, the greenhouse was actually built, fully enclosed and ready to go.
Step 7: Build some shelving.
During the greenhouse project, my gardening friend, Jobey, gave me 12 cedar crates that she wasn’t using anymore for her own greenhouse. I decided to use the cedar crates as shelving inside my greenhouse.
My husband installed 2 supports at about 36 inches high, one against the front wall, and one about 18″ from the wall for the boxes to rest on.

I was able to fit 5 across, nice and snug. I like this system because when it’s time to transplant, I can simply take the crate out with all of the plants, rather than find something to hold them all later.
If you are building, you might want solid shelves…go for it! And instead of building a floor-level shelf, I am happy if plants sit in the other crates right on the ground, since our gravel drains well.
On the outside, we installed some leftover gutters we had on hand to the exterior front wall of the ‘house:

Gutter gardening is a great way to garden if you don’t have a lot of space on the ground and are growing shallow rooted veggies. We are planting the cutest little round Parisian carrots in the gutters for our daughter. I can’t wait until they grow. And talk about a way to increase your space to grow!!! We’re goin’ vertical, baby!
Then, I batted my eyelashes, and my husband scavenged up some scrap lumber and built me an actual work table, which was really nice.

Yes, I’m spoiled, this I know. But I don’t get shiny jewelry or pretty perfume from my man…I get a workbench. And much preferred too!
That’s How to Build a Greenhouse for Cheap!
I hope to paint the ‘house one day, but maybe next year…
At the beginning of the process, I told you all that we were going to do this for under $100. And while I completely failed at keeping actual cost records, I can ballpark it for you.
- 2×4′s for framing $20
- screws and nails $20
- glass for windows $3
- greenhouse plastic $7.50
- thermometer $3
- hasp for 1 venting window $1.50
- misc hardware $5
- caulking & glazing materials $7
Grand total: approximately $67.00!

There’s still time to build your own greenhouse, you know…so get your creative thinking hat on, figure out what you have on hand and what you need to buy, and get to work!

My work here is done…

Comments
Leave a Reply
More Related Diys


Trending DIY Projects
- DIY
- Recipes
- Deals
- Blog


Report a Problem
Please select the problem you are facing with this deal:
- Price Increased
- Price Decreased
- No longer available
- Expired
- Link doesn't work
- Suggestion
- Compliment
- Other
Add more details:
Thank you for your feedback. We really appreciate it.
Enter your email address if you would like to receive a follow up.
Please Try Again
Thanks for providing the email address.
We will reach out to you as soon as possible.


Popular
Recommended
About Us

At Fabulessly Frugal, our goal is to help you live HEALTHY, WEALTHY, and WISE! My team and I work hard to bring you the best, online deals, clean eating, DIY's, freezer meal recipes, and more! I LOVE coaching and inspiring people to improve their health in my fitness challenge! You should also check out my favorite cleanse! Learn more about me and the rest of my team.


Copyright © 2008–2024
Fabulessly Frugal: A Coupon Blog Sharing Gift Ideas, Amazon Deals, Printable Coupons, DIY, How to Extreme Coupon, and Make Ahead Meals. All rights reserved
I have about 30 old wooden windows saved up for this same project. It’s great to the actual process that you went through too. I love the idea of using greenhouse plastic for the odd shapes because mine will also be a lean-to. Can’t wait to get started!
I love this plan. I haven’t had luck with veggie gardening in open bins in the yard. Partly due to squirrels/rabbits eating it & cats using it as a litter box. We are actually going to he replacing our 1950s windows this summer & I think a permanant greenhouse for next year would be amazing (currently using a portable pop up one)
Melanie, you will have to share some pictures! I love spending an hour in the ‘house every day, just breathing in dirt-air and “watching” my plants grow. It’s my time out. 🙂 Have lots of fun and good luck!
I love this! And since I’m so into making new things out of old stuff, I had to show this to my husband. He’s the gardener, and he was quite interested too. We’ve built a sort of temporary greenhouse from pvc pipe and plastic, but this is more permanent. Thank you for sharing!!
Dana, this is awesome! You should come make one for me…;) Seriously I have been trying to think of something to keep deer out of a garden, this just might be it.
i JUST LOVED THIS STORY OF THE $100 OR LESS GREENHOUSE. WHAT A VERY SMART WOMAN YOU ARE. JUST WISHED I LIVED CLOSE TO YOU. JUST A GREAT IDEA YOU HAD AND LOOKS PRETTY GOOD TOO. KEEP UP THE GREAT IDEAS AND SHARE THEM TOO. GOOD LUCK WITH YOUR GARDENING. CAROLYN COTNER
thanks carolyn! we had a lot of fun doing it and are now reaping the benefits of having it. I have cucumbers, peppers, tomatoes, herbs, beans, peas, and pumpkins all growing in the ‘house now, just waiting for mid-june to plant outside. Happy gardening!
Love love love it! What size is it? It’s exactly what I have in mind.
It’s apapproximately 6×6 at the floor and its highest point is about 8 feet. Glad you like it!
thank you so much, your blog is just what ive been searching for, i had the plan of a recycled lean to greenhouse in my head but needed to know how to put it all together. My plan is to add a 12 x 5 deck at the side of my existing deck and build my greenhouse on it, so i can walk straight out the house and walk a few steps into my greenhouse. I am an avid freecycler and was lucky to be given several full length shower doors. I will have to buy the wood which will cost a little but nothing compared to buying a brand new greenhouse. once again, very grateful for your blog. 🙂
You’re welcome!
AWESOME! I had the same idea after I replaced a bunch of wood windows and now they won’t go to waste. Cool!!! I like your “design.” Thank you! A similar structure is in progress now in NE PDX.
We have wanted a greenhouse for years! I never thought of finding old windows to use. Great idea 🙂
Go for it! Thanks for your comment, Dacia.
Thank you for such simple but complete instructions! I do have one question: it doesn’t appear that you dug a foundation for your greenhouse. Living in Oregon, has your g-house had any trouble with frost heaving? I’m in northern Idaho. Some folks tell me I need a foundation below the frostline, others say I don’t. Wondering what your experience has been.
We didn’t dig a foundation… but with as much snow as you get, it’s probably wise!
I just had 19 Windows replaced in my house and asked the window guys to pile up my old windows with this very idea in mind. Thanks for sharing, I am building mine in a few weeks.
Brilliant!
You are awesome! Wonderful story. You and your husband Rock! $100.00 and looks like that. Great Job! Guess if you want something bad enough you’ll make it happen. Some day I will have one too. Just hope it looks like yours. Pretty cool thanks for sharing your story it helps by seeing pics. & gets me motivated to know anything is possible. Thanks again
So glad you like it!
Nice story. I am always looking for ideas on making a small but stand alone greenhouse. My dad has saved up windows from when he bought some new high-end replacement windows from his farmhouse. I was thinking something like this… And I have also used gutters for gardening. I love them for growing strawberries and herbs…. except that is horizontal growing… not vertical! 😉 Horizontal is left to right and vertical is up and down. 😀
We live on the Oregon coast and have a similar weather problem- this is a great inspiration! Thanks😊
Yay! I’m so glad it’s helpful. When you do it, share the pictures with us!
Did you hinge windows or the roof for ventilation?
Love that this is made from mismatched windows. Function over appearance is a great way to go but this really looks ok, too!
🙂 Right on Cindy!
thanks. i want to build a cat enclosure- so i would use ur frame and add some fencing or wire and sheet metal or wire roof.
Love it. I am thinking about building one.
Love it…live just east of you on the Idaho border. Want to build this against our pumphouse shed which is heated. Thank you for the detailed building pics, will help us alot!
How much time (approx) did it take you to build this? Thank you!
Love it