DIY Frame Chalkboard
DIY Chalkboard Photo Tutorial
Who doesn’t love chalkboards? They are so fun and versatile, and are easier than you think to make yourself! The best part about making your own is that you can use any frame you have on hand to create a unique addition to your home.

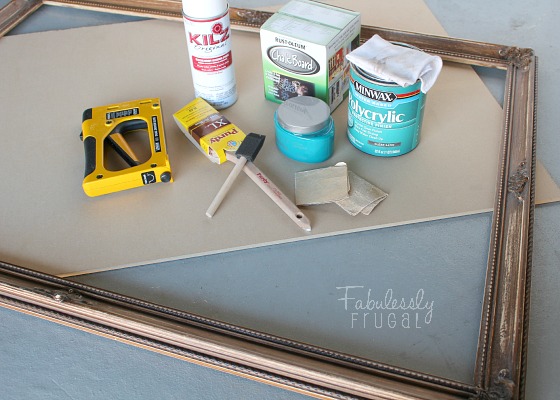
Supplies:
- Frame of any size
- Glass or ¼” MDF
- Primer
- Paint brushes
- Chalkboard Paint (not to be confused with “chalk paint”)
- Paint, in the color of your choice for the frame
- Chalk
- Clean rags
- Sandpaper
- Polycrylic or other clear topcoat
- Point driver, staple gun, small nails, or mending plates
Note: Another option is to use a pre-made chalkboard, which can be found at Home Depot and other similar stores. Depending on the size, it may be similar in price or a bit more. For the size I needed, the MDF was about $6 and the pre-made chalkboard was about $10.
I found this amazing frame for FREE and snatched it up. I knew right away I would turn it into a modern chalkboard. Such a simple and low cost project!
Prepare your frame by lightly sanding the frame with 150-220 grit sand paper. Clean the surface with a clean rag. I also blow air into the cracks to get any remaining dust out. Spray the entire front of the frame with spray primer. I use Kilz, which runs around $5.50 a can. This can should last through several small projects. You can certainly use a brush-on primer, I was just feeling a little lazy and wanted to make this step faster. Wait for the primer to dry.
Sometimes a very light sanding is required to brush off any specks that may be left behind with a spray primer. If you have a solid wood frame, especially one with little decorative detail, you may be able to just sand the shiny topcoat off and skip the primer.
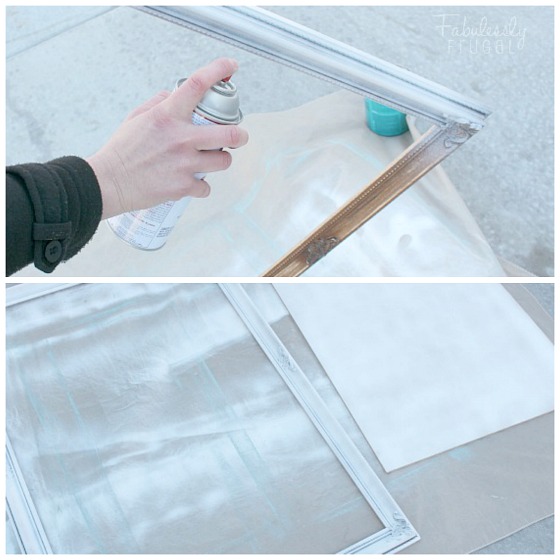
You also need to prepare your backer board, which will be your new chalkboard surface. If you frame has glass in it, this can be used as your backer board, and it is what you will paint with chalkboard paint. The frame I have was empty, so I made my own backer board. I like to purchase the ¼” thick MDF boards at Home Depot that are precut to 2’x4’, and they run around $5-6. Then I cut it down to 2’x3’ which was the size of my frame opening. First give the board a light sanding to remove any bumps, then wipe it down with a clean, slightly damp rag. Prime the board with the spray primer.
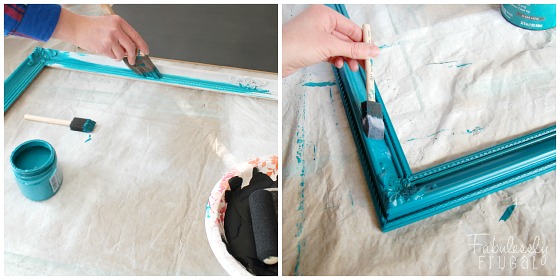
Now we paint! Wipe down the frame again with a slightly damp rag, to make sure the surface is clean. I used a Valspar sample I already had on hand, because you can’t beat free! If you really want to save time, go with a spray paint. Don’t be tempted to buy the $1 cans of spray paint though! Go with the good stuff. It’s worth the extra $2-3!
Follow the directions on the can. Let the first coat of paint dry, and add another coat. I’m always impatient and rarely wait the dry time suggested on the can. I usually recoat in an hour or so when it’s nice and dry to the touch. A minimum of two coats will be needed. Apply one light layer of polycrylic clear top coat (also available in brush on or spray form). My favorite is Minwax polycrylic satin finish. There are so many varieties of clear topcoats available, just about any of these products will do.
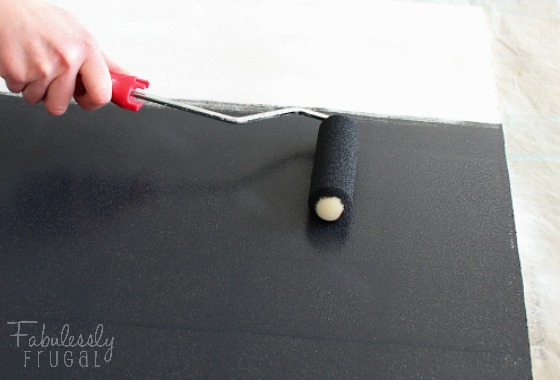
The next step for the backer board is to paint it. I use a foam roller and rolled on my Rust-oleum chalkboard paint. I chose to get a quart of it because I plan to use the extra paint on several other projects. It is usually about $10 at Home Depot and on Amazon. If you are just doing one small project, you can look in any craft store next to the acrylic paint and pick up a 2 oz. bottle of the paint for $1-2, or cheaper if you use a coupon!
Follow the directions on the paint you buy as they vary from product to product. For this brand, I needed to do 2 coats of chalkboard paint, letting it dry between coats. I also had to let this particular brand cure for three days before using the chalkboard.
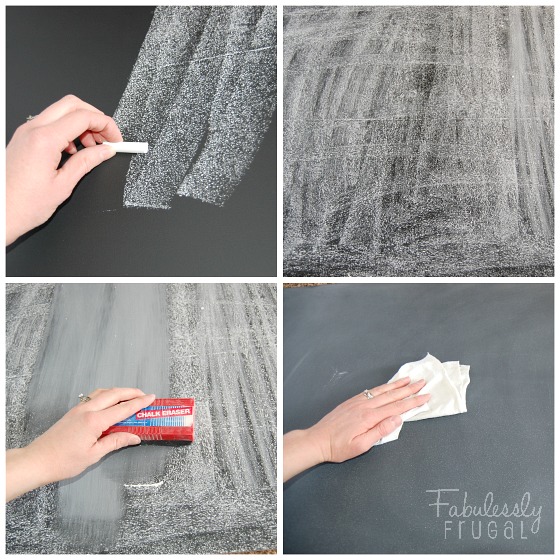
The next step, three days later, was to prime the new chalkboard. This is an important step, because it fills the holes in the porous chalkboard evenly. If you skip this step, your first chalkboard drawing will be permanently visible on the chalkboard.
To prime the surface, take a piece of chalk and lay it on its side, and completely color in the entire surface of the chalkboard in this way. You can then use a clean, soft rag or eraser and wipe away the excess. Once again, read the label. Some chalkboards have to cure for even longer before any water can be used to clean the surface. In this case, no water on the surface for seven days! The surface is now ready to use!
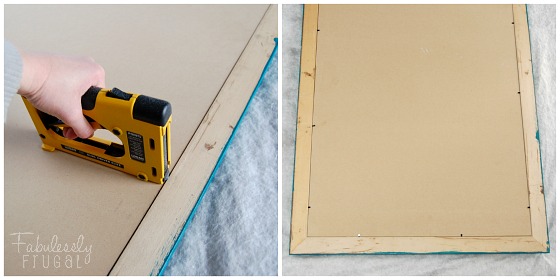
At this point I was ready to put my chalkboard into the frame. Just lay the frame face down on a soft surface (so as not to scratch the paint), then lay the chalkboard face-down into the frame. To finish off and hold everything in place, I LOVE my Logan Point Driver. This tool is a great investment for someone like me who does a lot of projects with frames. It installs the flexible tabs you find on the back of most picture frames that hold the picture and backer board in place.
If you don’t have one, don’t fret. You can easily secure the chalkboard into place with a staple gun, small nails, or even mending plates (which would be the most secure). All of these options are inexpensive and a good alternative for someone who is not in the market for a point driver.

Turn your frame over, and draw your masterpiece! Chalkboards are great for just about everything … Meal planning, family scheduling, decorative holiday art. The sky is the limit!
Thanks for sharing this fun project with us, Shannon!
Here are a few other chalkboard crafts we love:
Comments
Leave a Reply
More Related Diys


Trending DIY Projects
- DIY
- Recipes
- Deals
- Blog


Report a Problem
Please select the problem you are facing with this deal:
- Price Increased
- Price Decreased
- No longer available
- Expired
- Link doesn't work
- Suggestion
- Compliment
- Other
Add more details:
Thank you for your feedback. We really appreciate it.
Enter your email address if you would like
to receive a follow up.
Please Try Again
Thanks for providing the email address.
We will reach out to you as soon as possible.


Popular
Recommended
About Us

At Fabulessly Frugal, our goal is to help you live HEALTHY, WEALTHY, and WISE! My team and I work hard to bring you the best, online deals, clean eating, DIY's, freezer meal recipes, and more! I LOVE coaching and inspiring people to improve their health in my fitness challenge! You should also check out my favorite cleanse! Learn more about me and the rest of my team.

Copyright © 2008–2024
Fabulessly Frugal: A Coupon Blog Sharing Gift Ideas, Amazon Deals, Printable Coupons, DIY, How to Extreme Coupon, and Make Ahead Meals. All rights reserved
Home Depot sell s the premade chalk board for the same price as MDF in 2X4 and other sized so you don’t have to go to the extra expense of paint and brushes. You just have to buy the board and trim mold.
Hi, Darlene. Thanks for your comment! I actually found the pre-made chalkboards there last night and got one to try it out. It looks like another great option! (I will add it to the post.)
The MDF board I bought was about $6 and the pre-made chalkboard was about $10 for me though. Since I plan to do other projects with the paint and brushes, it worked out well for me to buy the MDF. 🙂