
DIY Embroidered Heart Valentine Decoration
DIY Decor for Valentine’s Day
We have been enjoying getting ready for Valentine’s Day around the house this year and making an Embroidered Heart was a fun afternoon project! If you’d like to see the other DIY Crafts and Decorations we have been working on, you can check them out here.
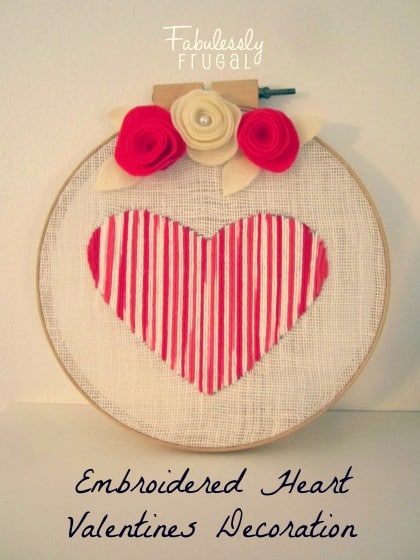
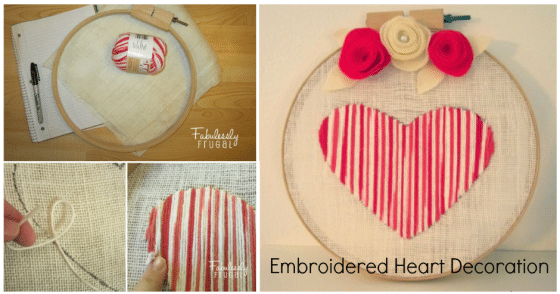
I love the look of embroidery projects. They have such old-timey character. I wanted to find a way to achieve a crafty, hand-made look without the extensive time and effort of hand-stitching through tiny holes with embroidery thread. I realized burlap has a similar cross-hatch pattern as embroidery fabric, and it would be a lot easier to thread yarn through it’s larger holes. Combine burlap and yarn and you get a fun, more do-able “embroidery” project.
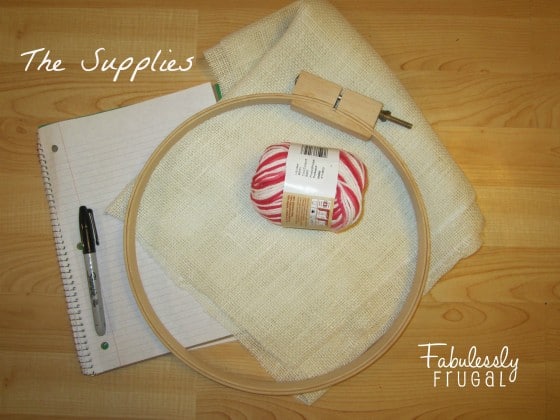
The Supplies:
- DIY Crafts and Decorations
- white burlap
- Valentine’s-colored yarn
- paper and permanent marker
- scissors and tape
Optional:
- felt
- hot glue
Instructions:
Start with an embroidery hoop, your choice of size. I used a 12-inch hoop. Whatever size you choose, you’ll want to make sure your cut of burlap in the width of the hoop, plus 3 or so inches to allow room for hoop to hold it properly. I got a ½ yard of white burlap.
![]()
Cut a heart shape out of a piece of paper. Size it to the hoop, making sure you like the balance of the size within the hoop. Place the burlap in the hoop between the two pieces, but don’t tighten it all the way until you make sure it is placed correctly. You’ll want to make the grain of the burlap goes straight up-and-down. That way when you thread the yarn it will look straight up-and-down too. You might need to tug on it a bit to get the burlap straight and at a tight fit. Outline the paper heart with a permanent marker.
![]()
I cut about 3 yards of yarn at a time. If you try to thread with yarn longer than that it becomes really difficult to keep it from tangling as you go. Prep your yarn by wrapping tape around one end (like the lacing activities you did in elementary school) and tie a knot on the other end. Start at the far left and feed the taped-end through from the back-side of the burlap to the front. Make a straight line and pull the yarn through to the back again. You will follow along the traced lines, always feeding the yarn through the opening just to the outside of the marker line, that way the marker is covered up as you go. If it starts to look sparse, go through the same holes twice to give the embroidery a fuller look. When you run out of yarn and need more, just be sure to tie the next piece on from the backside so the knot cannot be seen on the front.
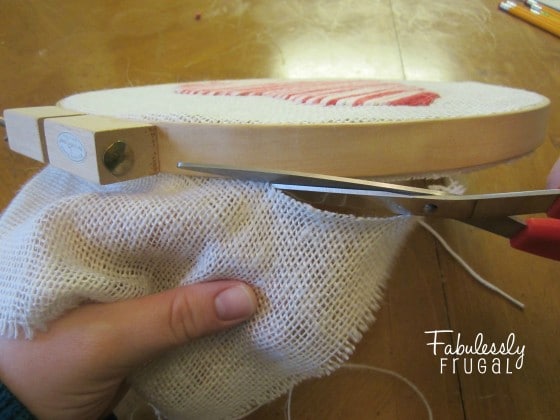
When you are finished embroidering, after following the line of the traced heart, tie a knot on the back-side to finish and cut any dangling yarn pieces. Cut the excess burlap off along the edge of the loop. If you want to secure it even more, you can use a hot glue gun and cover the cut burlap so it adheres to the wood on the back. I left mine unglued.
If you prefer the clean, simple look, leave it as is, but if you want more embellishments you could add some felt flowers like I did to mine.
![]()
Start by cutting circles 4-5 inches in diameter. It does not have to be perfectly round, in fact, waviness makes for more textured petals in the end. Cut in a spiral until you get to the center. Leave a small circle in the middle, no bigger than an inch wide. Roll the felt from the outside in. It doesn’t have to be wrapped tightly. When you get to the end, flip the flower over and cover the spiraled edges with hot glue and cover it with the 1-inch circle you left in the middle. I also cut little felt leaves for fun. Embellish any way you like. Get creative and enjoy this little Valentine’s handi-craft.
See all of our other Valentine’s Day posts:
Comments
Leave a Reply
More Related Diys


Trending DIY Projects
- DIY
- Recipes
- Deals
- Blog


Report a Problem
Please select the problem you are facing with this deal:
- Price Increased
- Price Decreased
- No longer available
- Expired
- Link doesn't work
- Suggestion
- Compliment
- Other
Add more details:
Thank you for your feedback. We really appreciate it.
Enter your email address if you would like to receive a follow up.
Please Try Again
Thanks for providing the email address.
We will reach out to you as soon as possible.


Popular
Recommended
About Us

At Fabulessly Frugal, our goal is to help you live HEALTHY, WEALTHY, and WISE! My team and I work hard to bring you the best, online deals, clean eating, DIY's, freezer meal recipes, and more! I LOVE coaching and inspiring people to improve their health in my fitness challenge! You should also check out my favorite cleanse! Learn more about me and the rest of my team.


Copyright © 2008–2024
Fabulessly Frugal: A Coupon Blog Sharing Gift Ideas, Amazon Deals, Printable Coupons, DIY, How to Extreme Coupon, and Make Ahead Meals. All rights reserved
This is absolutely adorable. I LOVE it!
I love this! So cute!
where do you get this yarn? What weight and ply is it? Would embroidery floss work?